DISC BRAKE CALIPERS
DESCRIPTION
The calipers are a single piston type in the rear and dual piston type in the front. The calipers are free to slide laterally, this allows continuous compensation for lining wear.
OPERATION
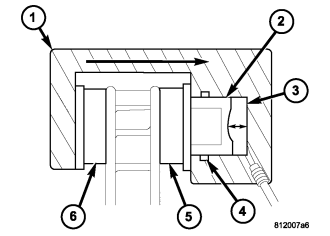
When the brakes are applied fluid pressure is exerted against the caliper piston (2). The fluid pressure is exerted equally and in all directions. This means pressure exerted against the caliper piston and within the caliper bore will be equal.
Fluid pressure applied to the piston is transmitted directly to the inboard brake pad (5). This forces the pad lining against the inner surface of the disc brake rotor. At the same time, fluid pressure within the piston bore forces the caliper to slide inward on the mounting bolts. This action brings the outboard brake pad lining (6) into contact with the outer surface of the disc brake rotor.
In summary, fluid pressure acting simultaneously on both piston and caliper, produces a strong clamping action. When sufficient force is applied, friction will attempt to stop the rotors from turning and bring the vehicle to a stop.
Application and release of the brake pedal generates only a very slight movement of the caliper and piston. Upon release of the pedal, the caliper and piston return to a rest position. The brake pads do not retract an appreciable distance from the rotor. In fact, clearance is usually at, or close to zero. The reasons for this are to keep road debris from getting between the rotor and lining and in wiping the rotor surface clear each revolution.
The caliper piston seal (4) controls the amount of piston (2) extension needed to compensate for normal lining wear.
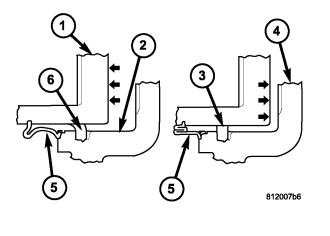
During brake application, the seal is deflected outward by fluid pressure and piston movement(6). When the brakes (and fluid pressure) are released, the seal relaxes and retracts the piston (3).
The amount of piston retraction is determined by the amount of seal deflection. Generally the amount is just enough to maintain contact between the piston and inboard brake pad.
DISASSEMBLY
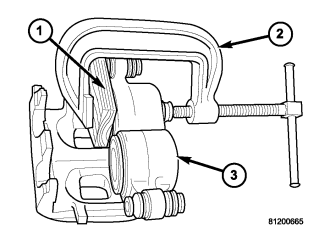
1. Drain the brake fluid from caliper.
2. C-clamp (2) a block of wood (1) over one piston.
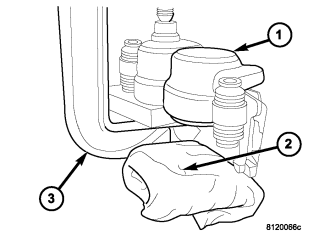
3. Take another piece of wood and pad it with one-inch thickness of shop towels (2). Place this piece in the outboard shoe side of the caliper in front of the other piston. This will cushion and protect caliper piston during removal.
4. To remove the caliper piston direct short bursts of low pressure air with a blow gun through the caliper brake hose port. Use only enough air pressure to ease the piston out.
CAUTION: Do not blow the piston out of the bore with sustained air pressure. This could result in a cracked piston.
WARNING: Never attempt to catch the piston as it leaves the bore. This could result in personal injury.
5. Remove the C-clamp and block of wood from the caliper and clamp it over the dust boot of the first piston removed. This will seal the empty piston bore.
6. Move the padded piece of wood in front of the other piston.
7. Remove the second piston using the same procedure with short bursts of low pressure air.
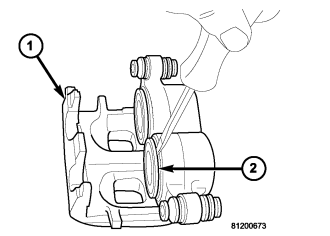
8. Remove piston dust boots (2) with a suitable pry tool.
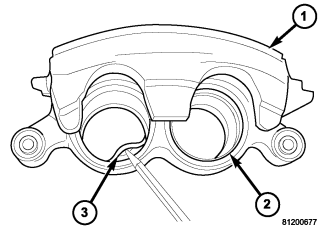
CAUTION: Do not scratch piston bore while removing the seals.
9. Remove piston seals (3) from caliper (1).
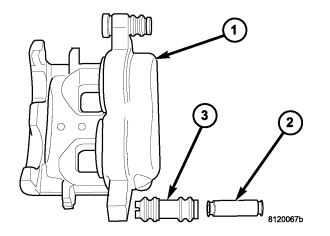
10. Push caliper mounting bolt bushings (3) out of the boot seals (2) and remove the boot seals from the caliper (1).
11. Remove caliper bleed screw.
CLEANING
Clean the caliper components with clean brake fluid or brake clean only. Wipe the caliper and piston dry with lint free towels or use low pressure compressed air.
CAUTION: Do not use gasoline, kerosene, paint thinner, or similar solvents. These products may leave a residue that could damage the piston and seal.
INSPECTION
The piston is made from a phenolic resin (plastic material) and should be smooth and clean.
The piston must be replaced if cracked or scored. Do not attempt to restore a scored piston surface by sanding or polishing.
CAUTION: If the caliper piston is replaced, install the same type of piston in the caliper. Never interchange phenolic resin and steel caliper pistons. The pistons, seals, seal grooves, caliper bore and piston tolerances are different.
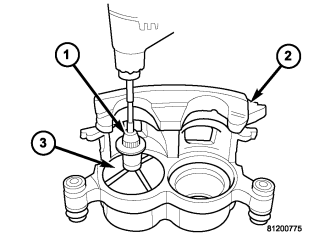
The bore can be lightly polished with a brake hone (3) to remove very minor surface imperfections. The caliper should be replaced if the bore is severely corroded, rusted, scored, or if polishing would increase bore diameter more than 0.025 mm (0.001 inch).
ASSEMBLY
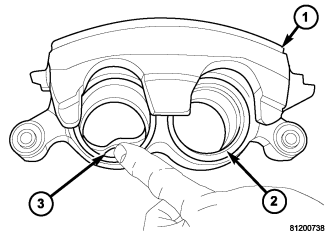
CAUTION: Dirt, oil, and solvents can damage caliper seals. Insure assembly area is clean and dry.
1. Lubricate caliper pistons, piston seals and piston bores with clean, fresh brake fluid.
NOTE: Verify seal is fully seated and not twisted.
2. Install new piston seals (3) into caliper bores (2).
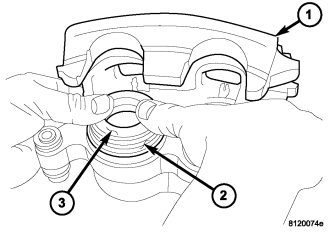
3. Lightly lubricate lip of new boot with silicone grease. Install boot on piston and work boot lip into the groove at the top of piston (3).
4. Stretch boot (2) rearward to straighten boot folds, then move boot forward until folds snap into place.
5. Install piston (3) into caliper bore and press piston down to the bottom of the caliper bore by hand or with hammer handle.
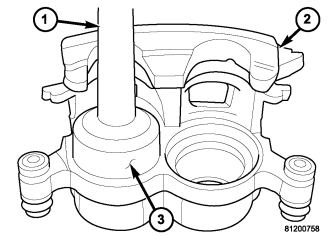
6. Seat dust boot in caliper (2) with Handle C-4171 (1) and Installer (3).
7. Install the second piston and dust boot.
8. Lubricate caliper mounting bolt bushings, boot seals and bores with Mopar brake grease or Dow Corning® G407 grease only.
CAUTION: Use of alternative grease may cause damage to the boots seals.
9. Install the boot seals into the caliper seal bores and center the seals in the bores.
10. Install mounting bolt bushings into the boot seals and insure seal lip is engaged into the bushing grooves at either end of the bushing.
11. Install caliper bleed screw.