STANDARD PROCEDURE
MANUAL BLEEDING
Use Mopar brake fluid, or an equivalent quality fluid meeting SAE J1703-F and DOT 3 standards only. Use fresh, clean fluid from a sealed container at all times.
Do not pump the brake pedal at any time while bleeding. Air in the system will be compressed into small bubbles that are distributed throughout the hydraulic system. This will make additional bleeding operations necessary.
Do not allow the master cylinder to run out of fluid during bleed operations. An empty cylinder will allow additional air to be drawn into the system. Check the cylinder fluid level frequently and add fluid as needed.
Bleed only one brake component at a time in the following sequence:
1. Fill the master cylinder reservoir with brake fluid.
2. If calipers are overhauled, open all caliper bleed screws. Then close each bleed screw as fluid starts to drip from it. Top off master cylinder reservoir once more before proceeding.
3. Attach one end of bleed hose to bleed screw and insert opposite end in glass container partially filled with brake fluid . Be sure end of bleed hose is immersed in fluid.
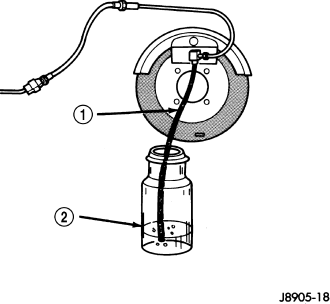
4. Open up bleeder, then have a helper press down the brake pedal. Once the pedal is down close the bleeder. Repeat bleeding until fluid stream is clear and free of bubbles. Then move to the next wheel.
PRESSURE BLEEDING
Use Mopar brake fluid, or an equivalent quality fluid meeting SAE J1703-F and DOT 3 standards only. Use fresh, clean fluid from a sealed container at all times.
Do not pump the brake pedal at any time while bleeding. Air in the system will be compressed into small bubbles that are distributed throughout the hydraulic system. This will make additional bleeding operations necessary.
Do not allow the master cylinder to run out of fluid during bleed operations. An empty cylinder will allow additional air to be drawn into the system. Check the cylinder fluid level frequently and add fluid as needed.
Bleed only one brake component at a time in the following sequence:
Follow the manufacturers instructions carefully when using pressure equipment. Do not exceed the tank manufacturers pressure recommendations. Generally, a tank pressure of 51-67 kPa (15-20 psi) is sufficient for bleeding.
Fill the bleeder tank with recommended fluid and purge air from the tank lines before bleeding.
Do not pressure bleed without a proper master cylinder adapter. The wrong adapter can lead to leakage, or drawing air back into the system. Use adapter provided with the equipment or Adapter 6921.
BRAKE PAD BURNISHING
CAUTION: After installing NEW brake pads, keep in mind that braking effectiveness might be somewhat reduced during the first brake applications.
When NEW brake pads are installed on a vehicle, this procedure must be used to correctly burnish (seat) the brake linings to the brake rotor discs.
1. Accelerate the vehicle to a steady speed of about 40 mph (65 km/h).
2. Using light brake pedal pressure, slow the vehicle from 40 mph to 0 mph in approximately 6 seconds.
3. Accelerate back up to 40 mph for approximately one minute to allow the brakes to cool down.
4. Repeat this procedure 15 to 20 times to correctly seat the brake lining material.
ABS VERIFICATION TEST
1. ABS VERIFICATION TEST
WARNING: Ensure braking capability is available before road testing.
NOTE: If the ABM (Anti-Lock Brake Module), SAS (Steering Angle Sensor), Dynamics Sensor was replaced, it must be initialized using the scan tool. If not initialized, the ABS indicator will flash continuously with no DTCs. To initialize the ABM and clear offsets have wheels pointing straight ahead and follow the directions on the scan tool. The drive test requires a 90° turn. If the Dynamics Sensor was replaced, test drive the vehicle by turning the vehicle left or right in a curving manner at a velocity between 10 and 25 km/hr (6 and 15 m.p.h.).
1. Turn the ignition off.
2. Connect all previously disconnected components and connectors.
3. Ensure all accessories are turned off and the battery is fully charged.
4. Ensure that the ignition is on, with the scan tool, erase all Diagnostic Trouble Codes from All modules. Start the engine and allow it to run for 2 minutes and fully operate the system that was malfunctioning.
5. Turn the ignition off and wait 5 seconds. Turn the ignition on and using the scan tool, read DTCs from all modules.
6. If any Diagnostic Trouble Codes are present, return to symptom list and trouble shoot new or recurring symptom.
NOTE: For Sensor Signal and Pump Motor faults, the ABM must sense all 4 wheels at 12 km/h (7.5 mph) before it will extinguish the ABS indicator.
7. If there are no DTCs present after turning ignition on, road test the vehicle for at least 5 minutes. Perform several anti-lock braking stops.
8. Again, with the scan tool read DTCs . If any DTCs are present, refer to the Table of Contents in the applicable Section for the diagnostic test procedure and troubleshoot the new or recurring symptom.
9. If there are no Diagnostic Trouble Codes (DTCs) present, and the customer's concern can no longer be duplicated, the repair is complete.
Are any DTCs present or is the original concern still present?
Yes
- Repair is not complete, refer to appropriate symptom.
No
- Repair is complete.