ACTUATOR-MODE DOOR
DESCRIPTION
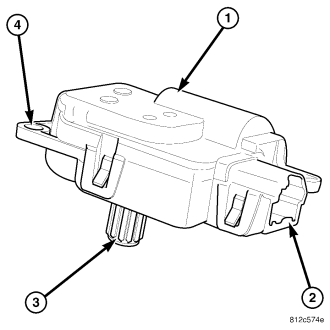
The rear mode door actuator (1) is a reversible, 12–volt direct current (DC), servo motor. The rear mode door actuator is located on the back of the rear HVAC housing. The rear mode door actuator is interchangeable with the actuator for the rear blend-air door. Each actuator is contained within an identical molded plastic housing with an integral wire connector receptacle (2). Three integral mounting tabs (4) allow the actuator to be secured to the rear HVAC housing. Each actuator also has an identical output shaft with splines (3) that connects it to the rear air door. The rear mode door actuator does not require mechanical indexing to the mode-air door, as it is electronically calibrated by the A/C-heater control.
OPERATION
The rear mode door actuator is connected to the A/C-heater control through the vehicle electrical system by a dedicated two-wire lead and connector of the rear HVAC wire harness. The rear mode door actuator can move the rear model-air door in two directions. When the A/C-heater control pulls the voltage on one side of the motor connection high and the other connection low, the rear mode-air door will move in one direction. When the A/C-heater control reverses the polarity of the voltage to the motor, the rear mode-air door moves in the opposite direction.
When the A/C-heater control makes the voltage to both connections high or both connections low, the rear mode-air door stops and will not move. The A/C-heater control uses a pulse-count positioning system to monitor the operation and relative position of the rear mode door actuator and the rear mode-air door. The A/C-heater control learns the rear mode-air door stop positions during the calibration procedure and will store a diagnostic trouble code (DTC) for any problems it detects in the rear mode door actuator circuit.
The rear mode door actuator is diagnosed using a scan tool (refer to 24 - HEATING & AIR CONDITIONING - DIAGNOSIS AND TESTING - HEATING AND A/C SYSTEMS and to 24 - HVAC Electrical Diagnostics for more information).
The rear mode door actuator cannot be adjusted or repaired and must be replaced if found inoperative or damaged.
REMOVAL
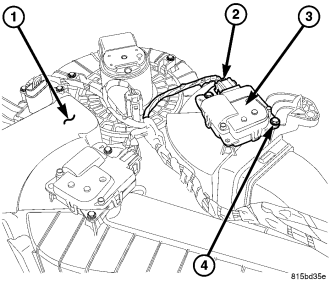
1. Remove rear HVAC housing (1) and place it on a workbench (refer to 24 - HEATING & AIR CONDITIONING/DISTRIBUTION -REAR/HOUSING-HVAC - REMOVAL).
2. Disconnect the rear HVAC wire harness connector (2) from the rear mode door actuator (3).
3. Remove the two screws (4) that secure the rear mode door actuator to the back of the rear HVAC housing and remove the actuator.
INSTALLATION
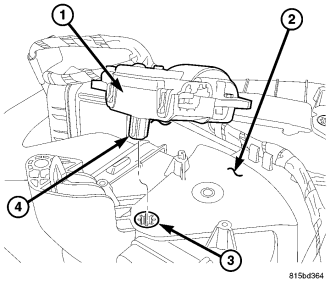
1. Position the rear mode door actuator (1) onto the back of the rear HVAC housing (2). If necessary, rotate the actuator slightly to align the splines on the actuator output shaft (4) with those in the rear mode door pivot shaft (3).
2. Install the two screws (4) that secure the rear mode door actuator (2) to the rear HVAC housing (1). Tighten the screws to 2 N·m (17 in. lbs.).
3. Connect the rear HVAC wire harness connector (2) to the rear mode door actuator.
4. Install the rear HVAC housing (refer to 24 - HEATING & AIR CONDITIONING/DISTRIBUTION - REAR/HOUSING-HVAC - INSTALLATION).
5. Initiate the Actuator Calibration function using a scan tool. Refer to HVAC System Test, found in 24 - HVAC - Electrical Diagnostics.