ADJUSTMENTS
ADJUSTMENT
NOTE:
Door adjustment measurements should be taken from stationary or welded body panels like the roof, rocker or quarter panels.
FORE/AFT
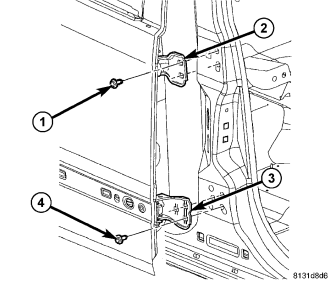
NOTE: Fore/aft (lateral) door adjustment is done by loosening the hinge to the body fasteners one hinge at a time and moving the door to the correct position.
1. Support the rear door with a suitable lifting device.
2. Loosen the five bolts (1 and 4) that secure the rear door hinges (2 and 3) to the b-pillar.
3. Adjust the rear door to the correct position (Refer to 23 - BODY/BODY STRUCTURE/GAP AND FLUSH - SPECIFICATIONS).
4. Tighten the upper bolt of the upper hinge to the b-pillar to 28 N·m (21 ft. lbs.).
5. Tighten the upper bolt of the lower hinge to 28 N·m (21 ft. lbs.).
6. Tighten the remaining hinge bolts to 28 N·m (21 ft. lbs.).
UP/DOWN
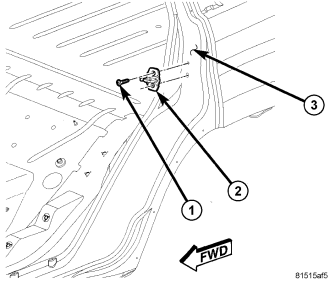
NOTE: Up/down door adjustment is done by loosening either the hinge to the body fasteners or the hinge to door fasteners and moving the door to the correct position.
NOTE: When the up/down adjustments are done correctly, the top of the door is positioned over flush to the roof (Refer to 23 - BODY/BODY STRUCTURE/GAP AND FLUSH - SPECIFICATIONS).
1. Support the rear door with a suitable lifting device.
2. Loosen the two bolts (1) that secure the striker (2) and the shim (3) to the C-pillar.
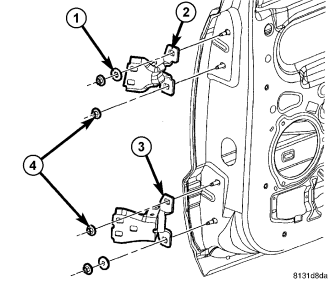
NOTE: When adjustment of the rear door requires the loosening of the door to hinge fasteners, it will be necessary to separate the epoxy bonded washers with a chisel or other suitable tool.
3. If necessary, loosen the five nuts (4) that secure the door hinges (2 and 3) to the rear door.
4. Separate the epoxy bonded washers (1) from the hinges with a chisel or other suitable tool.
5. If necessary, loosen the five bolts (1 and 4) that secure the rear door hinges (2 and 3) to the b-pillar.
6. Adjust the rear door to the correct position (Refer to 23 - BODY/BODY STRUCTURE/GAP AND FLUSH - SPECIFICATIONS).
7. Tighten the five nuts (4) that secure the door hinges (2 and 3) to the rear door to 31 N·m (23 ft. lbs.).
8. Tighten the upper bolt (1) of the upper hinge (2) to the b-pillar to 31 N·m (23 ft. lbs.).
9. Tighten the upper bolt (4) of the lower hinge (3) to 31 N·m (23 ft. lbs.).
10. Tighten the remaining hinge bolts to 31 N·m (23 ft. lbs.).
11. Tighten the two bolts (1) that secure the striker (2) and the shim (3) to the C-pillar. Tighten the bolts to 28 N·m (21 ft. lbs.).
IN/OUT
NOTE: In/out door adjustment is done by loosening the hinge to door fasteners one hinge at a time and moving the door to the correct position.
1. Support the rear door with a suitable lifting device.
2. Loosen the two bolts (1) that secure the striker (2) and the shim (3) to the C-pillar.
NOTE: When adjustment of the rear door requires the loosening of the door to hinge fasteners, it will be necessary to separate the epoxy bonded washers with a chisel or other suitable tool.
3. Loosen the five nuts (4) that secure the door hinges (2 and 3) to the rear door.
4. Separate the epoxy bonded washers (1) from the hinges with a chisel or other suitable tool.
5. Adjust the rear door to the correct position (Refer to 23 - BODY/BODY STRUCTURE/GAP AND FLUSH - SPECIFICATIONS).
6. Tighten the five nuts that secure the door hinges to the rear door. Tighten the nuts to 31 N·m (23 ft. lbs.).
7. Tighten the two bolts (1) that secure the striker (2) and the shim (3) to the C-pillar. Tighten the bolts to 28 N·m (21 ft. lbs.).