DAMPER-CRANKSHAFT
REMOVAL
1. Disconnect negative cable from battery.
2. Remove accessory drive belt (Refer to 7 - COOLING/ACCESSORY DRIVE/DRIVE BELTS - REMOVAL).
3. Drain cooling system (Refer to 7 - COOLING - STANDARD PROCEDURE).
4. Remove radiator upper hose.
5. Remove fan shroud (Refer to 7 - COOLING/ENGINE/RADIATOR FAN - REMOVAL).
6. Remove crankshaft damper bolt.
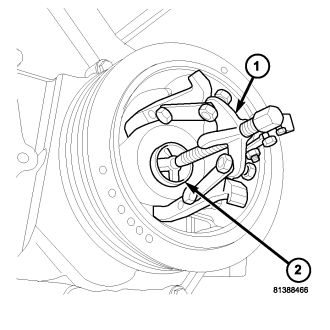
7. Remove damper using Special Tools 8513A Insert and 1023 Three Jaw Puller.
INSTALLATION
CAUTION: To prevent severe damage to the Crankshaft, Damper or Special Tool 8512–A, thoroughly clean the damper bore and the crankshaft nose before installing Damper.
1. Slide damper onto crankshaft slightly.
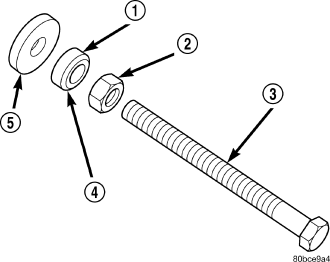
CAUTION: Special Tool 8512–A, is assembled in a specific sequence. Failure to assemble this tool in this sequence can result in tool failure and severe damage to either the tool or the crankshaft.
2. Assemble Special Tool 8512–A as follows, The nut is threaded onto the shaft first (2). Then the roller bearing (1) is placed onto the threaded rod (3) The hardened bearing surface of the bearing (1) MUST face the nut (2). Then the hardened washer (5) slides onto the threaded rod (3) . Once assembled coat the threaded rod's threads with Mopar® Nickel Anti-Seize or (Loctite No. 771).
3. Using Special Tool 8512–A, press damper onto crankshaft.
4. Install then tighten crankshaft damper bolt to 176 N·m (129 ft. lbs.).
5. Install radiator upper hose.
6. Install accessory drive belt (Refer to 7 - COOLING/ACCESSORY DRIVE/DRIVE BELTS - INSTALLATION).
7. Refill cooling system (Refer to 7 - COOLING - STANDARD PROCEDURE).
8. Connect negative cable to battery.