HINGE
REMOVAL
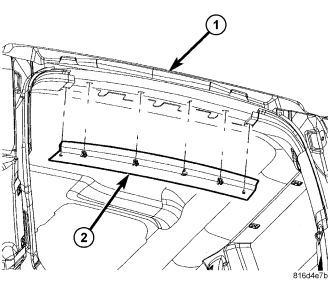
NOTE: It is not necessary to remove the liftgate to replace one or both hinges. The hinges can be replaced one at a time.
1. Open and support the liftgate with a suitable prop or block.
2. Remove the liftgate support struts. (Refer to 23 - LIFTGATE/SUPPORT STRUT - REMOVAL)
3. Using a trim stick C-4755 or equivalent, release the retaining clips that secure the header trim molding in the liftgate opening and remove.
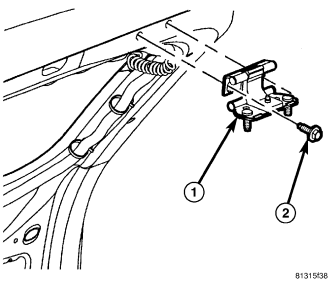
4. Mark the hinge (1) liftgate half location on the liftgate inner panel to aid reinstallation.
5. Remove the two screws (2) that secure the hinge to the liftgate.
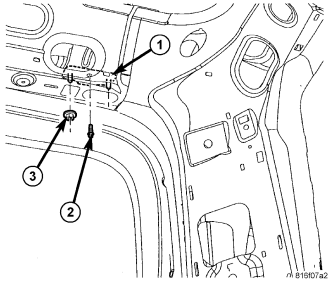
6. Mark the hinge body half location on the upper liftgate opening header to aid reinstallation.
7. Carefully pull the rear edge of the headliner downward from the header far enough to access and remove the two nuts (3) and one bolt (2) that secure the hinge to the underside of the header.
8. Remove the hinge from the vehicle.
INSTALLATION
NOTE: It is not necessary to remove the liftgate to replace one or both hinges. The hinges can be replaced one at a time.
NOTE: Use a suitable body sealer on the hinge to body mating surfaces prior to installation.
1. Position the body half of the liftgate hinge (1) to the upper liftgate opening header on the vehicle.
2. Carefully pull the rear edge of the headliner downward from the header far enough to install and tighten the two nuts (3) and one bolt (1) that secure the hinge to the underside of the header.
3. Tighten the fasteners to 28 N·m (21 ft. lbs.).
4. Position the liftgate to the liftgate half of the hinge (1) on the vehicle.
5. Install and tighten the two screws (2) that secure the hinge to the liftgate.
6. Tighten the screws to 28 N·m (21 ft. lbs.).
7. Install the support struts. (Refer to 23 - LIFTGATE/SUPPORT STRUT - INSTALLATION)
8. Remove the support from the liftgate.
9. Check the liftgate for proper alignment and operation. (Refer to 23 - BODY/BODY STRUCTURE/GAP AND FLUSH - SPECIFICATIONS)
10. Align the retaining tabs on the upper liftgate trim molding with the retaining clips in the liftgate opening and engage the retaining tabs that secure the trim molding to the liftgate opening.
11. Check for water leaks at hinge to body screws.