INSTALLATION
3.0L ENGINE
CAUTION: Be certain to adjust the refrigerant oil level when servicing the A/C refrigerant system (refer to 24 - HEATING & AIR CONDITIONING/PLUMBING - FRONT/REFRIGERANT OIL - STANDARD PROCEDURE - REFRIGERANT OIL LEVEL). Failure to properly adjust the refrigerant oil level will prevent the A/C system from operating as designed and can cause serious A/C compressor damage.
NOTE: When replacing multiple A/C system components, refer to the Refrigerant Oil Capacities chart to determine how much oil should be added to the refrigerant system (refer to 24 - HEATING & AIR CONDITIONING/PLUMBING - FRONT/REFRIGERANT OIL - STANDARD PROCEDURE - REFRIGERANT OIL LEVEL).
NOTE: Replacement of the refrigerant line O-ring seals and gaskets is required anytime a refrigerant line is opened. Failure to replace the rubber O-ring seals and metal gaskets could result in a refrigerant system leak.
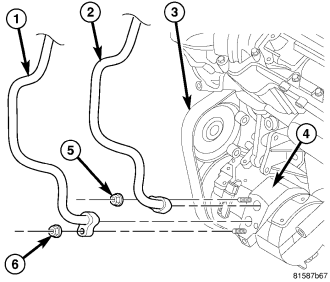
1. Position the A/C suction line (2) into the engine compartment.
2. Remove the tape or plugs from the opened suction line fittings and the compressor and expansion valve ports.
3. Lubricate a new O-ring and a new dual plane seal with clean refrigerant oil and install them onto the A/C suction line. Use only the specified seals as they are made of a special material for the R-134a system. Use only refrigerant oil of the type recommended for the A/C compressor in the vehicle.
4. Install the A/C suction line onto the A/C compressor (4).
5. Install the nut (5) that secures the A/C suction line to the A/C compressor. Tighten the nut to 20 N·m (15 ft. lbs.).
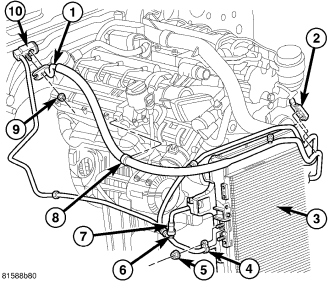
6. Install the A/C suction line (1) into the retaining brackets (2 and 8) and to the A/C expansion valve (10).
7. Install the nut (9) that secures the A/C suction line to the A/C expansion valve. Tighten the nut to 23 N·m (17 ft. lbs.).
8. Install the air intake tube and the resonator (refer to 9 - ENGINE/AIR INTAKE SYSTEM/HOUSING-AIR CLEANER - INSTALLATION).
9. Reconnect the negative battery cable.
10. Evacuate the refrigerant system (refer to 24 - HEATING & AIR CONDITIONING/PLUMBING - FRONT - STANDARD PROCEDURE - REFRIGERANT SYSTEM EVACUATE).
11. Adjust the refrigerant oil level (refer to 24 - HEATING & AIR CONDITIONING/PLUMBING - FRONT/REFRIGERANT OIL - STANDARD PROCEDURE - REFRIGERANT OIL LEVEL).
12. Charge the refrigerant system (refer to 24 - HEATING & AIR CONDITIONING/PLUMBING - FRONT - STANDARD PROCEDURE - REFRIGERANT SYSTEM CHARGE).
3.7L/4.7L ENGINES
CAUTION: Be certain to adjust the refrigerant oil level when servicing the A/C refrigerant system (refer to 24 - HEATING & AIR CONDITIONING/PLUMBING - FRONT/REFRIGERANT OIL - STANDARD PROCEDURE - REFRIGERANT OIL LEVEL). Failure to properly adjust the refrigerant oil level will prevent the A/C system from operating as designed and can cause serious A/C compressor damage.
NOTE: When replacing multiple A/C system components, refer to the Refrigerant Oil Capacities chart to determine how much oil should be added to the refrigerant system (refer to 24 - HEATING & AIR CONDITIONING/PLUMBING - FRONT/REFRIGERANT OIL - STANDARD PROCEDURE - REFRIGERANT OIL LEVEL).
NOTE: Replacement of the refrigerant line O-ring seals and gaskets is required anytime a refrigerant line is opened. Failure to replace the rubber O-ring seals and metal gaskets could result in a refrigerant system leak.
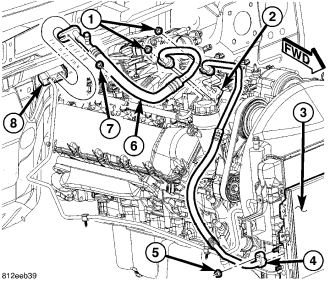
NOTE: LHD model shown. RHD model similar.
1. Position the A/C suction line (6) into the engine compartment.
2. Remove the tape or plugs from the suction line fittings and the A/C compressor (2) and A/C expansion valve (8).
3. Lubricate a new O-ring and a dual plane seal with clean refrigerant oil and install them onto the A/C suction line. Use only the specified seals as they are made of a special material for the R-134a system. Use only refrigerant oil of the type recommended for the A/C compressor in the vehicle.
4. Install the A/C suction line onto the A/C compressor.
5. Install the nut (1) that secures the A/C suction line to the A/C compressor. Tighten the nut to 20 N·m (15 ft. lbs.).
6. Install the A/C suction line onto the A/C expansion valve.
7. Install the nut (7) that secures the A/C suction line to the A/C expansion valve. Tighten the nut to 23 N·m (17 ft. lbs.).
8. Install the air intake tube and the resonator (refer to 9 - ENGINE/AIR INTAKE SYSTEM/AIR CLEANER HOUSING - INSTALLATION).
9. Reconnect the negative battery cable.
10. Evacuate the refrigerant system (refer to 24 - HEATING & AIR CONDITIONING/PLUMBING - FRONT - STANDARD PROCEDURE - REFRIGERANT SYSTEM EVACUATE).
11. Adjust the refrigerant oil level (refer to 24 - HEATING & AIR CONDITIONING/PLUMBING - FRONT/REFRIGERANT OIL - STANDARD PROCEDURE - REFRIGERANT OIL LEVEL).
12. Charge the refrigerant system (refer to 24 - HEATING & AIR CONDITIONING/PLUMBING - FRONT - STANDARD PROCEDURE - REFRIGERANT SYSTEM CHARGE).
5.7L ENGINE
CAUTION: Be certain to adjust the refrigerant oil level when servicing the A/C refrigerant system (refer to 24 - HEATING & AIR CONDITIONING/PLUMBING - FRONT/REFRIGERANT OIL - STANDARD PROCEDURE - REFRIGERANT OIL LEVEL). Failure to properly adjust the refrigerant oil level will prevent the A/C system from operating as designed and can cause serious A/C compressor damage.
NOTE: When replacing multiple A/C system components, refer to the Refrigerant Oil Capacities chart to determine how much oil should be added to the refrigerant system (refer to 24 - HEATING & AIR CONDITIONING/PLUMBING - FRONT/REFRIGERANT OIL - STANDARD PROCEDURE - REFRIGERANT OIL LEVEL).
NOTE: Replacement of the refrigerant line O-ring seals and gaskets is required anytime a refrigerant line is opened. Failure to replace the rubber O-ring seals and metal gaskets could result in a refrigerant system leak.
NOTE: LHD model shown in illustrations. RHD model similar.
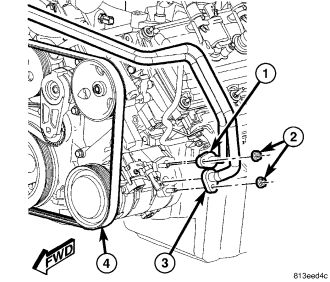
1. Position the A/C suction line (3) into the engine compartment.
2. Remove the tape or plugs from the opened suction line fittings and the compressor and expansion valve ports.
3. Lubricate a new O-ring and a new dual plane seal with clean refrigerant oil and install them onto the A/C suction line. Use only the specified seals as they are made of a special material for the R-134a system. Use only refrigerant oil of the type recommended for the A/C compressor in the vehicle.
4. Install the A/C suction line onto the A/C compressor (4).
5. Install the nut (2) that secures the A/C suction line to the A/C compressor. Tighten the nut to 20 N·m (15 ft. lbs.).
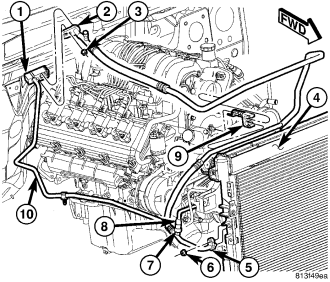
6. Install the A/C suction line (2) into the retaining bracket (9) and to the A/C expansion valve (1).
7. Install the nut (3) that secures the A/C suction line to the A/C expansion valve. Tighten the nut to 23 N·m (17 ft. lbs.).
8. Install the air intake tube and the resonator (refer to 9 - ENGINE/AIR INTAKE SYSTEM/HOUSING-AIR CLEANER - INSTALLATION).
9. Reconnect the negative battery cable.
10. Evacuate the refrigerant system (refer to 24 - HEATING & AIR CONDITIONING/PLUMBING - FRONT - STANDARD PROCEDURE - REFRIGERANT SYSTEM EVACUATE).
11. Adjust the refrigerant oil level (refer to 24 - HEATING & AIR CONDITIONING/PLUMBING - FRONT/REFRIGERANT OIL - STANDARD PROCEDURE - REFRIGERANT OIL LEVEL).
12. Charge the refrigerant system (refer to 24 - HEATING & AIR CONDITIONING/PLUMBING - FRONT - STANDARD PROCEDURE - REFRIGERANT SYSTEM CHARGE).