CONDENSER-A/C
DESCRIPTION
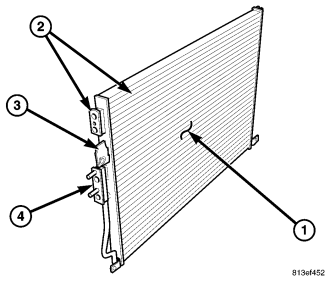
The A/C condenser (1) is located in the front of the engine compartment behind the grille. The A/C condenser is a heat exchanger that allows the high-pressure refrigerant gas being discharged by the A/C compressor to give up its heat to the air passing over the condenser fins, which causes the refrigerant to cool and change to a liquid state.
The A/C condenser is equipped with an integral automatic transmission cooler and tapping block (2), mounting provisions for the power steering cooler (3) and a tapping block for the A/C discharge line and the A/C receiver/drier (4).
OPERATION
When air passes through the fins of the A/C condenser, the high-pressure refrigerant gas within the A/C condenser gives up its heat. The refrigerant then condenses as it leaves the A/C condenser and becomes a high-pressure liquid. The volume of air flowing over the condenser fins is critical to the proper cooling performance of the A/C system. Therefore, it is important that there are no objects placed in front of the radiator grille openings at the front of the vehicle or foreign material on the condenser fins that might obstruct proper air flow. Also, any factory-installed air seals or shrouds must be properly reinstalled following radiator or A/C condenser service.
NOTE: Replacement of the refrigerant line O-ring seals and gaskets is required anytime a refrigerant line is opened. Failure to replace the rubber O-ring seals and metal gaskets could result in a refrigerant system leak.
The A/C condenser has no serviceable parts except for the O-ring seals and gaskets. The O-ring seals used on the connections are made from a special type of rubber not affected by R-134a refrigerant. The O-ring seals and gaskets must be replaced whenever a refrigerant line is removed from the A/C condenser.
The A/C condenser cannot be repaired and must be replaced if found to be leaking or damaged.
REMOVAL
WARNING: Refer to the applicable warnings and cautions for this system before performing the following operation (refer to 24 - HEATING & AIR CONDITIONING/PLUMBING - FRONT - WARNING) and (refer to 24 - HEATING & AIR CONDITIONING/PLUMBING - FRONT - CAUTION). Failure to follow the warnings and cautions could result in possible personal injury or death.
1. Disconnect and isolate the negative battery cable.
2. Recover the refrigerant from the refrigerant system (refer to 24 - HEATING & AIR CONDITIONING/PLUMBING - FRONT - STANDARD PROCEDURE - REFRIGERANT SYSTEM RECOVERY).
3. Remove the grille (refer to 23 - BODY/EXTERIOR/GRILLE - REMOVAL).
4. Remove the air filter housing and air inlet tube (refer to 9 - ENGINE/AIR INTAKE SYSTEM/HOUSING-AIR CLEANER - REMOVAL).
NOTE: It is not necessary to remove the hood latch from the radiator crossmember when servicing the A/C condenser.
5. Remove the upper radiator crossmember and support bracket and position them out of the way (refer to 23 - BODY/EXTERIOR/CROSSMEMBER-RADIATOR - REMOVAL).
6. Remove the power steering fluid cooler or position it out of the way (depending on application) (refer to 19 - STEERING/PUMP/COOLER-FLUID - REMOVAL).
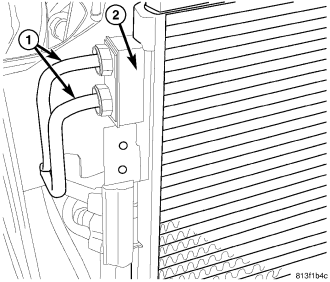
7. Disconnect the automatic transmission cooler lines (1) from the transmission fluid cooler (2) (refer to 7 - COOLING/TRANSMISSION - STANDARD PROCEDURE - TRANSMISSION COOLER LINE QUICK CONNECT FITTING).
8. Install plugs in, or tape over the automatic transmission cooler line fittings and the fluid cooler ports.
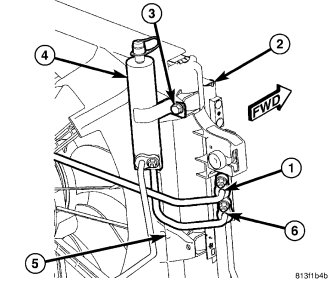
9. Disconnect the A/C discharge line (1) from the A/C condenser (2) (refer to 24 - HEATING & AIR CONDITIONING/PLUMBING - FRONT/LINE-A/C DISCHARGE - REMOVAL).
10. Loosen the screw (3) that secures the receiver/drier (4) to the radiator and fan shroud (5).
11. Disconnect the receiver drier inlet tube (6) from the A/C condenser (refer to 24 - HEATING & AIR CONDITIONING/PLUMBING - FRONT/RECEIVER/DRIER-A/C - REMOVAL).
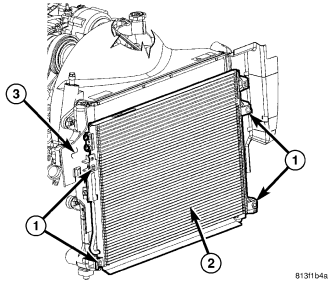
12. Remove the four bolts (1) that secure A/C condenser (2) to the radiator (3).
13. Carefully lift the A/C condenser straight up and out of the engine compartment.
INSTALLATION
CAUTION: Be certain to adjust the refrigerant oil level when servicing the A/C refrigerant system (refer to 24 - HEATING & AIR CONDITIONING/PLUMBING - FRONT/REFRIGERANT OIL - STANDARD PROCEDURE - REFRIGERANT OIL LEVEL). Failure to properly adjust the refrigerant oil level will prevent the A/C system from operating as designed and can cause serious A/C compressor damage.
NOTE: When replacing multiple A/C system components, refer to the Refrigerant Oil Capacities chart to determine how much oil should be added to the refrigerant system (refer to 24 - HEATING & AIR CONDITIONING/PLUMBING - FRONT/REFRIGERANT OIL - STANDARD PROCEDURE - REFRIGERANT OIL LEVEL).
NOTE: If only the A/C condenser is being replaced, add 30 milliliters (1 fluid ounce) of refrigerant oil to the refrigerant system. Use only refrigerant oil of the type recommended for the A/C compressor in the vehicle.
NOTE: Replacement of the refrigerant line O-ring seals and gaskets is required anytime a refrigerant line is opened. Failure to replace the rubber O-ring seals and metal gaskets could result in a refrigerant system leak.
NOTE: Be certain that each of the radiator and condenser air seals are installed in their proper locations. These air seals are required for the A/C and engine cooling systems to perform as designed.
1. Carefully position the A/C condenser (2) onto the radiator (3).
2. Install the four bolts (1) that secure the A/C condenser to the radiator. Tighten the bolts to 5 N·m (44 in. lbs.).
3. Connect the receiver/drier inlet tube (6) to the A/C condenser (2) (refer to 24 - HEATING & AIR CONDITIONING/PLUMBING - FRONT/RECEIVER/DRIER-A/C - INSTALLATION).
4. Tighten the screw (3) that secures the A/C receiver/drier (4) to the radiator and fan shroud (5). Tighten the screw to 5 N·m (44 in. lbs.).
5. Connect the A/C discharge line (1) to the A/C condenser (refer to 24 - HEATING & AIR CONDITIONING/PLUMBING - FRONT/LINE-A/C DISCHARGE - INSTALLATION) and (refer to 24 - HEATING & AIR CONDITIONING/PLUMBING - FRONT/LINE-A/C LIQUID - INSTALLATION).
6. Remove the tape or plugs from the automatic transmission cooler line fittings and the fluid cooler ports.
7. Connect the automatic transmission cooler lines (1) to the transmission fluid cooler (2) (refer to 7 - COOLING/TRANSMISSION - STANDARD PROCEDURE - TRANSMISSION COOLER LINE QUICK CONNECT FITTING).
8. Install the power steering fluid cooler (refer to 19 - STEERING/PUMP/COOLER-FLUID - INSTALLATION).
9. Install the upper radiator crossmember and support bracket (refer to 23 - BODY/EXTERIOR/CROSSMEMBER-RADIATOR - INSTALLATION).
10. Install the air filter housing and air inlet tube (refer to 9 - ENGINE/AIR INTAKE SYSTEM/HOUSING-AIR CLEANER - INSTALLATION).
11. Install the grille (refer to 23 - BODY/EXTERIOR/GRILLE - INSTALLATION).
12. Reconnect the negative battery cable.
13. Evacuate the refrigerant system (refer to 24 - HEATING & AIR CONDITIONING/PLUMBING - FRONT - STANDARD PROCEDURE - REFRIGERANT SYSTEM EVACUATE).
14. If the A/C condenser is being replaced, add 30 milliliters (1 fluid ounce) of refrigerant oil to the refrigerant system. When replacing multiple A/C system components, refer to the Refrigerant Oil Capacities chart to determine how much oil should be added to the refrigerant system (refer to 24 - HEATING & AIR CONDITIONING/PLUMBING - FRONT/REFRIGERANT OIL - STANDARD PROCEDURE - REFRIGERANT OIL LEVEL). Use only refrigerant oil of the type recommended for the A/C compressor in the vehicle.
15. Charge the refrigerant system (refer to 24 - HEATING & AIR CONDITIONING/PLUMBING - FRONT - STANDARD PROCEDURE - REFRIGERANT SYSTEM CHARGE).
16. Check the automatic transmission fluid level (refer to 21 - TRANSMISSION/TRANSAXLE/AUTOMATIC/FLUID AND FILTER - STANDARD PROCEDURE - CHECK OIL LEVEL). Fill as required (refer to 21 - TRANSMISSION/TRANSAXLE/AUTOMATIC/FLUID AND FILTER - STANDARD PROCEDURE - TRANSMISSION FILL).