REMOVAL
LAMP - FRONT
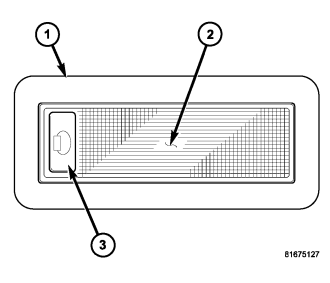
1. Disconnect and isolate the battery negative cable.
2. Using a small thin-bladed screwdriver, gently pry the switch end of the reading lamp lens (2) away from the lamp housing (1) far enough to unsnap the switch end of the lens from the housing. The switch end of the lens is identified by a tactile concave depression (3).
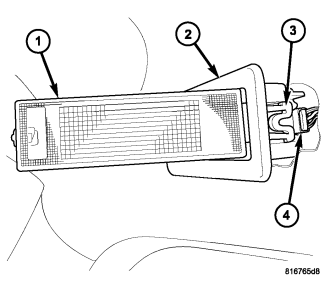
3. Swing the switch end of the lens (1) out and away from the lamp housing (2) until it is perpendicular to the lamp.
4. Pull the lens hinge/retainer (3) end of the housing outward from the headliner far enough to disconnect the wire harness connector (4) from the back of the lamp.
5. Slide the hinge/retainer end of the housing rearward from the mounting hole far enough to disengage the fixed retainer on the switch end of the housing from the headliner.
6. Remove the lamp from the vehicle.
BULB - FRONT
1. Disconnect and isolate the battery negative cable.
2. Using a small thin-bladed screwdriver, gently pry the switch end of the reading lamp lens (2) away from the lamp housing (1) far enough to unsnap the switch end of the lens from the housing. The switch end of the lens is identified by a tactile concave depression (3).
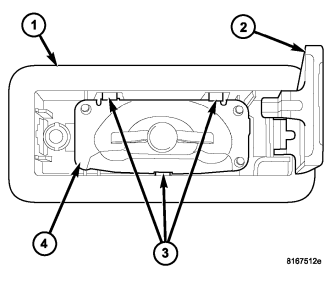
3. Swing the switch end of the lens (2) out and away from the lamp housing (1) until it is perpendicular to the lamp.
4. Starting at the switch end of the lamp, depress each of the three retainers (3) that secure the reflector (4) and disengage the reflector from the three locating pins within the lamp housing.
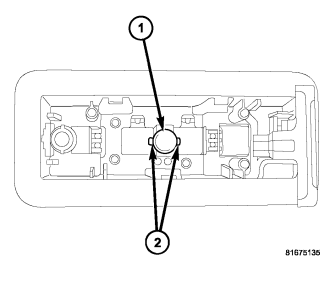
5. Pull the base of the bulb (1) straight out of the bulb holder (2) within the lamp housing.
BULB - SECOND ROW
NOTE: The second row reading lamps are integral to the grab handle in the headliner on the inner roof side rail over each outboard second row seating position.
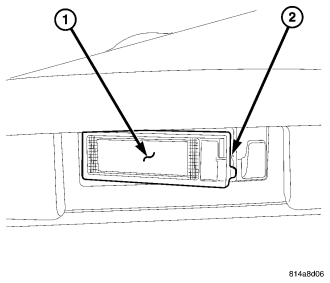
1. Disconnect and isolate the battery negative cable.
2. Using a small thin-bladed screwdriver, gently pry the upper corner at the forward end (2) of the reading lamp lens (1) away from the grab handle far enough to unsnap it from the lamp housing.
3. Pull the front end of the lens outward far enough to disengage the large tab at the rear of the lens from the lamp housing.
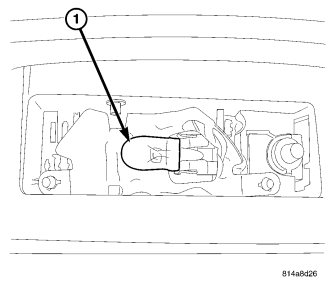
4. Pull the base of the bulb (1) straight out of the bulb holder within the lamp housing.
LAMP - THIRD ROW
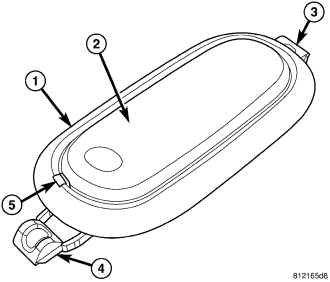
1. Disconnect and isolate the battery negative cable.
2. Insert the tip of a small flat bladed screwdriver into the notch (5) between the lens (2) and the housing (1) on one side of the reading lamp unit.
3. Gently pry the end of the lens outward until it unsnaps from the housing.
4. Swing the lens downward until it is perpendicular to the housing.
5. Pull the lens hinge/retainer (3) end of the housing downward slightly from the headliner, then slide the exposed end of the housing away from the mounting hole far enough to disengage the fixed retainer (4) on the notched end from the headliner.
6. Pull the lamp away from the headliner mounting hole far enough to access and disconnect the wire harness connector from the back of the lamp.
7. Remove the lamp from the vehicle.
BULB - THIRD ROW
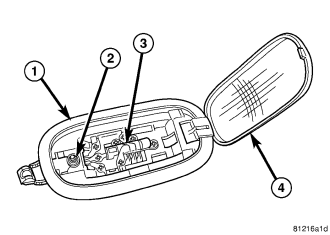
1. Disconnect and isolate the battery negative cable.
2. Insert the tip of a small flat-bladed screwdriver into the notch on the switch (2) side of the third row reading lamp between the lens (4) and the lamp housing (1).
3. Gently pry the notched edge of the lens downward until it unsnaps from the housing.
4. Swing the notched end of the lens downward far enough to access the bulb (3).
5. Carefully unsnap the bulb from the two bulb holders within the lamp housing.