INSTALLATION
FRONT
WARNING: To avoid personal injury or death, during and following any seat belt or child restraint anchor service, carefully inspect all seat belts, buckles, mounting hardware, retractors, tether straps, and anchors for proper installation, operation, or damage. Replace any belt that is cut, frayed, or torn. Straighten any belt that is twisted. Tighten any loose fasteners. Replace any belt that has a damaged or ineffective buckle or retractor. Replace any belt that has a bent or damaged latch plate or anchor plate. Replace any child restraint anchor or the unit to which the anchor is integral that has been bent or damaged. Never attempt to repair a seat belt or child restraint component. Always replace damaged or ineffective seat belt and child restraint components with the correct, new and unused replacement parts listed in the DaimlerChrysler Mopar® Parts Catalog.
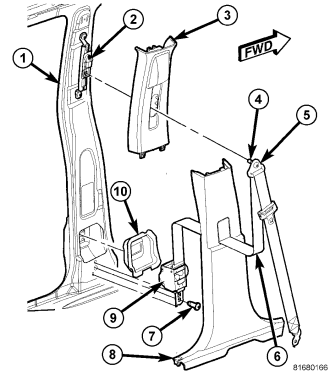
1. Be certain that the retractor shield (10) is properly installed in the inner B-pillar (1) and in good condition before installing the retractor.
2. Position the seat belt and retractor (9) into the vehicle as a unit.
3. Install and tighten the screw (7) that secures the retractor lower bracket to the base of the inner B-pillar. Tighten the screw to 39 N·m (29 ft. lbs.).
4. Route the front seat belt (6) turning loop and lower anchor through the seat belt opening in the lower B-pillar trim (8).
5. Reinstall the lower trim onto the B-pillar. (Refer to 23 - BODY/INTERIOR/B-PILLAR LOWER TRIM - INSTALLATION).
6. Reinstall the upper trim (3) onto the inside of the B-pillar. (Refer to 23 - BODY/INTERIOR/B-PILLAR UPPER TRIM - INSTALLATION).
7. Position the seat belt turning loop (5) onto the height adjuster (2) on the upper B-pillar. Be certain that the seat belt webbing between the retractor and the turning loop is not twisted.
8. Install and tighten the screw (4) that secures the turning loop to the height adjuster. Tighten the screw to 39 N·m (29 ft. lbs.).
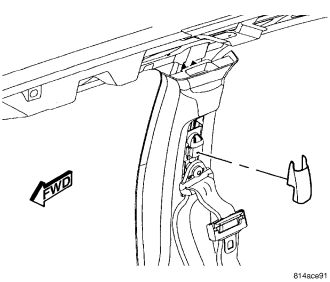
9. Insert the upper tabs of the turning loop trim cover into the slots of the height adjuster on the upper B-pillar, then lower the bottom of the cover and use hand pressure to press firmly and evenly on the cover until it snaps into place.
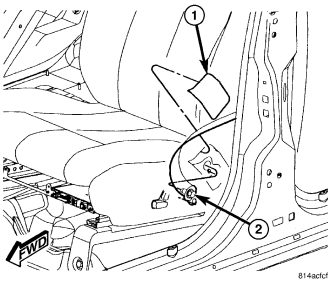
10. Position the seat belt lower anchor to the mounting hole on the outboard side of the front seat cushion frame. Be certain that the seat belt webbing between the turning loop and the lower anchor is not twisted.
11. Install and tighten the screw (2) that secures the lower anchor to the seat. Tighten the screw to 39 N·m (29 ft. lbs.).
12. Reinstall the lower anchor cover (1) onto the front seat cushion outboard side shield.
SECOND ROW CENTER
WARNING: To avoid personal injury or death, during and following any seat belt or child restraint anchor service, carefully inspect all seat belts, buckles, mounting hardware, retractors, tether straps, and anchors for proper installation, operation, or damage. Replace any belt that is cut, frayed, or torn. Straighten any belt that is twisted. Tighten any loose fasteners. Replace any belt that has a damaged or ineffective buckle or retractor. Replace any belt that has a bent or damaged latch plate or anchor plate. Replace any child restraint anchor or the unit to which the anchor is integral that has been bent or damaged. Never attempt to repair a seat belt or child restraint component. Always replace damaged or ineffective seat belt and child restraint components with the correct, new and unused replacement parts listed in the DaimlerChrysler Mopar® Parts Catalog.
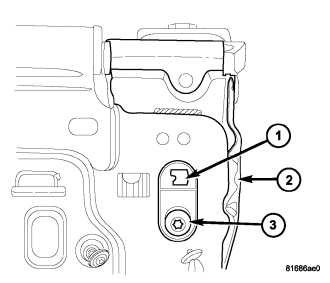
1. Position the second row center seat belt and retractor unit through the opening in the front upper right corner of the seat back frame (2). Be certain to engage the tab on the retractor into the slot (1) in the back of the seat back frame.
2. Install and tighten the screw (3) into the back of the center seat back frame that secures the retractor. Tighten the screw to 50 N·m (37 ft. lbs.).
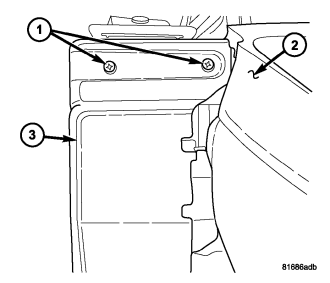
3. Pull the foam seat back cushion (2) away from the front upper right corner of the center seat back frame far enough to position the retractor shield (3) to the seat back frame.
4. Install and tighten the two screws (1) that secure the retractor shield to the seat back frame. Tighten the screws to 2 N·m (18 in. lbs.).
5. Reinstall the trim onto the trim onto the back and the top of the second row center seat back frame. (Refer to 23 - BODY/SEATS/SEAT BACK CUSHION / COVER - SECOND ROW - INSTALLATION).
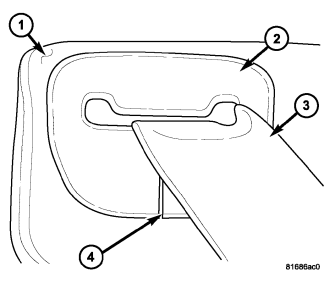
6. Slide the seat belt webbing (3) through the slot (4) in the seat belt escutcheon (2) and position the escutcheon to the top of the second row center seat back (1).
7. Using hand pressure, press the escutcheon firmly and evenly down onto the top of the seat back until the barrel clips are fully engaged.
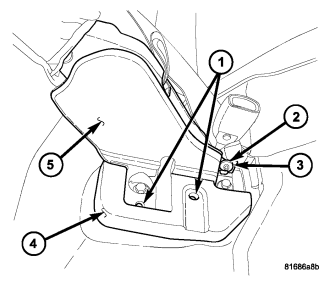
8. Position the seat belt lower anchor (2) to the buckle bracket on the outboard side of the right center seat support bracket. Be certain that the belt webbing is not twisted between the top of the seat back and the lower anchor.
9. Install and tighten the screw (3) that secures the lower anchor to the right center seat support bracket. Tighten the screw to 50 N·m (37 ft. lbs.).
10. Restore the right outboard second row seat to its seating position.
SECOND ROW OUTBOARD
WARNING: To avoid personal injury or death, during and following any seat belt or child restraint anchor service, carefully inspect all seat belts, buckles, mounting hardware, retractors, tether straps, and anchors for proper installation, operation, or damage. Replace any belt that is cut, frayed, or torn. Straighten any belt that is twisted. Tighten any loose fasteners. Replace any belt that has a damaged or ineffective buckle or retractor. Replace any belt that has a bent or damaged latch plate or anchor plate. Replace any child restraint anchor or the unit to which the anchor is integral that has been bent or damaged. Never attempt to repair a seat belt or child restraint component. Always replace damaged or ineffective seat belt and child restraint components with the correct, new and unused replacement parts listed in the DaimlerChrysler Mopar® Parts Catalog.
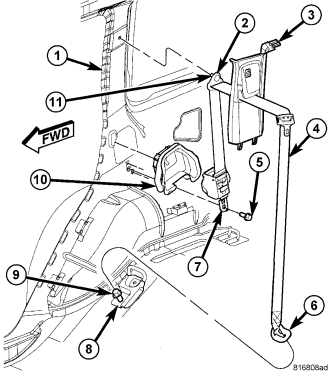
1. Be certain that the retractor shield (1) is properly installed in the inner C-pillar and in good condition before installing the retractor.
2. Position the second row outboard seat belt (4) and retractor (7) to the lower C-pillar as a unit.
3. Engage the locator tab on the back of the retractor into the slot in the lower C-pillar.
4. Install and tighten the screw (5) that secures the retractor to the lower C-pillar. Tighten the screw to 39 N·m (29 ft. lbs.).
5. Position the seat belt turning loop (2) to the upper C-pillar (1). Be certain the seat belt webbing between the retractor and the turning loop is not twisted.
6. Install and tighten the screw (11) that secures the seat belt turning loop to the upper C-pillar. Tighten the screw to 39 N·m (29 ft. lbs.).
7. Reinstall the trim onto the quarter inner panel. (Refer to 23 - BODY/INTERIOR/QUARTER TRIM PANEL - INSTALLATION).
8. Route the seat belt lower anchor (6) through the seat belt opening in the upper C-pillar trim (3).
9. Reinstall the trim onto the upper C-pillar. (Refer to 23 - BODY/INTERIOR/C-PILLAR TRIM - INSTALLATION).
10. Engage the seat belt lower anchor under the loosened screw (9) that secures the seat latch striker bracket (8) to the rear floor panel. Be certain the seat belt webbing between the turning loop and the lower anchor is not twisted.
11. Tighten the screw that secures the lower anchor and the seat latch striker bracket to the rear floor panel. Tighten the screw to 50 N·m (37 ft. lbs.).
12. Restore the second row outboard seat to its seating position.
THIRD ROW
WARNING: To avoid personal injury or death, during and following any seat belt or child restraint anchor service, carefully inspect all seat belts, buckles, mounting hardware, retractors, tether straps, and anchors for proper installation, operation, or damage. Replace any belt that is cut, frayed, or torn. Straighten any belt that is twisted. Tighten any loose fasteners. Replace any belt that has a damaged or ineffective buckle or retractor. Replace any belt that has a bent or damaged latch plate or anchor plate. Replace any child restraint anchor or the unit to which the anchor is integral that has been bent or damaged. Never attempt to repair a seat belt or child restraint component. Always replace damaged or ineffective seat belt and child restraint components with the correct, new and unused replacement parts listed in the DaimlerChrysler Mopar® Parts Catalog.
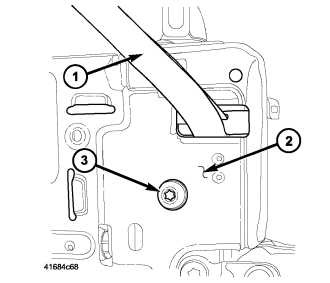
1. Position the third row seat belt and retractor as a unit through the top of the pocket on the front upper outboard corner of the seat back frame. Be certain to engage the tab on the retractor into the slot within the pocket.
2. Install and tighten the screw (3) below the pull strap (1) from the back of the seat back frame (2) that secures the retractor. Tighten the screw to 43 N·m (32 ft. lbs.).
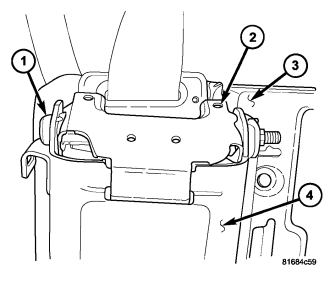
3. Position the retractor retainer bracket (2) over the top of the retractor pocket (4) on the front upper outboard corner of the seat back frame (3).
4. Install and tighten the through bolt (1) that secures the retainer bracket to the top of the retractor pocket on the seat back frame. Tighten the bolt to 43 N·m (32 ft. lbs.).
5. Reinstall the trim onto the top and the back of the third row seat back frame. (Refer to 23 - BODY/SEATS/SEAT BACK CUSHION / COVER - THIRD ROW - INSTALLATION).
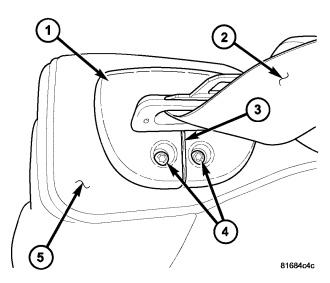
6. Slide the seat belt webbing (2) through the slot (3) in the seat belt escutcheon (1) and position the escutcheon to the top of the third row seat back (5).
7. Install and tighten the two screws (4) that secure the escutcheon to the top of the seat back. Tighten the screws to 3 N·m (28 in. lbs.).
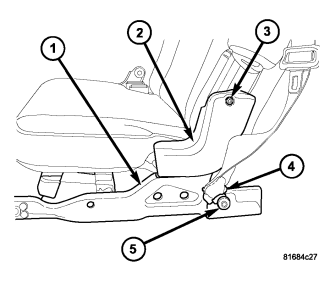
8. Position the seat belt lower anchor (4) to the outboard rear corner of the third row seat support bracket (1). Be certain that the belt webbing is not twisted between the top of the seat back and the lower anchor.
9. Install and tighten the screw (5) that secures the lower anchor to the seat support bracket. Tighten the screw to 43 N·m (32 ft. lbs.).
10. Reinstall the third row seat into the vehicle. (Refer to 23 - BODY/SEATS/SEAT - THIRD ROW - INSTALLATION).