STANDARD PROCEDURE
COOLANT LEVEL CHECK
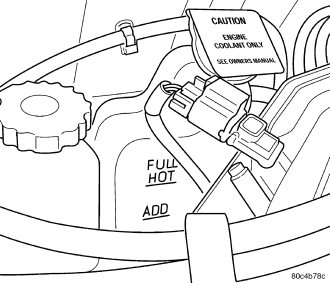
NOTE: Do not remove pressure cap for routine coolant level inspections.
The coolant recovery/reserve system provides a quick visual method for determining the coolant level without removing the pressure cap. Simply observe, with the engine idling and warmed up to normal operating temperature, that the level of the coolant in the recovery/reserve bottle is between the FULL HOT and ADD marks.
DRAINING COOLING SYSTEM
WARNING: Do not open the radiator draincock with the system hot and under pressure. Serious burns from coolant can occur.
NOTE: Drain, flush, and fill the cooling system at the mileage or time intervals specified in the MAINTENANCE SCHEDULE (Refer to LUBRICATION & MAINTENANCE/MAINTENANCE SCHEDULES - DESCRIPTION). If the solution is dirty, rusty, or contains a considerable amount of sediment; clean and flush with a reliable cooling system cleaner. Care should be taken in disposing of the used engine coolant from your vehicle. Check governmental regulations for disposal of used engine coolant.
1. Position a clean collecting container under draincock location.
2. Without removing the pressure cap and with system not under pressure, turn draincock counterclockwise to open.
3. The coolant reserve bottle should empty first, then remove the pressure cap.
4. If coolant reserve bottle does not empty first:
a. Check condition of the pressure cap and cap seals.
b. Check for kinked or torn overflow hose from filler neck to reserve bottle.
5. Allow cooling system to drain completely.
FILLING COOLING SYSTEM
WARNING: Make sure engine cooling system is cool before removing pressure cap or any hose. The cooling system is pressurized when hot. Severe personal injury may result from escaping hot coolant.
CAUTION: Do not use well water, or suspect water supply in cooling system. A 50/50 mixture of the recommended ethylene glycol and distilled water is recommended. For recommended coolant usage, (Refer to LUBRICATION & MAINTENANCE/FLUID TYPES - DESCRIPTION).
NOTE: For cooling system capacity (Refer to LUBRICATION & MAINTENANCE/SPECIFICATIONS - FLUID CAPACITIES).
1. Close radiator draincock. Hand tighten only.
2. Remove the cooling system pressure cap. Install Tool 8195 Filling Aid Funnel.
3. Use the supplied clip to pinch overflow hose.
NOTE: Be careful not to spill coolant on drive belts or the generator.
NOTE: While filling the cooling system, pour coolant into the larger section of the Tool 8195, Filling Aid Funnel .
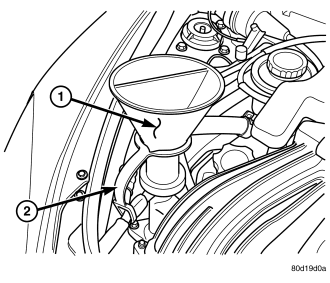
4. Pour coolant into system until funnel is full.
5. Start engine and run at 1500 - 2000 rpm to force air bubbles out.
6. Remove clip from overflow hose and release excess coolant in funnel into coolant recovery container.
7. Install cooling system pressure cap.
CAUTION: Coolant may leak out of the bottle overflow tube if filling too rapidly.
8. Slowly fill coolant reserve/recovery bottle to at least the FULL HOT mark with the recommended coolant. It may be necessary to add additional coolant to the reserve/recovery bottle after three or four warm-up/cool down cycles to maintain coolant level between the FULL HOT and ADD marks. This is due to the removal of trapped air from the system.
CLEANING/REVERSE FLUSHING
CLEANING
Drain the cooling system and refill with water. Run the engine with the radiator cap installed until the upper radiator hose is hot. Stop the engine and drain the water from system. If the water is dirty, fill the system with water, run the engine and drain the system. Repeat this procedure until the water drains clean.
REVERSE FLUSHING
Reverse flushing of the cooling system is the forcing of water through the cooling system. This is done using air pressure in the opposite direction of normal coolant flow. It is usually only necessary with very dirty systems with evidence of partial plugging.
REVERSE FLUSHING RADIATOR
Disconnect the radiator hoses from the radiator inlet and outlet. Attach a section of the radiator hose to the radiator bottom outlet fitting and insert the flushing gun. Connect a water supply hose and air supply hose to the flushing gun.
CAUTION: Internal radiator pressure must not exceed 138 kPa (20 psi) as damage to radiator may result.
Allow the radiator to fill with water. When the radiator is filled, apply air in short blasts. Allow the radiator to refill between blasts. Continue this reverse flushing until clean water flows out through the rear of the radiator cooling tube passages.
REVERSE FLUSHING ENGINE
Drain the cooling system. Remove the thermostat housing and thermostat. Install the thermostat housing. Disconnect the radiator upper hose from the radiator and attach the flushing gun to the hose. Disconnect the radiator lower hose from the water pump and attach a lead-away hose to the water pump inlet fitting.
CAUTION: On vehicles equipped with a heater water control valve, be sure the heater control valve is closed (heat off). This will prevent coolant flow with scale and other deposits from entering the heater core.
Connect the water supply hose and air supply hose to flushing gun. Allow the engine to fill with water. When the engine is filled, apply air in short blasts, allowing the system to fill between air blasts. Continue until clean water flows through the lead away hose.
Remove the lead away hose, flushing gun, water supply hose and air supply hose. Remove the thermostat housing and install the thermostat. Install the thermostat housing with a replacement gasket. Refer to Thermostat Replacement. Connect the radiator hoses. Refill the cooling system with the correct antifreeze/water mixture (Refer to LUBRICATION & MAINTENANCE/FLUID TYPES - DESCRIPTION). Refer to Refilling the Cooling System.
CHEMICAL CLEANING
In some instances, use a radiator cleaner (Mopar® Radiator Kleen or equivalent) before flushing. This will soften scale and other deposits and aid flushing operation.
CAUTION: Follow manufacturers instructions when using these products.