P0341-CAMSHAFT POSITION SENSOR PERFORMANCE-BANK 1 SENSOR 1
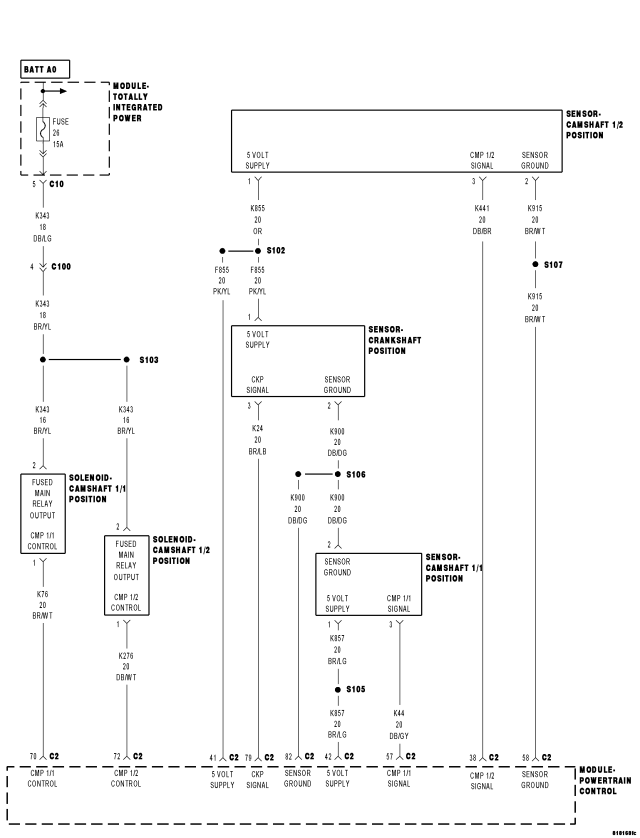
For a complete wiring diagram Refer to Section 8W
- When Monitored:
With the engine cranking or running.
- Set Condition:
The PCM receives either no signal or an incorrect signal from the Camshaft 1/1 Position Sensor.
| Possible Causes |
| INTERMITTENT DTC |
| (K857) 5 VOLT SUPPLY CIRCUIT SHORTED TO VOLTAGE |
| (K44) CMP 1/1 SIGNAL CIRCUIT SHORTED TO VOLTAGE |
| (K857) 5 VOLT SUPPLY CIRCUIT SHORTED TO GROUND |
| (K44) CMP 1/1 SIGNAL CIRCUIT SHORTED TO GROUND |
| (K857) 5 VOLT SUPPLY CIRCUIT SHORTED TO THE (K44) CMP 1/1 SIGNAL CIRCUIT |
| (K857) 5 VOLT SUPPLY CIRCUIT SHORTED TO THE (K900) SENSOR GROUND CIRCUIT |
| (K44) CMP 1/1 SIGNAL CIRCUIT SHORTED TO THE (K900) SENSOR GROUND CIRCUIT |
| (K857) 5 VOLT SUPPLY CIRCUIT OPEN OR HIGH RESISTANCE |
| (K44) CMP 1/1 SIGNAL CIRCUIT OPEN OR HIGH RESISTANCE |
| (K900) SENSOR GROUND CIRCUIT OPEN OR HIGH RESISTANCE |
| CAMSHAFT 1/1 POSITION SENSOR |
| CAMSHAFT 1/2 POSITION SENSOR |
| POWERTRAIN CONTROL MODULE (PCM) |
Always perform the Pre-Diagnostic Troubleshooting procedure before proceeding. (Refer to 9 - ENGINE - STANDARD PROCEDURE)
Diagnostic Test
1. DTC IS ACTIVEStart the engine and allow it to reach operating temperature. If the engine will not start, crank the engine for several seconds.
WARNING: When the engine is operating, do not stand in direct line with the fan. Do not put your hands near the pulleys, belts, or fan. Do not wear loose clothing. Failure to follow these instructions can result in personal injury or death.
With the scan tool, select View DTCs.
Is the status Active for this DTC?
Yes
- Go to 2
No
- Refer to the *CHECKING FOR AN INTERMITTENT DTC Diagnostic Procedure. (Refer to 9 - ENGINE - DIAGNOSIS AND TESTING)
2. (K857) 5 VOLT SUPPLY CIRCUIT VOLTAGE
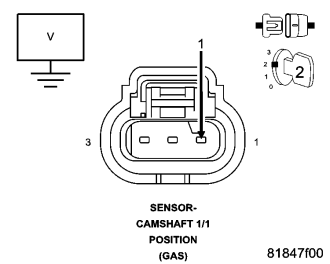
Turn the ignition off.
Disconnect the Camshaft 1/1 Position Sensor connector.
Turn the ignition on.
Measure the voltage of the (K857) 5 Volt Supply circuit in the Camshaft 1/1 Position Sensor harness connector.
Is the voltage between 4.5 and 5.5 volts?
Yes
- Go to 3
No
- Go to 7
3. (K44) CMP 1/1 SIGNAL CIRCUIT VOLTAGE
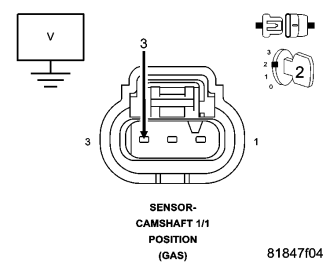
Measure the voltage of the (K44) CMP 1/1 Signal circuit in the Camshaft 1/1 Position Sensor harness connector.
Is the voltage between 4.5 and 5.5 volts?
Yes
- Go to 4
No
- Go to 11
4. (K900) SENSOR GROUND CIRCUIT TEST
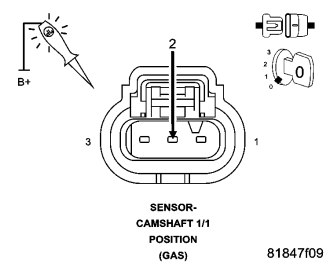
Turn the ignition off.
Using a 12 volt test light connected to 12 volts, check the (K900) Sensor Ground in the Camshaft 1/1 Position Sensor harness connector.
NOTE: The test light should be illuminated and bright. Compare the brightness to that of a direct connection to the battery.
Is the test light illuminated and bright?
Yes
- Go to 5
No
- Go to 15
5. (K857) 5 VOLT SUPPLY CIRCUIT SHORTED TO THE (K44) CMP 1/1 SIGNAL CIRCUIT
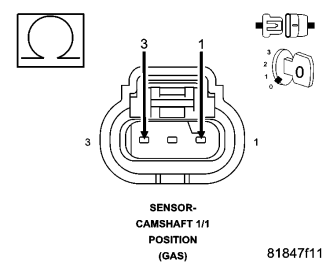
Measure the resistance between the (K857) 5 Volt Supply circuit and the (K44) CMP 1/1 Signal circuit in the Camshaft 1/1 Position Sensor harness connector.
Is the resistance above 100 ohms?
Yes
- Go to 6
No
- Repair the (K857) 5 Volt Supply circuit for a short to the (K44) CMP 1/1 Signal circuit.
- Perform the PCM Verification Test Ver. 1 (Refer to 9 - ENGINE - STANDARD PROCEDURE).
6. CAMSHAFT 1/2 POSITION SENSOR IRREGULAR SIGNAL
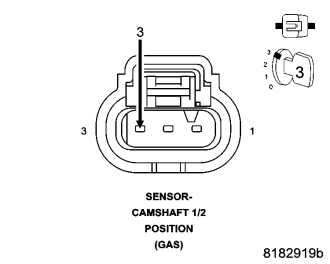
Connect the Camshaft 1/1 Position Sensor connector.
Using a lab scope and the Miller special tool #6801, backprobe the (K441) CMP 1/2 Signal circuit in the Camshaft 1/2 Position Sensor harness connector.
Ignition on, engine not running.
Wiggle the related wire harness and lightly tap on the Camshaft 1/2 Position Sensor while monitoring the lab scope screen.
Start the engine.
Monitor the Camshaft 1/2 Position Sensor signal on the lab scope screen.
Were any Camshaft 1/2 Position Sensor signals irregular or missing?
Yes
- Go to 17
No
- Go to 16
7. (K857) 5 VOLT SUPPLY CIRCUIT SHORTED TO VOLTAGE
Turn the ignition off.
Disconnect the Powertrain Control Module (PCM) connector.
Turn the ignition on.
Measure the voltage of the (K857) 5 Volt Supply circuit in the Camshaft 1/1 Position Sensor harness connector.
Is there any voltage present?
Yes
- Repair the (K857) 5 Volt Supply circuit for a short to voltage.
- Perform the PCM Verification Test Ver. 1 (Refer to 9 - ENGINE - STANDARD PROCEDURE).
No
- Go to 8
8. (K857) 5 VOLT SUPPLY CIRCUIT SHORTED TO GROUND
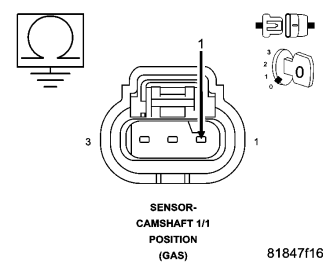
Turn the ignition off.
Measure the resistance between ground and the (K857) 5 Volt Supply circuit in the Camshaft 1/1 Position Sensor harness connector.
Is the resistance above 100 ohms?
Yes
- Go to 9
No
- Repair the (K857) 5 Volt Supply circuit for a short to ground.
- Perform the PCM Verification Test Ver. 1 (Refer to 9 - ENGINE - STANDARD PROCEDURE).
9. (K857) 5 VOLT SUPPLY CIRCUIT SHORTED TO THE (K900) SENSOR GROUND CIRCUIT
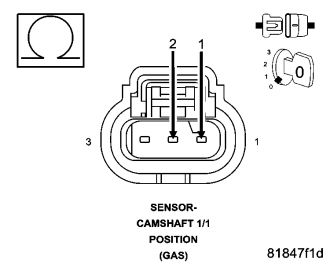
Measure the resistance between the (K857) 5 Volt Supply circuit and the (K900) Sensor Ground circuit in the Camshaft 1/1 Position Sensor harness connector.
Is the resistance above 100 ohms?
Yes
- Go to 10
No
- Repair the (K857) 5 Volt Supply circuit for a short to the (K900) Sensor Ground circuit.
- Perform the PCM Verification Test Ver. 1 (Refer to 9 - ENGINE - STANDARD PROCEDURE).
10. (K857) 5 VOLT SUPPLY CIRCUIT OPEN OR HIGH RESISTANCE
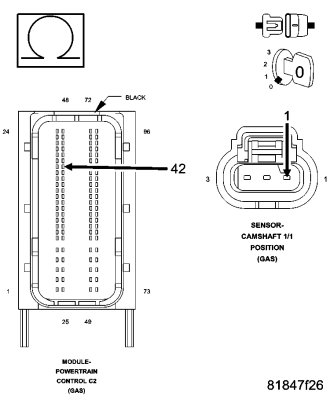
Measure the resistance of the (K857) 5 Volt Supply circuit between the Camshaft 1/1 Position Sensor harness connector and the Powertrain Control Module (PCM) harness connector.
Is the resistance below 5.0 ohms?
Yes
- Go to 18
No
- Repair the (K857) 5 Volt Supply circuit for an open circuit or high resistance.
- Perform the PCM Verification Test Ver. 1 (Refer to 9 - ENGINE - STANDARD PROCEDURE).
11. (K44) CMP 1/1 SIGNAL CIRCUIT SHORTED TO VOLTAGE
Turn the ignition off.
Disconnect the Powertrain Control Module (PCM) connector.
Turn the ignition on.
Measure the voltage of the (K44) CMP 1/1 Signal circuit in the Camshaft 1/1 Position Sensor harness connector.
Is there any voltage present?
Yes
- Repair the (K44) CMP 1/1 Signal circuit for a short to voltage.
- Perform the PCM Verification Test Ver. 1 (Refer to 9 - ENGINE - STANDARD PROCEDURE).
No
- Go to 12
12. (K44) CMP 1/1 SIGNAL CIRCUIT SHORTED TO GROUND
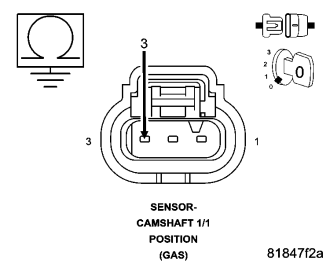
Turn the ignition off.
Measure the resistance between ground and the (K44) CMP 1/1 Signal circuit in the Camshaft 1/1 Position Sensor harness connector.
Is the resistance above 100 ohms?
Yes
- Go to 13
No
- Repair the (K44) CMP 1/1 Signal circuit for a short to ground.
- Perform the PCM Verification Test Ver. 1 (Refer to 9 - ENGINE - STANDARD PROCEDURE).
13. (K44) CMP 1/1 SIGNAL CIRCUIT SHORTED TO (K900) SENSOR GROUND CIRCUIT
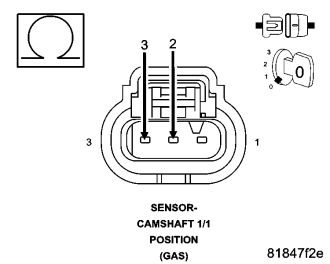
Measure the resistance between the (K44) CMP 1/1 Signal circuit and the (K900) Sensor Ground circuit in the Camshaft 1/1 Position Sensor harness connector.
Is the resistance above 100 ohms?
Yes
- Go to 14
No
- Repair the (K44) CMP 1/1 Signal circuit for a short to the (K900) Sensor Ground circuit.
- Perform the PCM Verification Test Ver. 1 (Refer to 9 - ENGINE - STANDARD PROCEDURE).
14. (K44) CMP 1/1 SIGNAL CIRCUIT OPEN OR HIGH RESISTANCE
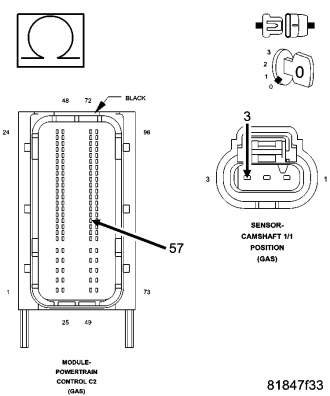
Measure the resistance of the (K44) CMP 1/1 Signal circuit between the Camshaft 1/1 Position Sensor harness connector and the Powertrain Control Module (PCM) harness connector.
Is the resistance below 5.0 ohms?
Yes
- Go to 18
No
- Repair the (K44) CMP 1/1 Signal circuit for an open circuit or high resistance.
- Perform the PCM Verification Test Ver. 1 (Refer to 9 - ENGINE - STANDARD PROCEDURE).
15. (K900) SENSOR GROUND CIRCUIT OPEN OR HIGH RESISTANCE
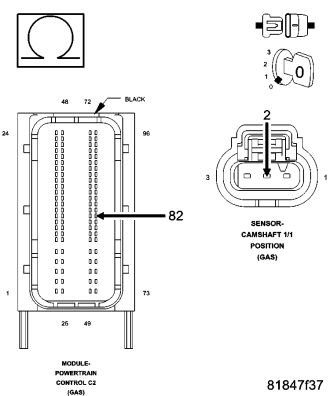
Turn the ignition off.
Disconnect the Powertrain Control Module (PCM) connector.
Measure the resistance of the (K900) Sensor Ground circuit between the Camshaft 1/1 Position Sensor harness connector and the Powertrain Control Module (PCM) harness connector.
Is the resistance below 5.0 ohms?
Yes
- Go to 18
No
- Repair the (K900) Sensor Ground circuit for an open circuit or high resistance.
- Perform the PCM Verification Test Ver. 1 (Refer to 9 - ENGINE - STANDARD PROCEDURE).
16. CAMSHAFT 1/1 POSITION SENSOR
Using the wiring diagram/schematic as a guide, inspect the wiring and connectors between the Camshaft 1/1 Position Sensor and the Powertrain Control Module (PCM).
Look for any chafed, pierced, pinched, or partially broken wires.
Look for broken, bent, pushed out or corroded terminals.
Inspect the Camshaft 1/1 Position Sensor for conditions such as loose mounting screws, damage, or cracks.
If no other problems are found, remove the Camshaft 1/1 Position Sensor.
Inspect the Camshaft 1/1 Position Sensor and mounting area for any condition that would result in an incorrect signal, such as damage, foreign material, or excessive movement.
Were any problems found?
Yes
- Repair as necessary.
- Perform the PCM Verification Test Ver. 1 (Refer to 9 - ENGINE - STANDARD PROCEDURE).
No
- Replace the Camshaft 1/1 Position Sensor.
- Perform the PCM Verification Test Ver. 1 (Refer to 9 - ENGINE - STANDARD PROCEDURE).
17. CAMSHAFT 1/2 POSITION SENSOR
Using the wiring diagram/schematic as a guide, inspect the wiring and connectors between the Camshaft 1/2 Position Sensor and the Powertrain Control Module (PCM).
Look for any chafed, pierced, pinched, or partially broken wires.
Look for broken, bent, pushed out or corroded terminals.
Inspect the Camshaft 1/2 Position Sensor for conditions such as loose mounting screws, damage, or cracks.
If no other problems are found, remove the Camshaft 1/2 Position Sensor.
Inspect the Camshaft 1/2 Position Sensor and mounting area for any condition that would result in an incorrect signal, such as damage, foreign material, or excessive movement.
Were any problems found?
Yes
- Repair as necessary.
- Perform the PCM Verification Test Ver. 1 (Refer to 9 - ENGINE - STANDARD PROCEDURE).
No
- Replace the Camshaft 1/2 Position Sensor.
- Perform the PCM Verification Test Ver. 1 (Refer to 9 - ENGINE - STANDARD PROCEDURE).
18. POWERTRAIN CONTROL MODULE (PCM)
Using the wiring diagram/schematic as a guide, inspect the wiring and connectors between the Camshaft 1/1 Position Sensor and the Powertrain Control Module (PCM).
Look for any chafed, pierced, pinched, or partially broken wires.
Look for broken, bent, pushed out or corroded terminals.
Monitor the scan tool data relative to this circuit and wiggle test the wiring and connectors.
Look for the data to change or for the DTC to reset during the wiggle test.
Refer to any Technical Service Bulletins that may apply.
Were any problems found?
Yes
- Repair as necessary.
- Perform the PCM Verification Test Ver. 1 (Refer to 9 - ENGINE - STANDARD PROCEDURE).
No
- Replace and program the Powertrain Control Module (PCM) in accordance with the Service Information.
- Perform the PCM Verification Test Ver. 1 (Refer to 9 - ENGINE - STANDARD PROCEDURE).