DIAGNOSIS AND TESTING
- B1092-FRONT LEFT SEAT HEATER CONTROL CIRCUIT LOW
- B1094-FRONT LEFT SEAT HEATER CONTROL CIRCUIT OPEN
- B1096-FRONT RIGHT SEAT HEATER CONTROL CIRCUIT LOW
- B1098-FRONT RIGHT SEAT HEATER CONTROL CIRCUIT OPEN
- B10BB - LEFT HEATED SEAT SWITCH INPUT CIRCUIT STUCK - CLUSTER
- B10BC - RIGHT HEATED SEAT SWITCH INPUT CIRCUIT STUCK - CLUSTER
- B2181- HEATED SEAT MODULE POWER SUPPLY LOW
- B2182- HEATED SEAT MODULE POWER SUPPLY HIGH
- B221A-HEATED SEAT MODULE INTERNAL
B1092-FRONT LEFT SEAT HEATER CONTROL CIRCUIT LOW
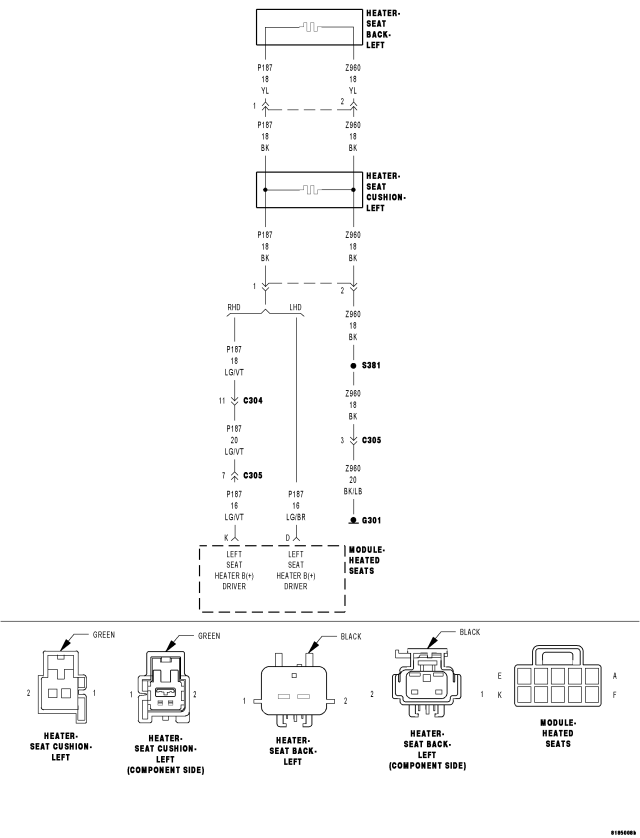
For a complete wiring diagram Refer to Section 8W.
- When Monitored:
Ignition on, during the heated seat operation.
- Set Condition:
This code is set immediately after the Heated Seat Module (HSM) detects the control circuit shorted to ground.
| Possible Causes |
| (P187) LEFT SEAT HEATER B(+) DRIVER SHORTED TO GROUND |
| SEAT CUSHION HEATER ELEMENT SHORTED |
| SEAT BACK HEATER ELEMENT SHORTED |
| HEATED SEAT MODULE |
Diagnostic Test
1. VERIFY THAT DTC B1092-FRONT LEFT SEAT HEATER CONTROL CIRCUIT LOW IS ACTIVEWith the scan tool, record and erase DTC's.
Operate the Heated Seat Switch in both positions several times.
With the scan tool, read DTC's.
Does the DTC B1092 – FRONT LEFT SEAT HEATER CONTROL CIRCUIT LOW reset?
Yes
- Go To 2
No
- The conditions that caused this code to set are not present at this time. Using the wiring diagram/schematic as a guide, inspect the wiring and connectors.
- Perform BODY VERIFICATION TEST – VER 1. (Refer to BODY VERIFICATION TEST – VER 1).
2. DISCONNECT LEFT SEAT CUSHION HEATER 2-WAY CONNECTOR AND READ DTC'S
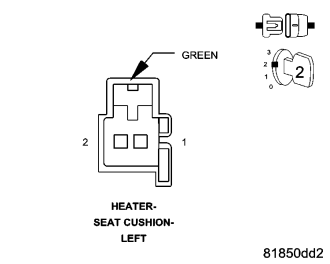
Disconnect the Left Seat Cushion Heater 2–way connector.
NOTE: Check connectors - Clean and repair as necessary.
With the scan tool, erase HSM DTC's
Operate the Heated Seat Switch in both positions several times.
With the scan tool, read DTC's.
Does the scan tool display the same DTC?
Yes
- Go To 5
No
- Go To 3
3. CHECK THE (P187) LEFT SEAT HEATER B(+) DRIVER FOR A SHORT TO GROUND AT THE SEAT
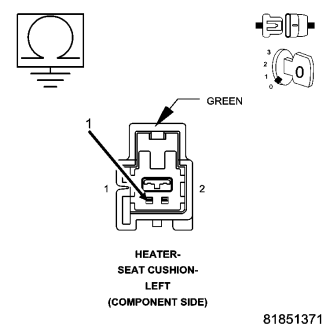
Measure between the (P187) Left Seat Heater B(+) Driver circuit at the Left Seat Heater connector (component side) and the seat frame for a short to ground.
Is the resistance below 1000 ohms?
No
- Go To 4
Yes
- Repair/replace the pigtail/heating element as necessary for a short to ground condition.
- Perform BODY VERIFICATION TEST – VER 1 (Refer to BODY VERIFICATION TEST – VER 1).
4. CHECK THE LEFT HEATER ELEMENT SEAT CUSHION AND SEAT BACK RESISTANCE
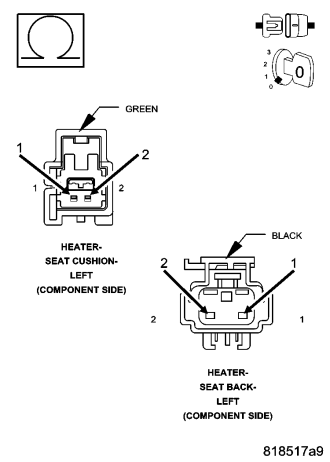
Gain access to the seat cushion and seat back heater connectors.
Check the resistance of each of the heater elements by measuring between the (P187) Left Seat Heater B(+) Driver and the Ground circuit at the seat cushion and seat back heater connectors.
For the seat cushion element, the resistance value is 3 to 5.5 ohms.
For the seat back element, the resistance value is 4 to 6 ohms.
Is the resistance correct for each heater element?
Yes
- Using the wiring diagram/schematic as a guide, inspect the wiring and connectors for an intermittent short to ground.
No
- Replace the heater element as necessary.
- Perform BODY VERIFICATION TEST – VER 1. (Refer to BODY VERIFICATION TEST – VER 1).
5. CHECK THE (P187) LEFT SEAT HEATER B(+) DRIVER CIRCUIT FOR A SHORT TO GROUND
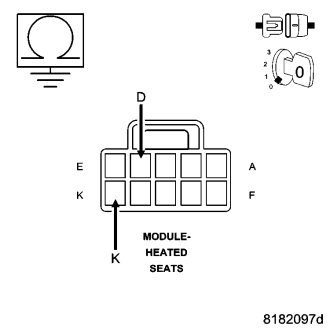
Ensure the Left Seat Cushion Heater 2–way connector is still disconnected.
Disconnect the Heated Seat Module connector.
NOTE: Check connectors - Clean and repair as necessary.
Measure the (P187) Left Seat Heater B(+) Driver circuit cavity D for (LHD) or K for (RHD) at the HSM connector to ground.
Is the resistance below 5.0 ohms?
Yes
- Repair the (P187) Left Seat Heater B(+) Driver circuit for a short to ground.
- Perform BODY VERIFICATION TEST – VER 1. (Refer to BODY VERIFICATION TEST – VER 1).
No
- Replace the Heated Seat Module.
- Perform BODY VERIFICATION TEST – VER 1. (Refer to BODY VERIFICATION TEST – VER 1).
B1094-FRONT LEFT SEAT HEATER CONTROL CIRCUIT OPEN
For a complete wiring diagram Refer to Section 8W.
- When Monitored:
Ignition on, during the heated seat operation.
- Set Condition:
This code is set immediately after the Heated Seat Module detects an open in the seat heater B(+) driver circuit.
| Possible Causes |
| (P187) LEFT SEAT HEATER B(+) DRIVER WIRE OPEN |
| (Z960) GROUND WIRE OPEN |
| SEAT CUSHION HEATER ELEMENT OPEN |
| SEAT BACK HEATER ELEMENT OPEN |
| HEATED SEAT MODULE |
Diagnostic Test
1. VERIFY THAT DTC B1094-FRONT LEFT SEAT HEATER CONTROL CIRCUIT OPEN IS ACTIVEWith the scan tool, record and erase DTC's.
Operate the Heated Seat Switch in both positions several times.
With the scan tool, read DTC's.
Does the DTC B1094 FRONT LEFT SEAT HEATER CONTROL CIRCUIT OPEN reset?
Yes
- Go To 2
No
- The conditions that caused this code to set are not present at this time. Using the wiring diagram/schematic as a guide, inspect the wiring and connectors.
- Perform BODY VERIFICATION TEST – VER 1. (Refer to BODY VERIFICATION TEST – VER 1).
2. CHECK FOR AN OPEN SEAT HEATER ELEMENT CIRCUIT
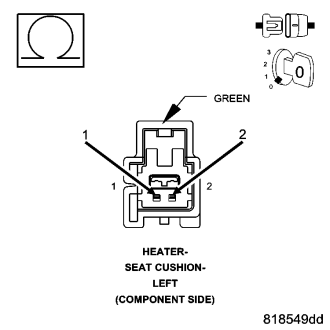
Disconnect the Left Seat Cushion Heater 2–way connector.
NOTE: Check connectors - Clean and repair as necessary.
Measure the total resistance of the cushion and seat back heater elements at the Left Seat Cushion 2–way connector (component side).
Is the total resistance 2.5 to 3.5 ohms + or – .5 ohms?
Yes
- Go To 4
No
- Go To 3
3. CHECK THE LEFT SEAT HEATER ELEMENT RESISTANCE
Gain access to and disconnect the seat cushion and seat back heater connectors.
NOTE: Check connectors - Clean and repair as necessary.
Measure each of the heater elements by measuring between the (P187) Left Seat Heater B(+) Driver and the Ground circuit at the seat cushion and seat back heater connectors.
For the seat cushion element, the resistance value is 3 to 5.5 ohms.
For the seat back element, the resistance value is 4 to 6 ohms.
Is the resistance correct for each heater element?
Yes
- Check for an open in the pigtail harness and repair as necessary.
- Perform BODY VERIFICATION TEST – VER 1. (Refer to BODY VERIFICATION TEST – VER 1).
No
- Replace the heater element as necessary.
- Perform BODY VERIFICATION TEST – VER 1. (Refer to BODY VERIFICATION TEST – VER 1).
4. CHECK THE LEFT SEAT HEATER GROUND CIRCUIT
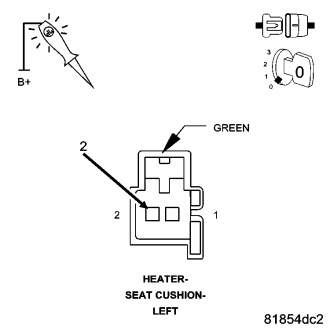
Using a 12-volt test light connected to 12-volts, check the (Z960) Ground circuit at the Left Seat Cushion Heater 2–way connector (harness side).
Does the test light illuminate brightly?
Yes
- Go To 5
No
- Repair the (Z960) Ground circuit for an open.
- Perform BODY VERIFICATION TEST – VER 1. (Refer to BODY VERIFICATION TEST – VER 1).
5. CHECK THE (P187) LEFT SEAT HEATER B(+) DRIVER CIRCUIT FOR AN OPEN.
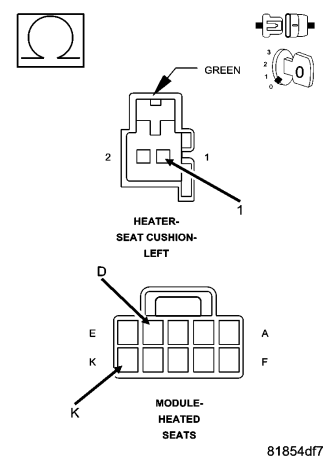
Disconnect the Heated Seat Module connector.
NOTE: Check connectors - Clean and repair as necessary.
Measure the (P187) Left Seat Heater B(+) Driver circuit cavity D for (LHD) or K for (RHD) from the HSM connector to the Left Seat Cushion Heater 2–way connector (harness side).
Is the resistance below 5.0 ohms?
Yes
- Replace the Heated Seat Module.
- Perform BODY VERIFICATION TEST – VER 1. (Refer to BODY VERIFICATION TEST – VER 1).
No
- Repair the (P187) Left Seat Heater B(+) Driver circuit for an open.
- Perform BODY VERIFICATION TEST – VER 1. (Refer to BODY VERIFICATION TEST – VER 1).
B1096-FRONT RIGHT SEAT HEATER CONTROL CIRCUIT LOW
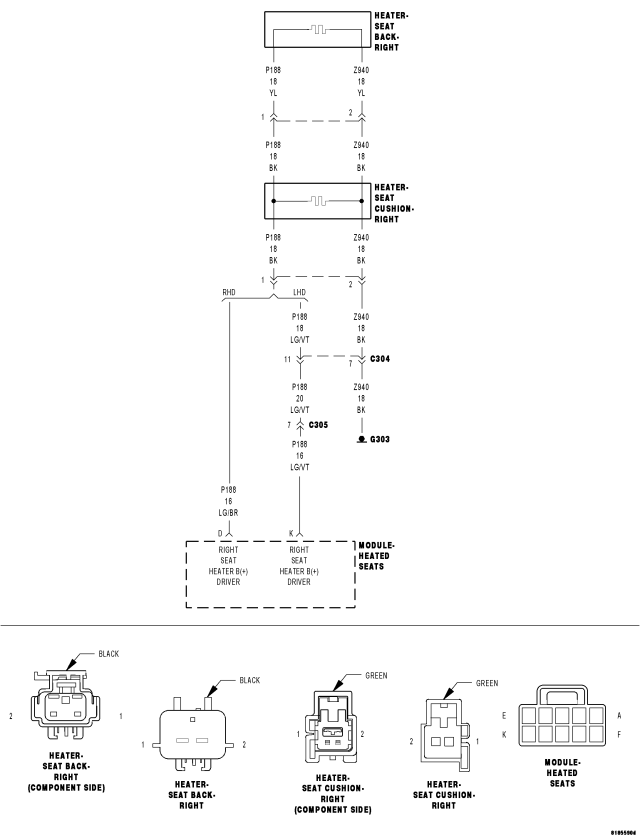
For a complete wiring diagram Refer to Section 8W.
- When Monitored:
Ignition on, during the heated seat operation.
- Set Condition:
This code is set immediately after the Heated Seat Module detects the control circuit shorted to ground.
| Possible Causes |
| (P188) RIGHT SEAT HEATER B(+) DRIVER SHORTED TO GROUND |
| SEAT CUSHION HEATER ELEMENT SHORTED |
| SEAT BACK HEATER ELEMENT SHORTED |
| HEATED SEAT MODULE |
Diagnostic Test
1. VERIFY THAT DTC B1096-FRONT RIGHT SEAT HEATER CONTROL CIRCUIT LOW IS ACTIVEWith the scan tool, record and erase DTC's.
Operate the Heated Seat Switch in both positions several times.
With the scan tool, read DTC's.
Does the DTC B1096 – FRONT RIGHT SEAT HEATER CONTROL CIRCUIT LOW reset?
Yes
- Go To 2
No
- The conditions that caused this code to set are not present at this time. Using the wiring diagram/schematic as a guide, inspect the wiring and connectors.
- Perform BODY VERIFICATION TEST – VER 1. (Refer to BODY VERIFICATION TEST – VER 1).
2. DISCONNECT RIGHT CUSHION HEATER 2-WAY CONNECTOR AND READ DTC'S
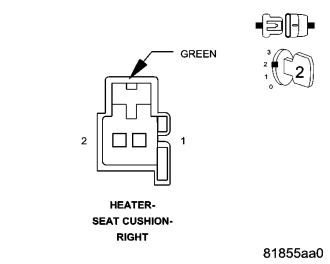
Disconnect the Left Seat Cushion Heater 2–way connector.
NOTE: Check connectors - Clean and repair as necessary.
With the scan tool, erase HSM DTC's.
Operate the Heated Seat Switch in both positions several times.
With the scan tool, read DTC's.
Does the scan tool display the same DTC?
Yes
- Go To 5
No
- Go To 3
3. CHECK THE (P188) RIGHT SEAT HEATER B(+) DRIVER FOR A SHORT TO GROUND AT THE SEAT
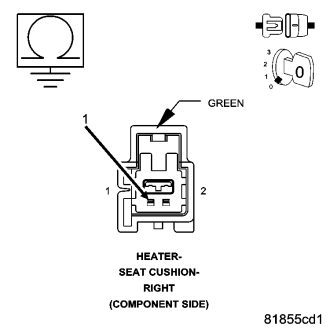
Measure between the (P188) Right Seat Heater B(+) Driver circuit at the Right Seat Heater connector (component side) and the seat frame for a short to ground.
Is the resistance below 1000 ohms?
No
- Go To 4
Yes
- Repair/replace the pigtail/heating element as necessary for a short to ground condition.
- Perform BODY VERIFICATION TEST – VER 1 (Refer to BODY VERIFICATION TEST – VER 1).
4. CHECK THE RIGHT HEATER ELEMENT SEAT CUSHION AND SEAT BACK RESISTANCE
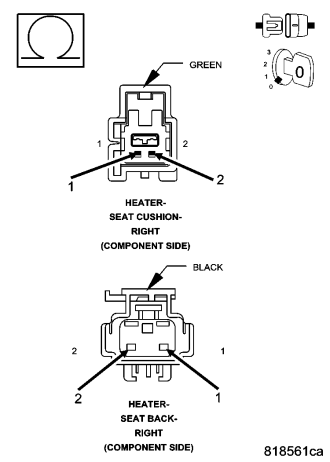
Gain access to the seat cushion and seat back heater connectors.
Check the resistance of each of the heater elements by measuring between the (P188) Right Seat Heater B(+) Driver and the Ground circuit at the seat cushion and seat back heater connectors.
For the seat cushion element, the resistance value is 3 to 5.5 ohms.
For the seat back element, the resistance value is 4 to 6 ohms.
Is the resistance correct for each heater element?
Yes
- Using the wiring diagram/schematic as a guide, inspect the wiring and connectors for an intermittent short to ground.
No
- Replace the heater element as necessary.
- Perform BODY VERIFICATION TEST – VER 1. (Refer to BODY VERIFICATION TEST – VER 1).
5. CHECK THE (P188) RIGHT SEAT HEATER B(+) DRIVER CIRCUIT FOR A SHORT TO GROUND
Ensure the Right Seat Cushion Heater 2–way connector is still disconnected.
Disconnect the Heated Seat Module connector.
NOTE: Check connectors - Clean and repair as necessary.
Measure the (P188) Right Seat Heater B(+) Driver circuit cavity K for (LHD) or D for (RHD) at the HSM connector to ground.
Is the resistance below 5.0 ohms?
Yes
- Repair the (P188) Right Seat Heater B(+) Driver circuit for a short to ground.
- Perform BODY VERIFICATION TEST – VER 1. (Refer to BODY VERIFICATION TEST – VER 1).
No
- Replace the Heated Seat Module.
- Perform BODY VERIFICATION TEST – VER 1. (Refer to BODY VERIFICATION TEST – VER 1).
B1098-FRONT RIGHT SEAT HEATER CONTROL CIRCUIT OPEN
For a complete wiring diagram Refer to Section 8W.
- When Monitored:
Ignition on, during the heated seat operation.
- Set Condition:
This code is set immediately after the Heated Seat Module detects an open in the seat heater B(+) driver circuit.
| Possible Causes |
| (P188) RIGHT SEAT HEATER B(+) DRIVER WIRE OPEN |
| (Z940) GROUND WIRE OPEN |
| SEAT CUSHION HEATER ELEMENT OPEN |
| SEAT BACK HEATER ELEMENT OPEN |
| HEATED SEAT MODULE |
Diagnostic Test
1. VERIFY THAT DTC B1098-FRONT RIGHT SEAT HEATER CONTROL CIRCUIT OPEN IS ACTIVEWith the scan tool, record and erase DTC's.
Operate the Heated Seat Switch in both positions several times.
With the scan tool, read DTC's.
Does the DTC B1098 FRONT RIGHT SEAT HEATER CONTROL CIRCUIT OPEN reset?
Yes
- Go To 2
No
- The conditions that caused this code to set are not present at this time. Using the wiring diagram/schematic as a guide, inspect the wiring and connectors.
- Perform BODY VERIFICATION TEST – VER 1. (Refer to BODY VERIFICATION TEST – VER 1).
2. CHECK FOR AN OPEN SEAT HEATER ELEMENT
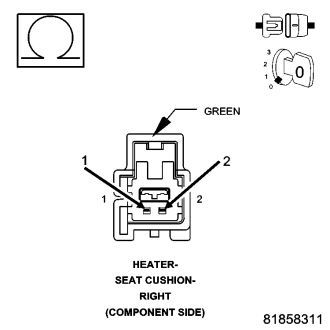
Disconnect the Right Seat Cushion Heater 2–way connector.
NOTE: Check connectors - Clean and repair as necessary.
Measure the total resistance of the cushion and seat back heater elements at the Right Seat Cushion 2–way connector (component side).
Is the total resistance 2.5 to 3.5 ohms + or – .5 ohms?
Yes
- Go To 4
No
- Go To 3
3. CHECK THE RIGHT SEAT HEATER ELEMENT RESISTANCE
Gain access to and disconnect the seat cushion and seat back heater connectors.
NOTE: Check connectors - Clean and repair as necessary.
Measure each of the heater elements by measuring between the (P188) Right Seat Heater B(+) Driver and the Ground circuit at the seat cushion and seat back heater connectors.
For the seat cushion element, the resistance value is 3 to 5.5 ohms.
For the seat back element, the resistance value is 4 to 6 ohms.
Is the resistance correct for each heater element?
Yes
- Check for an open in the pigtail harness and repair as necessary.
- Perform BODY VERIFICATION TEST – VER 1. (Refer to BODY VERIFICATION TEST – VER 1).
No
- Replace the heater element as necessary.
- Perform BODY VERIFICATION TEST – VER 1. (Refer to BODY VERIFICATION TEST – VER 1).
4. CHECK THE SEAT HEATER GROUND CIRCUIT
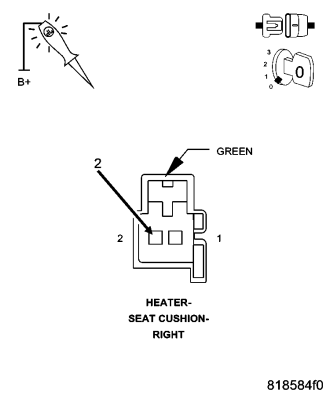
Using a 12-volt test light connected to 12-volts, check the (Z940) Ground circuit at the Right Seat Cushion Heater 2–way connector (harness side).
Does the test light illuminate brightly?
Yes
- Go To 5
No
- Repair the (Z940) Ground circuit for an open.
- Perform BODY VERIFICATION TEST – VER 1. (Refer to BODY VERIFICATION TEST – VER 1).
5. CHECK THE (P188) RIGHT SEAT HEATER B(+) DRIVER CIRCUIT FOR AN OPEN.
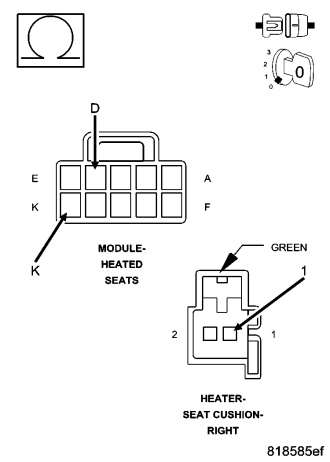
Disconnect the Heated Seat Module connector.
NOTE: Check connectors - Clean and repair as necessary.
Measure the (P188) Right Seat Heater B(+) Driver circuit cavity K for (LHD) or D for (RHD) from the HSM connector to the Right Seat Cushion Heater 2–way connector (harness side).
Is the resistance below 5.0 ohms?
Yes
- Replace the Heated Seat Module.
- Perform BODY VERIFICATION TEST – VER 1. (Refer to BODY VERIFICATION TEST – VER 1).
No
- Repair the (P188) Right Seat Heater B(+) Driver circuit for an open.
- Perform BODY VERIFICATION TEST – VER 1. (Refer to BODY VERIFICATION TEST – VER 1).
B10BB - LEFT HEATED SEAT SWITCH INPUT CIRCUIT STUCK - CLUSTER
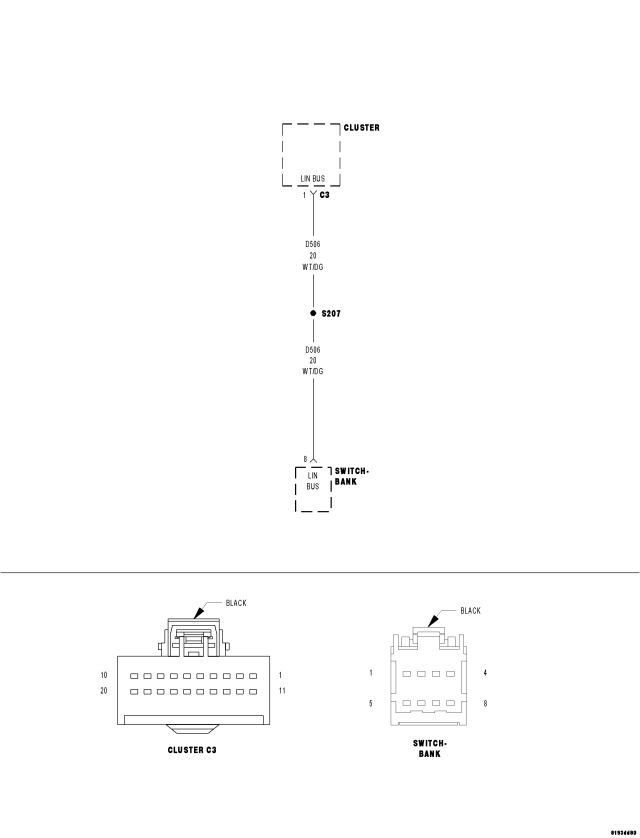
For a complete wiring diagram Refer to Section 8W.
- When Monitored:
Continuously
- Set Condition:
When the Heated Seat Switch in the Switch Bank is held in the On position for over 10 seconds, this code will set.
| Possible Causes |
| (D506) LIN BUS CIRCUIT PARTIAL SHORT TO GROUND |
| SWITCH BANK STUCK |
| INSTRUMENT CLUSTER |
Diagnostic Test
1. TEST FOR INTERMITTENT CONDITIONTurn the ignition on.
With the scan tool, record and erase DTC's.
Operate the Heated Seat Switch several times.
Cycle the ignition from on to off.
Turn the ignition on.
With the scan tool, read DTC's.
Does the scan tool display B10BB LEFT HEATED SEAT SWITCH INPUT CIRCUIT STUCK?
Yes
- Go To 2
No
- The conditions that caused this code to set are not present at this time. Using the wiring diagram/schematic as a guide, inspect the wiring and connectors.
- Perform BODY VERIFICATION TEST - VER 1. (Refer to 8 - ELECTRICAL/ELECTRONIC CONTROL MODULES - STANDARD PROCEDURE)
2. SWITCH SHORTED
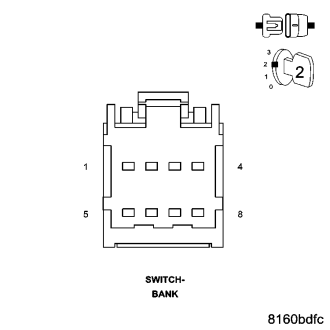
With the scan tool, erase DTC's.
Disconnect the Switch Bank connector.
With the scan tool, read DTC's.
Does the scan tool display B10BB – LEFT HEATED SEAT SWITCH INPUT CIRCUIT STUCK?
No
- Replace the Switch Bank.
- Perform BODY VERIFICATION TEST - VER 1. (Refer to 8 - ELECTRICAL/ELECTRONIC CONTROL MODULES - STANDARD PROCEDURE)
Yes
- Go To 3
3. (D506) LIN BUS CIRCUIT PARTIAL SHORT TO GROUND
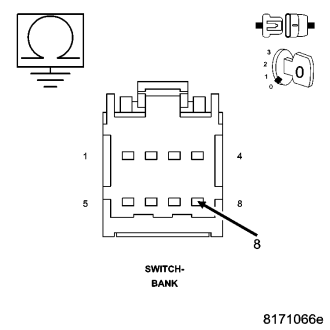
Turn the ignition off.
Disconnect the Cluster C3 connector.
Measure the resistance between ground and the (D506) LIN Bus circuit.
Is the resistance below 10000.0 ohms?
Yes
- Repair the (D506) LIN Bus circuit for a partial short to ground.
- Perform BODY VERIFICATION TEST - VER 1. (Refer to 8 - ELECTRICAL/ELECTRONIC CONTROL MODULES - STANDARD PROCEDURE)
No
- Replace the Instrument Cluster in accordance with the Service Information.
- Perform BODY VERIFICATION TEST - VER 1. (Refer to 8 - ELECTRICAL/ELECTRONIC CONTROL MODULES - STANDARD PROCEDURE)
B10BC - RIGHT HEATED SEAT SWITCH INPUT CIRCUIT STUCK - CLUSTER
For a complete wiring diagram Refer to Section 8W.
- When Monitored:
Continuously
- Set Condition:
When the Heated Seat Switch in the Switch Bank is held in the On position for over 10 seconds, this code will set.
| Possible Causes |
| (D506) LIN BUS CIRCUIT PARTIAL SHORT TO GROUND |
| SWITCH BANK STUCK |
| INSTRUMENT CLUSTER |
Diagnostic Test
1. TEST FOR INTERMITTENT CONDITIONTurn the ignition on.
With the scan tool, record and erase DTC's.
Operate the Heated Seat Switch several times.
Cycle the ignition from on to off.
Turn the ignition on.
With the scan tool, read DTC's.
Does the scan tool display B10BC RIGHT HEATED SEAT SWITCH INPUT CIRCUIT STUCK?
Yes
- Go To 2
No
- The conditions that caused this code to set are not present at this time. Using the wiring diagram/schematic as a guide, inspect the wiring and connectors.
- Perform BODY VERIFICATION TEST - VER 1. (Refer to 8 - ELECTRICAL/ELECTRONIC CONTROL MODULES - STANDARD PROCEDURE)
2. SWITCH SHORTED
With the scan tool, erase DTC's.
Disconnect the Switch Bank connector.
With the scan tool, read DTC's.
Does the scan tool display B10BC – RIGHT HEATED SEAT SWITCH INPUT CIRCUIT STUCK?
No
- Replace the Switch Bank.
- Perform BODY VERIFICATION TEST - VER 1. (Refer to 8 - ELECTRICAL/ELECTRONIC CONTROL MODULES - STANDARD PROCEDURE)
Yes
- Go To 3
3. (D506) LIN BUS CIRCUIT PARTIAL SHORT TO GROUND
Turn the ignition off.
Disconnect the Cluster C3 connector.
Measure the resistance between ground and the (D506) LIN Bus circuit.
Is the resistance below 10000.0 ohms?
Yes
- Repair the (D506) LIN Bus circuit for a partial short to ground.
- Perform BODY VERIFICATION TEST - VER 1. (Refer to 8 - ELECTRICAL/ELECTRONIC CONTROL MODULES - STANDARD PROCEDURE)
No
- Replace the Instrument Cluster in accordance with the Service Information.
- Perform BODY VERIFICATION TEST - VER 1. (Refer to 8 - ELECTRICAL/ELECTRONIC CONTROL MODULES - STANDARD PROCEDURE)
B2181- HEATED SEAT MODULE POWER SUPPLY LOW
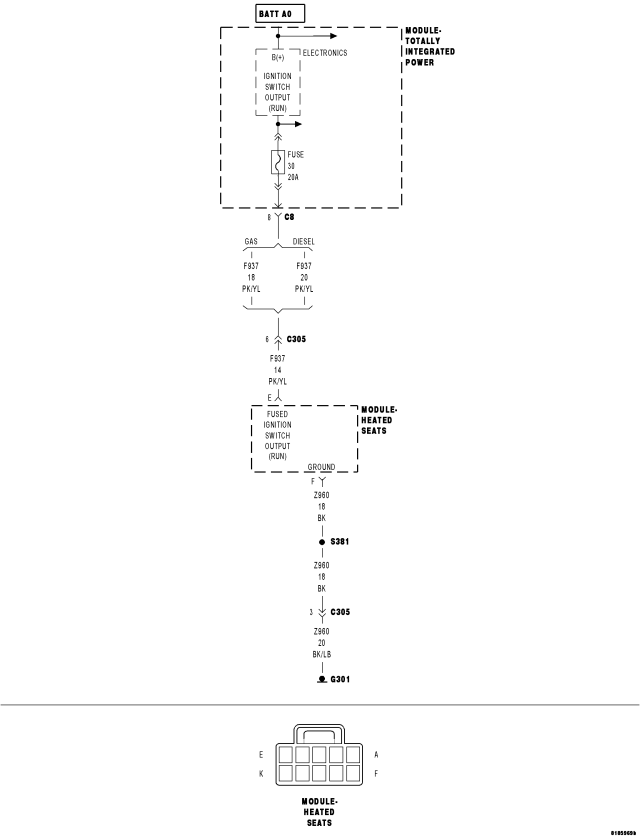
For a complete wiring diagram Refer to Section 8W.
- When Monitored:
During heated seat operation.
- Set Condition:
This code is set immediately if the Heated Seat Module detects voltage under 10 volts on the (F937) Fused Ignition Switch Output (Run) circuit.
| Possible Causes |
| (F937) FUSED IGNITION SWITCH OUTPUT (RUN) CIRCUIT HIGH RESISTANCE |
| HEATED SEAT MODULE |
Diagnostic Test
1. CHECK PCM FOR CHARGING SYSTEM DTCWith the scan tool, read Powertrain Control Module DTC's.
Are there any Charging System DTC's set in the Powertrain Control Module?
Yes
- (Refer to 8 - ELECTRICAL/CHARGING - DIAGNOSIS AND TESTING) for Charging System diagnostic procedures.
No
- Go To 2
- Perform BODY VERIFICATION TEST – VER 1. (Refer to BODY VERIFICATION TEST - VER 1).
2. VERIFY THAT DTC B2181 - HEATED SEAT MODULE POWER SUPPLY LOW IS ACTIVE
With the scan tool, record and erase DTC's.
Turn the ignition switch to the Off position then start the engine and operate the heated seats for one minute.
With the scan tool, read DTC's.
Does the DTC B2181 - HEATED SEAT MODULE POWER SUPPLY LOW reset?
Yes
- Go To 3
No
- The conditions that caused this code to set are not present at this time. Using the wiring diagram/schematic as a guide, inspect the wiring and connectors.
- Perform BODY VERIFICATION TEST – VER 1. (Refer to BODY VERIFICATION TEST - VER 1).
3. (F937) FUSED IGNITION SWITCH OUTPUT (RUN) CIRCUIT HIGH RESISTANCE
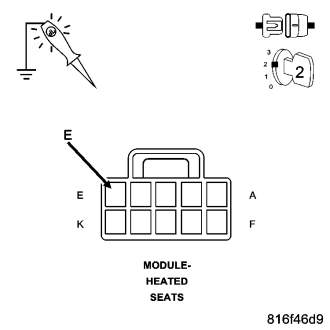
Disconnect the Heated Seat Module connector.
NOTE: Check connectors - Clean and repair as necessary.
Start the engine and let idle.
Using a 12-volt test light connected to ground, check the (F937) Fused Ignition Switch Output (Run) circuit at the HSM connector.
NOTE: The test light must illuminate brightly. Compare the brightness to that of a direct connection to the battery.
Does the test light illuminate brightly?
Yes
- Replace the Heated Seat Module in accordance with the Service Information.
- Perform BODY VERIFICATION TEST – VER 1. (Refer to BODY VERIFICATION TEST - VER 1).
No
- Repair the (F937) Fused Ignition Switch Output (Run) circuit as necessary.
- Perform BODY VERIFICATION TEST – VER 1. (Refer to BODY VERIFICATION TEST - VER 1).
B2182- HEATED SEAT MODULE POWER SUPPLY HIGH
For a complete wiring diagram Refer to Section 8W.
- When Monitored:
During heated seat operation.
- Set Condition:
This code is set immediately if the Heated Seat Module detects voltage over 16.0 volts on the (F937) Fused Ignition Switch Output (Run) circuit.
| Possible Causes |
| TROUBLE CODE PRESENT |
| CHARGING SYSTEM HIGH |
Diagnostic Test
1. CHECK PCM FOR CHARGING SYSTEM DTCWith the scan tool, record and erase DTC's.
Cycle the ignition switch from On to Off.
Start the engine.
Run the engine at approximately 1500 RPM for 1 minute.
With the scan tool, read DTCs.
With the scan tool, read Powertrain Control Module DTC's.
Are there any Charging System DTC's set in the Powertrain Control Module?
Yes
- (Refer to 8 - ELECTRICAL/CHARGING - DIAGNOSIS AND TESTING) for Charging System diagnostic procedures.
- Perform BODY VERIFICATION TEST – VER 1. (Refer to 8 - ELECTRICAL/ELECTRONIC CONTROL MODULES - STANDARD PROCEDURE)
No
- The conditions that caused this code to set are not present at this time. Using Service Information, check the charging system.
- Perform BODY VERIFICATION TEST – VER 1. (Refer to BODY VERIFICATION TEST - VER 1).
B221A-HEATED SEAT MODULE INTERNAL
For a complete wiring diagram Refer to Section 8W.
- When Monitored:
Ignition on.
- Set Condition:
This code is set immediately if the Heated Seat Module internal self test fails.
| Possible Causes |
| HEATED SEAT MODULE |
Diagnostic Test
1. VERIFY THAT DTC B221A-HEATED SEAT MODULE INTERNAL IS ACTIVEWith the scan tool, record and erase DTC's.
Cycle the ignition switch off then back on.
With the scan tool, read DTC's.
Does the DTC B221A-HEATED SEAT MODULE INTERNAL reset?
Yes
- Replace the Heated Seat Module.
- Perform BODY VERIFICATION TEST – VER 1. (Refer to 8 - ELECTRICAL/ELECTRONIC CONTROL MODULES - STANDARD PROCEDURE)
No
- The conditions that caused this code to set are not present at this time. Using the wiring diagram/schematic as a guide, inspect the wiring and connectors.
- Perform BODY VERIFICATION TEST – VER 1. (Refer to 8 - ELECTRICAL/ELECTRONIC CONTROL MODULES - STANDARD PROCEDURE)