ARM-UPPER CONTROL
REMOVAL
1. Raise and support the vehicle. (Refer to LUBRICATION & MAINTENANCE/HOISTING - STANDARD PROCEDURE)
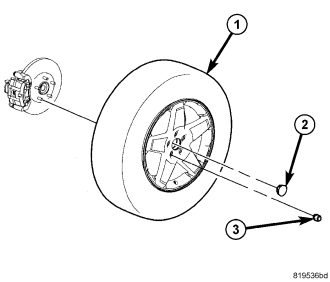
2. Remove the wheel mounting nuts (3), then the tire and wheel assembly (1).
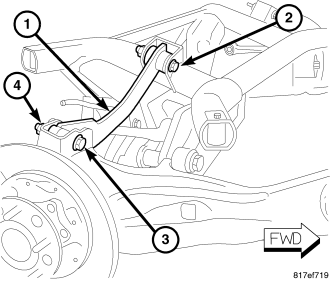
3. Remove the nut (4) and bolt (3) securing the upper control arm (1) to the trailing link.
4. Remove the bolt (2) securing the upper control arm (1) to the crossmember.
5. Remove the upper control arm (1).
INSTALLATION
1. Position the upper control arm (1) and install the bolt (2) securing the arm to the crossmember. Do not tighten at this time.
2. Install the bolt (3) and nut (4) securing the upper control arm (1) to the trailing link. Do not tighten at this time.
3. Install the tire and wheel assembly (1) (Refer to 22 - TIRES/WHEELS - INSTALLATION). Install and tighten the wheel mounting nuts (3) to 135 N·m (100 ft. lbs.).
4. Lower the vehicle.
5. Position the vehicle on an alignment rack/drive-on lift. Raise the vehicle as necessary to access mounting bolts and nuts.
6. Tighten the upper control arm mounting bolt at the crossmember to 95 N·m (70 ft. lbs.).
7. Tighten the upper control arm mounting bolt nut at the trailing link to 95 N·m (70 ft. lbs.).
8. Perform wheel alignment as necessary. (Refer to 2 - SUSPENSION/WHEEL ALIGNMENT - STANDARD PROCEDURE)