LINK-TOE
REMOVAL
1. Raise and support the vehicle. (Refer to LUBRICATION & MAINTENANCE/HOISTING - STANDARD PROCEDURE)
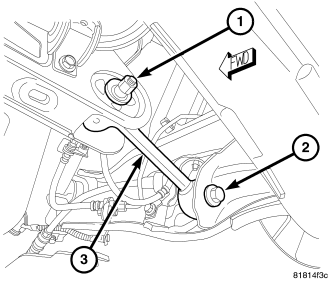
2. Remove the bolt (2) securing the toe link (3) to the trailing link.
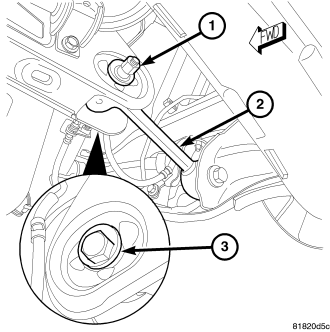
3. Mark the position of the cam bolt cam on the crossmember using a paint marker or crayon. This mark will be used upon installation to help get the alignment close prior to performing rear wheel alignment. Do not use any type marker that will scratch or damage the surface of the crossmember.
4. While holding the cam bolt head (3) stationary, loosen and remove the toe link mounting cam bolt nut (1) and washer. Remove the cam bolt.
5. Remove the toe link (2).
INSTALLATION
CAUTION: When installing the cam bolt (3) and washer make sure the cams stay inside the abutments built into the crossmember. Failure to do so can damage the abutments and make toe adjustment difficult.
1. Position the toe link (2) and install the cam bolt (3) from the front through the crossmember and link. Match the cam on the bolt to the marks made during removal or position the top of the cam to the 12 O'clock position.
2. Install the cam washer and nut (1) securing the toe link (2) to the trailing link. Do not tighten at this time.
3. Install the bolt (2) securing the link to the crossmember. To install the bolt it may be necessary to flex the trailing link body mount bushing inward or outward using an appropriate prying tool. Do not tighten at this time.
4. Lower the vehicle.
5. Position the vehicle on an alignment rack/drive-on lift. Raise the vehicle as necessary to access mounting bolts and nuts.
6. Tighten the toe link mounting bolt at the trailing link to 95 N·m (70 ft. lbs.).
7. Perform wheel alignment as necessary. (Refer to 2 - SUSPENSION/WHEEL ALIGNMENT - STANDARD PROCEDURE)
8. Once rear toe is set, while holding the cam bolt head (3) stationary, tighten the toe link mounting cam bolt nut (1) to 35 N·m (26 ft. lbs.).