STANDARD PROCEDURE
BODY LUBRICATION
All mechanisms and linkages should be lubricated when necessary. This will maintain ease of operation and provide protection against rust and excessive wear. The weatherstrip seals should be lubricated to prolong their life as well as to improve door sealing.
All applicable exterior and interior vehicle operating mechanisms should be inspected and cleaned. Pivot/sliding contact areas on the mechanisms should then be lubricated.
1. When necessary, lubricate the operating mechanisms with the specified lubricants.
2. Apply silicone lubricant to a cloth and wipe it on door seals to avoid over-spray that can soil passenger's clothing.
3. Before applying lubricant, the component should be wiped clean. After lubrication, any excess lubricant should be removed.
4. The hood latch, latch release mechanism, latch striker, and safety latch should be lubricated periodically.
5. The door lock cylinders should be lubricated twice each year (preferably autumn and spring).
- Spray a small amount of lock cylinder lubricant directly into the lock cylinder.
- Apply a small amount to the key and insert it into the lock cylinder.
- Rotate it to the locked position and then back to the unlocked position several times.
- Remove the key. Wipe the lubricant from it with a clean cloth to avoid soiling of clothing.
HEAT STAKING
1. Remove trim panel.
2. Bend or move the trim panel components at the heat staked joints. Observe the heat staked locations and/or component seams for looseness.
3. Heat stake the components.
a. If the heat staked or component seam location is loose, hold the two components tightly together and using a soldering gun with a flat tip, melt the material securing the components together. Do not over heat the affected area, damage to the exterior of the trim panel may occur.
b. If the heat staked material is broken or missing, use a hot glue gun to apply new material to the area to be repaired. The panels that are being heat staked must be held together while the applying the glue. Once the new material is in place, it may be necessary to use a soldering gun to melt the newly applied material. Do not over heat the affected area, damage to the exterior of the trim panel may occur.
4. Allow the repaired area to cool and verify the repair.
5. Install trim panel.
PLASTIC BODY PANEL REPAIR
There are many different types of plastics used in today's automotive environment. We group plastics in three different categories: Rigid, Semi-Rigid, and Flexible. Any of these plastics may require the use of an adhesion promoter for repair. These types of plastic are used extensively on DaimlerChrysler Motors vehicles. Always follow repair material manufacturer's plastic identification and repair procedures.
Rigid Plastics:
Examples of rigid plastic use: Fascias, Hoods, Doors, and other Body Panels, which include SMC, ABS, and Polycarbonates.
Semi-Rigid Plastics:
Examples of semi-rigid plastic use: Interior Panels, Under Hood Panels, and other Body Trim Panels.
Flexible Plastics:
Examples of flexible plastic use: Fascias, Body Moldings, and upper and lower Fascia Covers.
Repair Procedure:
The repair procedure for all three categories of plastics is basically the same. The one difference is the material used for the repair. The materials must be specific for each substrate, rigid repair material for rigid plastic repair, semi-rigid repair material for semi-rigid plastic repair and flexible repair material for flexible plastic repair.
Adhesion Promoter/Surface Modifier:
Adhesion Promoters/Surface Modifiers are required for certain plastics. All three categories may have plastics that require the use of adhesion promoter/surface modifiers. Always follow repair material manufacturer's plastic identification and repair procedures.
SAFETY PRECAUTION AND WARNINGS
WARNING:
NOTE:
RIGID, SEMI-RIGID, AND FLEXIBLE PLASTIC PARTS TYPES
| CODE | FAMILY NAME | COMMON TRADE NAME | TYPICAL APPLICATION |
| ASA | ACRYLONITRILE STYRENE ACRYLITE | LURAN S | CONSOLES, GRILLES |
| ABS | ACRYLONITRILE BUTADIENE STYRENE | TERLURAN | "A" PILLARS, CONSOLES, GRILLES |
| ABS/PC | ABS/PC ALLOY | PULSE, PROLOY, BAYBLEND | DOORS, INSTRUMENT PANELS |
| ABS/PVC | ABS/PV ALLOY | PROLOY, PULSE, LUSTRAN, CYCLOVIN | DOOR PANELS, GRILLES, TRIM |
| BMC | BULK MOLDING COMPOUND | BMC | FENDER EXTENSIONS |
| EMA | EHTYLENE METHYL ACRYLATE/IONOMER | SURLYN, EMA, IONOMER | BUMPER GUARDS, PADS |
| METTON | METTON | METTON | GRILLES, KICK PANELS, RUNNING BOARDS |
| MPPO | MODIFIED POLYPHENYLENE OXIDE | MPPO | SPOILER ASSEMBLY |
| PA | POLYAMID | ZYTEL, VYDYNE, PA, MINLON | FENDERS, QUARTER PANELS |
| PET | THERMOPLASTIC POLYESTER | RYNITE | TRIM |
| PBT/PPO | PBT/PPO ALLOY | GERMAX | CLADDINGS |
| PBTP | POLYBUTYLENE THEREPTHALATE | PBT, PBTP, POCAN, VALOX | WHEEL COVERS, FENDERS, GRILLES |
| PBTP/EEBC | POLYBUTYLENE THEREPTHALATE/EEBC ALLOY | BEXLOY, "M", PBTP/EEBC | FASCIAS, ROCKER PANEL, MOLDINGS |
| PC | POLYCARBONATE | LEXAN, MERLON, CALIBRE, MAKROLON PC | TAIL LIGHT LENSES, IP TRIM, VALANCE PANELS |
| PC/ABS | PC/ABS ALLOY | GERMAX, BAY BLENDS, PULSE | DOORS, INSTRUMENT PANELS |
| PPO | POLYPHENYLENE OXIDE | AZDEL, HOSTALEN, MARLEX, PRFAX, NORYL, GTX, PPO | INTERIOR TRIM, DOOR PANELS, SPLASH SHIELDS, STEERING COLUMN SHROUD |
| PPO/PA | POLYPHENYLENE/POLYAMID | PPO/PA, GTX 910 | FENDERS, QUARTER PANELS |
| PR/FV | FIBERGLASS REINFORCED PLASTIC | FIBERGLASS, FV, PR/FV | BODY PANELS |
| PS | POLYSTYRENE | LUSTREX, STYRON, PS | DOOR PANELS, DASH PANELS |
| RTM | RESIN TRANSFER MOLDING COMPOUND | RTM | BODY PANELS |
| SMC | SHEET MOLDED COMPOUND | SMC | BODY PANELS |
| TMC | TRANSFER MOLDING COMPOUND | TMC | GRILLES |
| UP | UNSATURATED POLYESTER (THERMOSETTING) | SMC, BMC, TMC, ZMC, IMC, XSMC, UP | GRILLE OPENING PANEL, LIFTGATES, FLARESIDE FENDERS, FENDER EXTENSIONS |
| EEBC | ETHER/ESTER BLOCKED CO-POLYMER | EEBC | BUMPERS |
| EEBC/PBTP | EEBC/POLYBUTYLENE TEREPTHALATE | EEBC, PBTP, BEXLOY | BUMPER, ROCKER PANELS |
| EMPP | ETHYLENE MODIFIED POLYPROPYLENE | EMPP | BUMPER COVERS |
| EPDM | ETHYLENE/PROPROPYLENE DIENE MONOMER | EPDM, NORDEL, VISTALON | BUMPERS |
| EPM | ETHYLENE/PROPROPYLENE CO-POLYMER | EPM | FENDERS |
| MPU | FOAM POLYURETHANE | MPU | SPOILERS |
| PE | POLYETHYLENE | ALATHON, DYLAN, LUPOLEN, MARLEX | — |
| PP | POLYPROPYLENE (BLENDS) | NORYL, AZDEL, MARLOX, DYLON, PRAVEX | INNER FENDER, SPOILERS, KICK PANELS |
| PP/EPDM | PP/EPDM ALLOY | PP/EPDM | SPOILERS, GRILLES |
| PUR | POLYURETHANE | COLONELS, PUR, PU | FASCIAS, BUMPERS |
| PUR/PC | PUR/PC ALLOY | TEXIN | BUMPERS |
| PVC | POLYVINYL CHLORIDE | APEX, GEON, VINYLITE | BODY MOLDINGS, WIRE INSULATION, STEERING WHEELS |
| RIM | REACTION INJECTED MOLDED POLYURETHANE | RIM, BAYFLEX | FRONT FASCIAS, MODULAR WINDOWS |
| RRIM | REINFORCED REACTION INJECTED MOLDED | PUR, RRIM | FASCIAS, BODY PANELS, BODY TRIMS |
| TPE | THERMO POLYETHYLENE | TPE, HYTREL, BEXLOY-V | FASCIAS, BUMPERS, CLADDINGS |
| TPO | THERMOPOLYOLEFIN | POLYTROPE, RENFLEX, SANTOPRENE, VISAFLEX, ETA, APEX, TPO, SHIELDS, CLADDINGS | BUMPERS, END CAPS, TELCAR, RUBBER, STRIPS, SIGHT, INTERIOR B POST |
| TPP | THERMO-POLYPROPYLENE | TPP | BUMPERS |
| TPU | THERMOPOLYURETHANE, POLYESTER | TPU, HYTREL, TEXIN, ESTANE | BUMPERS, BODY SIDE, MOLDINGS, FENDERS, FASCIAS |
PANEL SECTIONING
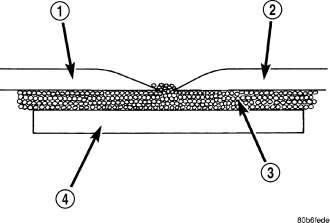
If it is required to section a large panel for a plastic repair, it will be necessary to reinforce the panel. To bond two plastic panels together, a reinforcement must overlap both panels. The panels must be “V'd” at a 20 °angle. The area to be reinforced should be washed, then sanded. Be sure to wipe off any excess soap and water when finished. Lightly sand or abrade the plastic with an abrasive pad or sandpaper. Blow off any dust with compressed air or wipe with a clean dry rag.
When bonding plastic panels, follow repair material manufacturers recommendations. Be sure that enough adhesive has been applied to allow squeeze out and to fill the full bond line. Once the pieces have been brought together, do not move them until the adhesive is cured. The assembly can be held together with clamps, rivets, etc. A faster cure can be obtained by heating with a heat lamp or heat gun. After the parts have been bonded and have had time to cure, rough sand the seam and apply the final adhesive filler to the area being repaired. Smooth the filler with a spreader, wooden tongue depressor, or squeegee. For fine texturing, a small amount of water can be applied to the filler surface while smoothing. The cured filler can be sanded as necessary and, as a final step, cleanup can be done with soapy water. Wipe the surface clean with a dry cloth allowing time for the panel to dry before moving on with the repair.
PANEL REINFORCEMENT
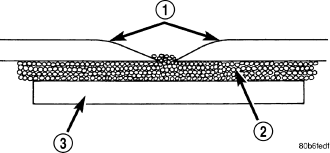
Structural repair procedures for rigid panels with large cracks and holes will require a reinforcement backing. Reinforcements can be made with several applications of glass cloth saturated with structural adhesive. Semi-rigid or flexible repair materials should be used for semi-rigid or flexible backing reinforcement and open meshed fiberglass dry wall tape can be used to form a reinforcement. The dry wall tape allows the resin to penetrate through and make a good bond between the panel and the adhesive. Structurally, the more dry wall tape used, the stronger the repair.
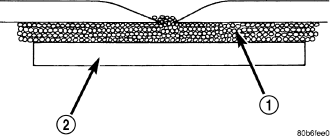
Another kind of repair that can be done to repair large cracks and holes is to use a scrap piece of similar plastic and bond with structural adhesive. The reinforcement should cover the entire break and should have a generous amount of overlap on either side of the cracked or broken area.
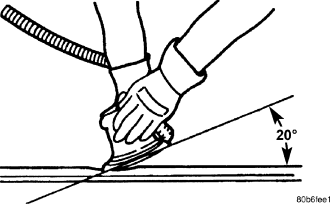
When repairing plastic, the damaged area is first “V'd” out, or beveled. Large bonding areas are desirable when repairing plastic because small repairs are less likely to hold permanently. Beveling the area around a crack at a 20° angle will increase the bonding surface for a repair. It is recommended that sharp edges be avoided because the joint may show through after the panel is refinished.
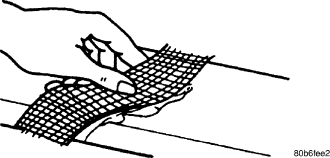
- Panel repair for both flexible and rigid panels are basically the same. The primary difference between flexible panel repair and rigid panel repair is in the adhesive materials used.
- The technician should first decide what needs to be done when working on any type of body panel. One should determine if it is possible to return the damage part to its original strength and appearance without exceeding the value of the replacement part.
- When plastic repairs are required, it is recommended that the part be left on the vehicle when ever possible. That will save time, and the panel will remain stationary during the repair. Misalignment can cause stress in the repair areas and can result in future failure.
VISUAL INSPECTION
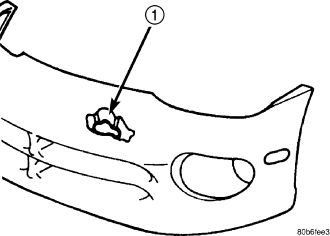
Composite materials can mask the severity of an accident. Adhesive bond lines, interior structure of the doors, and steel structures need to be inspected carefully to get a true damage assessment. Close inspection may require partial removal of interior trim or inner panels.
Identify the type of repair: Puncture or Crack - Damage that has penetrated completely through the panel. Damage is confined to one general area; a panel section is not required. However, a backer panel, open fiberglass tape, or matted material must be bonded from behind.
PANEL SURFACE PREPARATION
If a body panel has been punctured, cracked, or crushed, the damaged area must be removed from the panel to achieve a successful repair. All spider web cracks leading away from a damaged area must be stopped or removed. To stop a running crack in a panel, drill a 6 mm (0.250 in.) hole at the end of the crack farthest away from the damage. If spider web cracks can not be stopped, the panel would require replacement. The surfaces around the damaged area should be stripped of paint and freed from wax and oil. Scuff surfaces around repair area with 360 grit wet/dry sandpaper, or equivalent, to assure adhesion of repair materials.
PATCHING PANELS
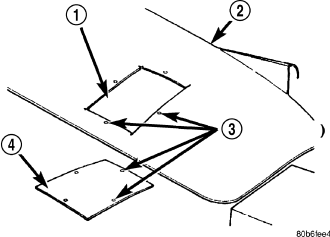
A panel that has extensive puncture type damage can be repaired by cutting out the damaged material. Use a suitable reciprocating saw or cut off wheel to remove the section of the panel that is damaged. The piece cut out can be used as a template to shape the new patch. It is not necessary to have access to the back of the panel to install a patch. Bevel edges of cutout at 20° to expose a larger bonding area on the outer side. This will allow for an increased reinforcement areas.
PANEL PATCH FABRICATIONS
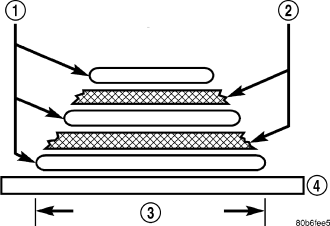
A patch can be fabricated from any rigid fiberglass panel that has comparable contour with the repair area. Lift gates and fenders can be used to supply patch material. If existing material is not available or compatible, a patch can be constructed with adhesive and reinforcement mesh (dry wall tape). Perform the following operation if required:
1. Cover waxed paper or plastic with adhesive backed nylon mesh (dry wall tape) larger than the patch required.
2. Tape waxed paper or plastic sheet with mesh to a surface that has a compatible contour to the repair area.
3. Apply a liberal coat of adhesive over the reinforcement mesh. If necessary apply a second or third coat of adhesive and mesh after first coat has cured. The thickness of the patch should be the same as the repair area.
4. After patch has cured, peel waxed paper or plastic from the back of the patch.
5. If desired, a thin film coat of adhesive can be applied to the back of the patch to cover mesh for added strength.
PANEL PATCH INSTALLATION
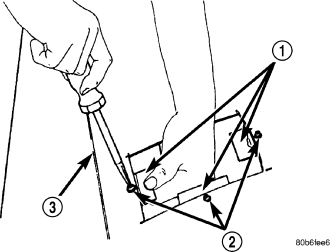
1. Make a paper or cardboard pattern the size and shape of the cutout hole in the panel.
2. Trim 3 mm (0.125 in.) from edges of pattern so patch will have a gap between connecting surfaces.
3. Using the pattern as a guide, cut the patch to size.
4. Cut scrap pieces of patch material into 50 mm (2 in.) squares to use as patch supports to sustain the patch in the cutout.
5. Drill 4 mm (0.160 in.) holes 13 mm (0.5 in.) in from edge of cutout hole.
6. Drill 4 mm (0.160 in.) holes 13 mm (0.5 in.) away from edge of patch across from holes drilled around cutout.
7. Drill 3 mm (0.125 in.) holes in the support squares 13 mm (0.5 in.) from the edge in the center of one side.
8. Scuff the backside of the body panel around the cutout hole with a scuff pad or sandpaper.
9. Mix enough adhesive to cover one side of all support squares.
10. Apply adhesive to cover one side of all support squares.
11. Using number 8 sheet metal screws, secure support squares to back side of body panel with adhesive sandwiched between the panel and squares.
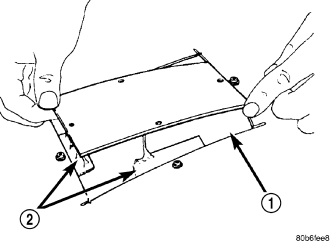
12. Position patch in cutout against support squares and adjust patch until the gap is equal along all sides.
13. Drill 3 mm (0.125 in.) holes in the support squares through the pre-drilled holes in the patch.
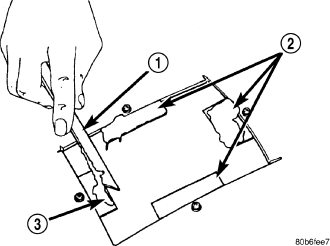
14. Apply a coat of adhesive to the exposed ends of the support squares.
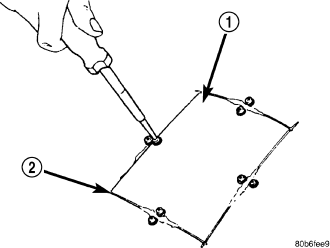
15. Install screws to hold the patch to support squares. Tighten screws until patch surface is flush with panel surface.
16. Allow adhesive to cure, and remove all screws.
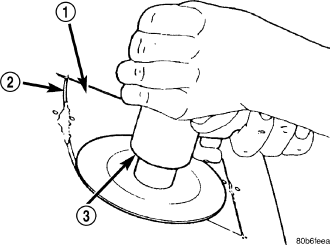
17. Using a 125 mm (5 in.) 24 grit disc grinder, grind a 50 mm (2 in.) to 75 mm (3 in.) wide and 2 mm (0.080 in.) deep path across the gaps around the patch. With compressed air, blow dust from around patch.
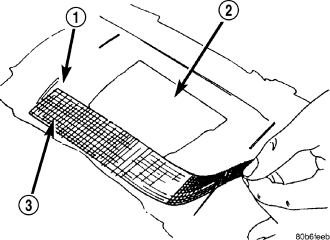
18. Apply adhesive backed nylon mesh (dry wall tape) over gaps around patch.
19. Mix enough adhesive to cover the entire patch area.
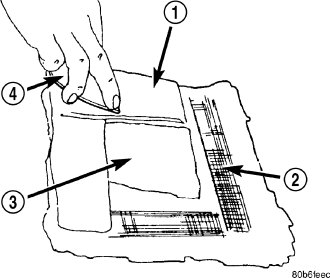
20. Apply adhesive over the mesh around patch, and smooth epoxy with a wide spreader to reduce finish grinding. Use two to three layers of mesh and adhesive to create a stronger repair.
PATCHED PANEL SURFACING
After patch panel is installed, the patch area can be finished using the same methods as finishing other types of body panels. If mesh material is exposed in the patched area, grind surface down, and apply a coat of high quality rigid plastic body filler. Prime, block sand, and paint as required.
BUZZ, SQUEAK & RATTLE
Buzz, Squeak & Rattles (BSR) may be caused by any one or more of the following and may be corrected as indicated:
- Loose fasteners should be tightened to specifications.
- Damaged or missing clips should be replaced.
- Damaged trim panels should be replaced.
- Incorrectly installed trim panels should be reinstalled properly.
Many BSR complaints such as loose trim, can be serviced using the Mopar® Parts BSR Noise Reduction Kit. This kit contains various tapes including foam, flock and anti-squeak used to eliminate noises caused by metal, plastic and vinyl components. Long life lubricants and greases can also be used on a variety of components. Refer to the Buzz, Squeak & Rattle Kit table for material contents and usage.
| ITEM |
FEATURES |
APPLICATIONS |
SERVICE TEMP |
| Itch And Squeak Tape |
An abrasion resistant material thin enough to conform to most irregular surfaces. Stops most itches and squeaks. |
Between metal and metal, metal and plastic, metal and vinyl, vinyl and plastic. Interior. Examples: Trim panels and bezels. |
-40° to 107° C (-40° to 225° F) |
| Black Nylon Flock |
Nylon Flock with an aggressive acrylic adhesive. Provides for cushioning and compression fit, also isolates components. Water-resistant. |
Between metal and metal, metal and plastic, vinyl and plastic. Examples: Pull cups, bezels, clips, ducts, top cover to glass, cowl panel. |
-40° to 82° C (-40° to 180° F) |
| High Density Urethane Foam |
Tear resistant, highly resilient and durable. |
Between metal and metal, metal and plastic. Water-resistant. Examples: I/P, heavy metal rattles, isolating brackets. |
-40° to 82° C (-40° to 180° F) |
| Open Cell Foam Tape |
Soft foam conforms to irregular surfaces. |
Wire harness and connector wrap. Examples: Seals, gasket, wiring, heat ducts. |
-40° to 82° C (-40° to 180° F) |
| Closed Cell Low Density Foam Tape |
Soft, conformable. Water-resistant. |
Wherever bulk is needed. Prevents closing flutters and rattles when applied to door watershield. Examples: Door, I/P. |
-40° to 82° C (-40° to 180° F) |
| NYE® Grease 880 |
Long life. |
Suspensions. Examples: Strut bushings, sway bars. |
-40° to 200° C (-40° to 390° F) |
| Krytox® Oil |
Long life. Will not dry out or harm plastics or rubber. |
When access is not possible, oil will migrate to condition. Vinyl, rubber, plastic, metal. Examples: Convertible top bushings, pull cups trim panel inserts. |
-34° to 205° C (-30° to 400° F) |
| Krytox® Grease |
Long life. Will not dry out or harm plastics or rubber. |
Vinyl, rubber, plastic, metal, glass. Examples: Weather-strips, backlite and windshield moldings. |
-34° to 205° C (-30° to 400° F) |