INSTALLATION
FRONT
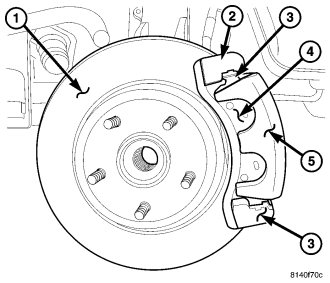
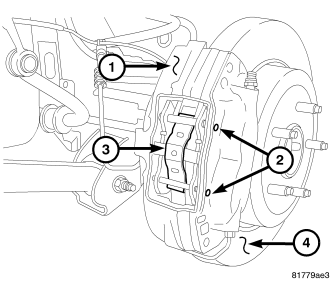
1. Remove and clean all rust and debris from the anti-rattle clip mounting surfaces (3) on the brake caliper adapter (2).
2. Install new anti-rattle clips (3) into the caliper adapter (2).
3. Install the inboard and outboard brake pads (4) onto the caliper adapter (2).
4. Install caliper (5) on the caliper adapter (2).
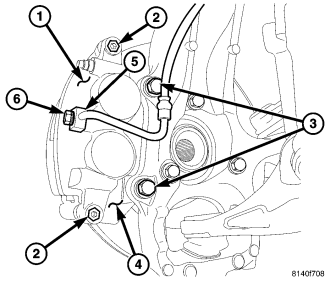
5. Install the caliper slide pin bolts (2) and tighten to 44 N·m (32 ft. lbs.).
6. Install wheel and tire assembly.
7. Remove support and lower vehicle.
8. Pump brake pedal until caliper pistons and brake pads are seated and a firm brake pedal is obtained.
9. Fill brake fluid.
FRONT - SRT8
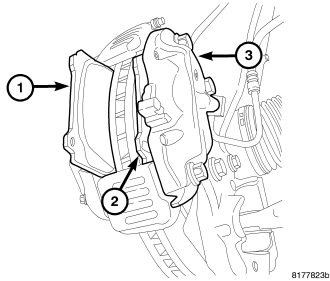
1. Make sure all caliper pistons are fully seated (bottomed) in bores.
NOTE: Brake pads need to have the shims and cooper paste applied. Paste is applied between the shim and the backing plate of the pads, and along the edges of the pads.
2. Slide the NEW inboard (2) and outboard brake pads (1) and shims into the opening of the disc brake caliper (3).
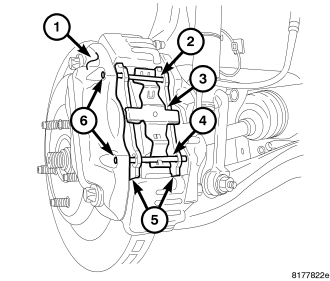
3. From the inboard side, slide the upper brake pad support pin (2) through the caliper and upper holes (6) in both brake pads (5). Ensure that the small end of the support pin is in hole (6) in outboard half of caliper.
4. Install the upper end of brake pad spring clip (3) under upper brake pad support pin (2).
5. Press on lower end of spring clip (3) until it touches brake rotor.
6. Slide lower brake pad support pin (4) through caliper and lower holes (6) in both brake pads (5) in the same manner the upper pin was installed. Ensure small end of support pin is in hole (6) in outboard half of caliper.
7. Release the spring clip (3) allowing it to engage lower support pin (4).
8. From inboard side, seat upper and lower support pins (2&4) into caliper (1) using pin punch and hammer. Support pins must be driven into caliper until support pin retaining rings are locked into place.
9. Once support pins are fully installed into caliper (1), inspect assembled caliper to make sure spring clip (3) is centered in opening of caliper, correctly engaging upper and lower support pins, and is resting against both brake pads.
10. Install tire and wheel assembly. (Refer to 22 - TIRES/WHEELS - INSTALLATION).
11. Lower vehicle.
12. Pump brake pedal several times to set pads to caliper and brake rotor.
13. Check and adjust brake fluid level in reservoir. (Refer to 5 - BRAKES/HYDRAULIC/MECHANICAL/FLUID - STANDARD PROCEDURE)
NOTE: When NEW brake pads are installed, they must be burnished (seated) to the rotor. This must be done to ensure the proper performance of the replacement brake pads.
14. Road test vehicle making several stops to wear off any foreign material on brakes and to seat brake pad linings. NEW brake pads need to be burnished properly. (Refer to 5 - BRAKES/HYDRAULIC/MECHANICAL/BRAKE PADS/SHOES - STANDARD PROCEDURE)
REAR
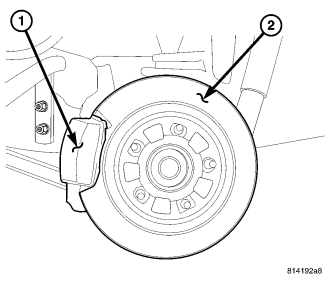
1. Install the inboard & outboard brake pads onto the caliper.
2. Lubricate the slide pins and slide pin bushings with caliper slide grease or the grease provided with the brake pads.
3. Install caliper (1) on the anchor.
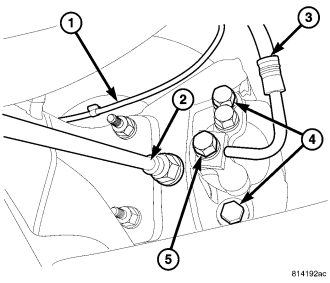
4. Install the caliper slide pin bolts (4) and tighten to 25 N·m (18 ft. lbs.).
5. Install wheel and tire assembly.
6. Remove support and lower vehicle.
7. Pump brake pedal until caliper piston and brake pads are seated and a firm brake pedal is obtained.
8. Fill brake fluid level if necessary.
REAR - SRT8
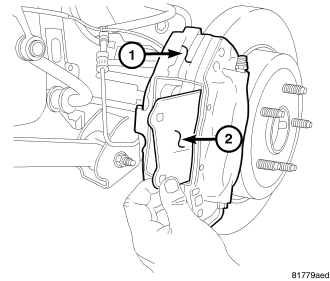
1. Make sure all caliper pistons are fully seated (bottomed) in bores.
NOTE: Brake pads need to have the shims and cooper paste applied. Paste is applied between the shim and the backing plate of the pads, and along the edges of the pads.
2. Slide the NEW inboard and outboard brake pads (2) and shims into the opening of the disc brake caliper (1). If installing rear brake pads, make sure beveled end of each pad lining is directed against the direction the rotor is rotating in when vehicle is moving forward, in other words, the rear pads need to have beveled end facing upward.
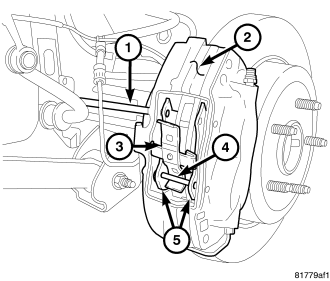
3. From the inboard side, slide the lower brake pad support pin (4) through caliper (2) and lower holes in both brake pads (5). Ensure that small end of support pin is in hole in outboard half of caliper.
4. Install lower end of brake pad spring clip (3) under lower brake pad support pin (4).
5. Press on upper end of spring clip (3) until it touches brake rotor.
6. Slide upper brake pad support pin (1) through caliper (2) and upper holes in both brake pads (5) in the same manner the lower pin was installed. Ensure small end of support pin is in hole in outboard half of caliper.
7. Release the spring clip allowing it to engage upper support pin.
8. From inboard side, seat upper and lower support pins (2) into caliper (1) using pin punch and hammer. Support pins must be driven into caliper until support pin retaining rings are locked into place.
9. Once support pins are fully installed into caliper, inspect assembled caliper to make sure spring clip (3) is centered in opening of caliper, correctly engaging upper and lower support pins (2), and is resting against both brake pads.
10. Install tire and wheel assembly. (Refer to 22 - TIRES/WHEELS - INSTALLATION)
11. Lower vehicle.
NOTE: When NEW brake pads are installed, they must be burnished (seated) to the rotor. This must be done to ensure the proper performance of the replacement brake pads.
12. Pump brake pedal several times to set pads to caliper and brake rotor.
13. Check and adjust brake fluid level in reservoir. (Refer to 5 - BRAKES/HYDRAULIC/MECHANICAL/FLUID - STANDARD PROCEDURE)