MANIFOLD - EXHAUST RIGHT
DESCRIPTION
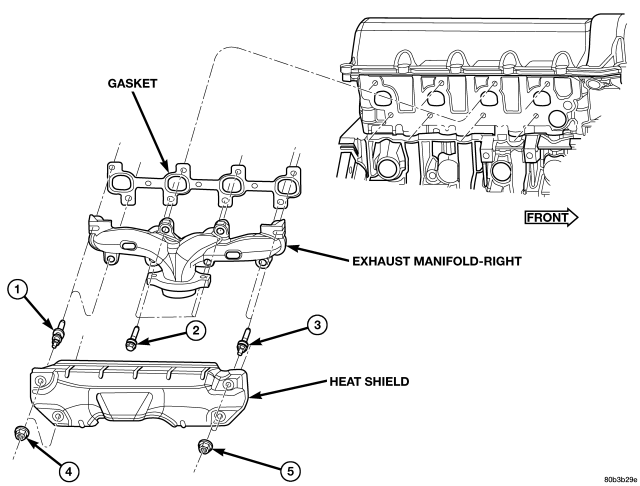
The exhaust manifolds are log style with a patented flow enhancing design to maximize performance. The exhaust manifolds are made of high silicon molybdenum cast iron. A perforated core graphite exhaust manifold gasket is used to improve sealing to the cylinder head. The exhaust manifolds are covered by a three layer laminated heat shield for thermal protection and noise reduction. The heat shields are fastened with a torque prevailing nut that is backed off slightly to allow for the thermal expansion of the exhaust manifold.
REMOVAL
1. Disconnect negative cable for battery.
2. Remove battery from vehicle.
3. Remove Power Distribution Center (PDC) fasteners and set aside.
4. Remove battery tray assembly.
5. Remove washer bottle assembly
6. Remove accessory drive belt (Refer to 7 - COOLING/ACCESSORY DRIVE/DRIVE BELTS - REMOVAL).
7. Remove A/C compressor from mounting and set aside.
8. Remove A/C accumulator support bracket fastener.
9. Drain coolant (Refer to 7 - COOLING - STANDARD PROCEDURE).
10. Remove heater hoses at engine.
11. Remove fasteners attaching exhaust manifold heat shield .
12. Remove heat shield .
13. Remove upper exhaust manifold attaching fasteners .
14. Raise vehicle on hoist.
15. Disconnect exhaust pipe from manifold.
16. Remove fasteners attaching starter. Move starter aside.
17. Remove lower exhaust manifold attaching fasteners.
18. Remove exhaust manifold and gasket . Manifold is removed from below the engine compartment.
CLEANING
1. Clean the exhaust manifold using a suitable cleaning solvent, then allow to air dry.
2. Clean all gasket residue from the manifold mating surface.
INSPECTION
1. Inspect the exhaust manifold for cracks in the mating surface and at every mounting bolt hole.
2. Using a straight edge and a feeler gauge, check the mating surface for warp and twist.
3. Inspect the manifold to exhaust pipe mating surface for cracks, gouges, or other damage that would prevent sealing.
INSTALLATION
1. Install exhaust manifold and gasket from below engine compartment.
2. Install lower exhaust manifold fasteners. DO NOT tighten until all fasteners are in place.
3. Lower vehicle and install upper exhaust manifold fasteners. Tighten all manifold bolts starting at center and working outward to 25 N·m (18 ft. lbs.).
CAUTION: Over tightening heat shield fasteners, may cause shield to distort and/or crack.
4. Install exhaust manifold heat shield. Tighten fasteners to 8 N·m (72 in. lbs.), then loosen 45 degrees.
5. Install starter and fasteners.
6. Connect exhaust pipe to manifold.
7. Connect heater hoses at engine.
8. Install fastener attaching A/C accumulator.
9. Install A/C compressor and fasteners.
10. Install accessory drive belt (Refer to 7 - COOLING/ACCESSORY DRIVE/DRIVE BELTS - INSTALLATION).
11. Install washer bottle and battery tray assembly.
12. Install PDC.
13. Install battery and connect cables.
14. Fill cooling system (Refer to 7 - COOLING - STANDARD PROCEDURE).