SWITCH-HORN
DESCRIPTION
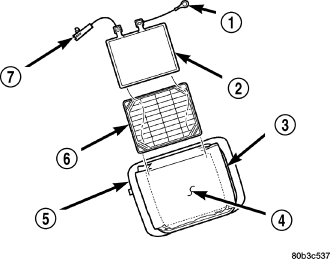
A center-blow, normally open, resistive membrane-type horn switch is secured in a plastic tray that is inserted in a pocket sewn on the front of the driver side airbag retainer strap. The horn switch is concealed behind the driver side airbag module trim cover.
The steering wheel and steering column must be properly grounded in order for the horn switch to function properly. The horn switch and plastic tray are serviced as a unit. If the horn switch is damaged or inoperative, or if the driver side airbag is deployed, the horn switch and tray must be replaced as a unit.
REMOVAL
WARNING: On vehicles equipped with airbags, refer to electrical, restraints before attempting any steering wheel, steering column, or instrument panel component diagnosis or service. Failure to take the proper precautions could result in accidental airbag deployment and possible personal injury.
1. Disconnect and isolate the battery negative cable.
2. Remove the trim cover from the driver side airbag. (Refer to 8 - ELECTRICAL/RESTRAINTS/DRIVER AIRBAG - REMOVAL).
3. Remove the horn switch (2) and tray (6) as a unit from the pouch on the retaining strap of the driver side airbag (5).
INSTALLATION
WARNING: On vehicles equipped with airbags, refer to electrical, restraints before attempting any steering wheel, steering column, or instrument panel component diagnosis or service. Failure to take the proper precautions could result in accidental airbag deployment and possible personal injury.
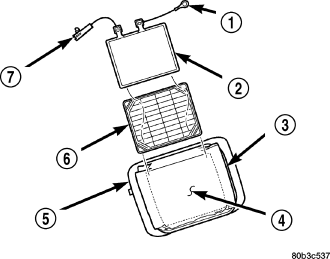
1. Install the horn switch (2) and tray as a unit into the pouch on the retaining strap of the driver side airbag (5).
NOTE: Be certain that the tray is facing the airbag module, that the horn switch is facing the trim cover, that the horn switch feed wire is on the left, and that the horn switch ground wire is on the right.
2. Install the trim cover onto the driver side airbag. (Refer to 8 - ELECTRICAL/RESTRAINTS/DRIVER AIRBAG - INSTALLATION) for the procedure.
3. Connect the battery negative cable.