EVAPORATOR-A/C
DESCRIPTION
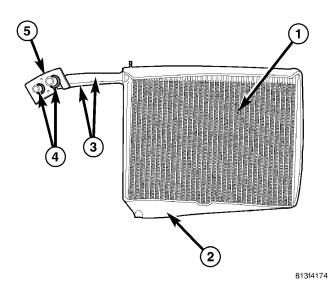
NOTE: LHD model shown. RHD model similar.
The A/C evaporator (1) for the heating-A/C system is located within the HVAC housing, behind the instrument panel. The A/C evaporator and insulator (2) are positioned in the HVAC housing so that all air entering the housing must pass over the evaporator fins before it is distributed through the heating-A/C system ducts and outlets. However, air passing over the evaporator fins will only be conditioned when the A/C compressor is engaged and circulating refrigerant through the A/C evaporator.
The A/C evaporator tubes (3) are connected and sealed to the A/C expansion valve by use of rubber O-rings (4) and a tapping block (5).
The A/C evaporator can only be serviced by removing and disassembling the HVAC housing assembly.
OPERATION
Refrigerant enters the A/C evaporator from the A/C expansion valve as a low-temperature, low-pressure mixture of liquid and gas. As air flows over the fins of the A/C evaporator, the humidity in the air condenses on the fins, and the heat from the air is absorbed by the refrigerant. Heat absorption causes the refrigerant to boil and vaporize. The refrigerant becomes a low-pressure gas when it leaves the A/C evaporator.
NOTE: Replacement of the refrigerant line O-ring seals and gaskets is required anytime a refrigerant line is opened. Failure to replace the rubber O-ring seals and metal gaskets could result in a refrigerant system leak.
The A/C evaporator has no serviceable parts except for the O-ring seals. The O-ring seals used on the connections are made from a special type of rubber not affected by R-134a refrigerant. The O-ring seals must be replaced whenever the A/C expansion valve is removed from the A/C evaporator.
The A/C evaporator cannot be repaired and must be replaced if found to be leaking or damaged.
REMOVAL
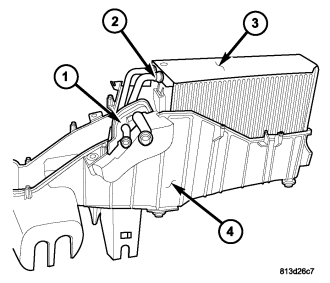
NOTE: LHD model shown. RHD model similar.
1. Remove the HVAC housing (refer to 24 - HEATING & AIR CONDITIONING/DISTRIBUTION/HOUSING-HVAC - REMOVAL).
2. Disassemble the HVAC housing as necessary to access the A/C evaporator (1) (refer to 24 - HEATING & AIR CONDITIONING/DISTRIBUTION/HOUSING-HVAC - DISASSEMBLY).
3. Open the rubber seal (1) and carefully lift the A/C evaporator (2) and insulator (3) out of the lower half of the HVAC housing (4).
4. If required, remove the rubber seal from the lower half of the HVAC housing. If the seal is deformed or damaged, it must be replaced.
5. If required, remove the insulator from the A/C evaporator. If the insulator is deformed or damaged, it must be replaced.
INSTALLATION
CAUTION: Be certain to adjust the refrigerant oil level when servicing the A/C refrigerant system (refer to 24 - HEATING & AIR CONDITIONING/PLUMBING/REFRIGERANT OIL - STANDARD PROCEDURE - REFRIGERANT OIL LEVEL). Failure to properly adjust the refrigerant oil level will prevent the A/C system from operating as designed and can cause serious A/C compressor damage.
NOTE: When replacing multiple A/C system components, refer to the Refrigerant Oil Capacities chart to determine how much oil should be added to the refrigerant system (refer to 24 - HEATING & AIR CONDITIONING/PLUMBING/REFRIGERANT OIL - STANDARD PROCEDURE - REFRIGERANT OIL LEVEL).
NOTE: If only the A/C evaporator is being replaced, add 60 milliliters (2 fluid ounces) of refrigerant oil to the refrigerant system. Use only refrigerant oil of the type recommended for the A/C compressor in the vehicle.
NOTE: Replacement of the refrigerant line O-ring seals and gaskets is required anytime a refrigerant line is opened. Failure to replace the rubber O-ring seals and metal gaskets could result in a refrigerant system leak.
NOTE: LHD model shown. RHD model similar.
1. If removed, install the insulator (3) over the A/C evaporator (2). If the seal is deformed or damaged, it must be replaced.
2. If removed, install the rubber seal (1) into the lower half of the HVAC housing (4). If the seal is deformed or damaged, it must be replaced.
3. Install the A/C evaporator into the lower half of the HVAC housing. Make sure that the evaporator drain within the HVAC housing is clean and unrestricted and that the insulator and rubber seal are properly installed.
4. Assemble the HVAC housing (refer to 24 - HEATING & AIR CONDITIONING/DISTRIBUTION/HOUSING-HVAC - ASSEMBLY).
5. Install the HVAC housing (refer to 24 - HEATING & AIR CONDITIONING/DISTRIBUTION/HOUSING-HVAC - INSTALLATION).
6. If the A/C evaporator is being replaced, add 60 milliliters (2 fluid ounces) of refrigerant oil to the refrigerant system. When replacing multiple A/C system components, refer to the Refrigerant Oil Capacities chart to determine how much oil should be added to the refrigerant system (refer to 24 - HEATING & AIR CONDITIONING/PLUMBING/REFRIGERANT OIL - STANDARD PROCEDURE - REFRIGERANT OIL LEVEL). Use only refrigerant oil of the type recommended for the A/C compressor in the vehicle.