CLUTCH-LOW/REVERSE
DISASSEMBLY
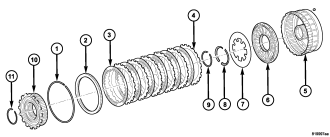
1. Remove the inner overrunning clutch snap-ring (11) from the low/reverse clutch retainer (5).
2. Remove the outer low/reverse reaction plate flat snap-ring (1).
3. Remove the low/reverse clutch (3, 4) and the overrunning clutch (10) from the low/reverse clutch retainer (5) as an assembly.
4. Separate the low/reverse clutch (3, 4) from the overrunning clutch (10).
NOTE: The ORC is no longer serviced , it is sold an assembly only. Be certain that the outer race will rotate in one direction but not both relative to the inner race
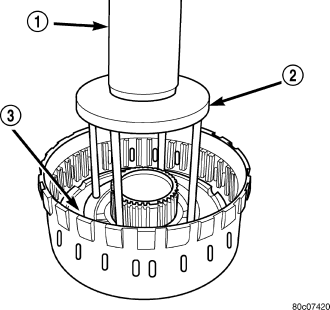
5. Using Spring Compressor 8285 (2) and a suitable shop press (1), compress the low/reverse Belleville spring (3) and remove the split retaining ring holding the Belleville spring into the low/reverse clutch retainer.
6. Remove the low/reverse Belleville spring (3) and piston from the low/reverse clutch retainer. Use 20 psi of air pressure to remove the piston if necessary.
CLEANING
Clean the overrunning clutch assembly, clutch cam, and low-reverse clutch retainer. Dry them with compressed air after cleaning.
INSPECTION
Inspect condition of each clutch part after cleaning. Replace the overrunning clutch roller and spring assembly if any rollers or springs are worn or damaged, or if the roller cage is distorted, or damaged. Replace the cam if worn, cracked or damaged.
Replace the LR clutch retainer if the piston bores or ID bushings are scored or damaged.
ASSEMBLY
1. Check the bleed orifice to ensure that it is not plugged or restricted.
2. Lubricate the seals with Mopar® ATF +4, Automatic Transmission Fluid, prior to installation.
3. Install the low/reverse piston into the low/reverse clutch retainer.
4. Position the low/reverse Belleville spring (3) on the low/reverse piston.
5. Using Spring Compressor 8285 (2) and a suitable shop press (1), compress the low/reverse Belleville spring (3) and install the split retaining ring to hold the Belleville spring into the low/reverse clutch retainer.
6. Install the lower overrunning clutch snap-ring.
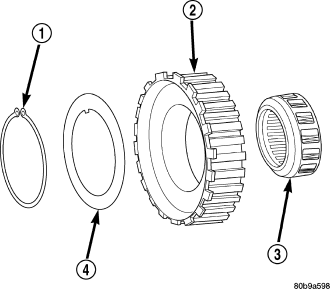
7. Assemble the inner and outer races (2) of the overrunning clutch (3).
8. Position the overrunning clutch spacer (4) on the overrunning clutch (3).
9. Install the upper overrunning clutch snap-ring (1).
10. Assemble and install the low/reverse clutch pack (3, 4) into the low/reverse clutch retainer (5).
11. Install the low/reverse reaction plate (2) into the low/reverse clutch retainer (5). The reaction plate is directional and must be installed with the flat side down.
12. Install the low/reverse clutch pack snap-ring (1). The snap-ring is selectable and should be chosen to give the correct clutch pack clearance.
13. Measure the low/reverse clutch pack clearance and adjust as necessary. The correct clutch clearance is 1.00-1.74 mm (0.039-0.069 in.).
NOTE: When installing the overrunning clutch be certain the steps on the gear face upward.
14. Install the overrunning clutch (10) into the low/reverse clutch retainer (5) making sure that the index splines are aligned with the retainer.
15. Install the overrunning clutch inner snap-ring (11).