DIAGNOSIS AND TESTING
RADIATOR PRESSURE CAP
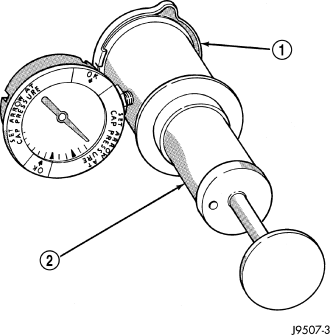
Remove cap (1) from pressure bottle or radiator as appropriate. Be sure that sealing surfaces are clean. Moisten rubber gasket with water and install the cap on pressure tester (tool 7700 or an equivalent) .
Operate the tester pump (2) and observe the gauge pointer at its highest point. The cap release pressure should be 124 to 145 kPa (18 to 21 psi). The cap is satisfactory when the pressure holds steady. It is also good if it holds pressure within the 124 to 145 kPa (18 to 21 psi) range for 30 seconds or more. If the pointer drops quickly, replace the cap.
CAUTION: Radiator pressure testing tools are very sensitive to small air leaks, which will not cause cooling system problems. A pressure cap that does not have a history of coolant loss should not be replaced just because it leaks slowly when tested with this tool. Add water to tool. Turn tool upside down and recheck pressure cap to confirm that cap needs replacement.
RADIATOR PRESSURE CAP
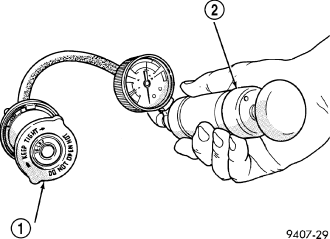
Dip the pressure cap (1) in water. Clean any deposits off the vent valve or its seat and apply cap to end of the Pressure Cap Test Adaptor that is included with the Cooling System Tester 7700. Working the plunger, bring the pressure to 104 kPa (15 psi) on the gauge. If the pressure cap fails to hold pressure of at least 97 kPa (14 psi), replace the pressure cap.
CAUTION: The Cooling System Tester Tool is very sensitive to small air leaks that will not cause cooling system problems. A pressure cap that does not have a history of coolant loss should not be replaced just because it leaks slowly when tested with this tool. Add water to the tool. Turn tool upside down and recheck pressure cap to confirm that cap is bad.
If the pressure cap tests properly while positioned on Cooling System Tester (2) , but will not hold pressure or vacuum when positioned on the filler neck. Inspect the filler neck and cap top gasket for irregularities that may prevent the cap from sealing properly.
PRESSURE RELIEF TEST
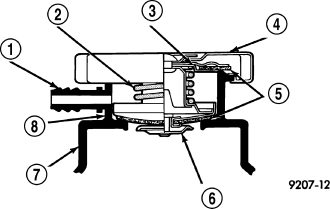
The pressure cap upper gasket (seal) pressure relief can be checked by removing the overflow hose at the radiator filler neck nipple . Attach the Radiator Pressure Tool to the filler neck nipple (1) and pump air into the radiator. Pressure cap upper gasket should relieve at 69-124 kPa (10-18 psi) and hold pressure at 55 kPa (8 psi) minimum.
WARNING: THE WARNING WORDS “DO NOT OPEN HOT” ON THE RADIATOR PRESSURE CAP IS A SAFETY PRECAUTION. WHEN HOT, PRESSURE BUILDS UP IN COOLING SYSTEM. TO PREVENT SCALDING OR INJURY, THE RADIATOR CAP SHOULD NOT BE REMOVED WHILE THE SYSTEM IS HOT OR UNDER PRESSURE.
There is no need to remove the radiator cap at any time except for the following purposes:
1. Check and adjust coolant freeze point.
2. Refill system with new coolant.
3. Conducting service procedures.
4. Checking for vacuum leaks.
WARNING: IF VEHICLE HAS BEEN RUN RECENTLY, WAIT 15 MINUTES BEFORE REMOVING CAP. THEN PLACE A SHOP TOWEL OVER THE CAP AND WITHOUT PUSHING DOWN ROTATE COUNTERCLOCKWISE TO THE FIRST STOP. ALLOW FLUIDS TO ESCAPE THROUGH THE OVERFLOW TUBE AND WHEN THE SYSTEM STOPS PUSHING COOLANT AND STEAM INTO THE CRS TANK AND PRESSURE DROPS PUSH DOWN AND REMOVE THE CAP COMPLETELY. SQUEEZING THE RADIATOR INLET HOSE WITH A SHOP TOWEL (TO CHECK PRESSURE) BEFORE AND AFTER TURNING TO THE FIRST STOP IS RECOMMENDED.