P2294-FUEL PRESSURE SOLENOID OPEN CIRCUIT
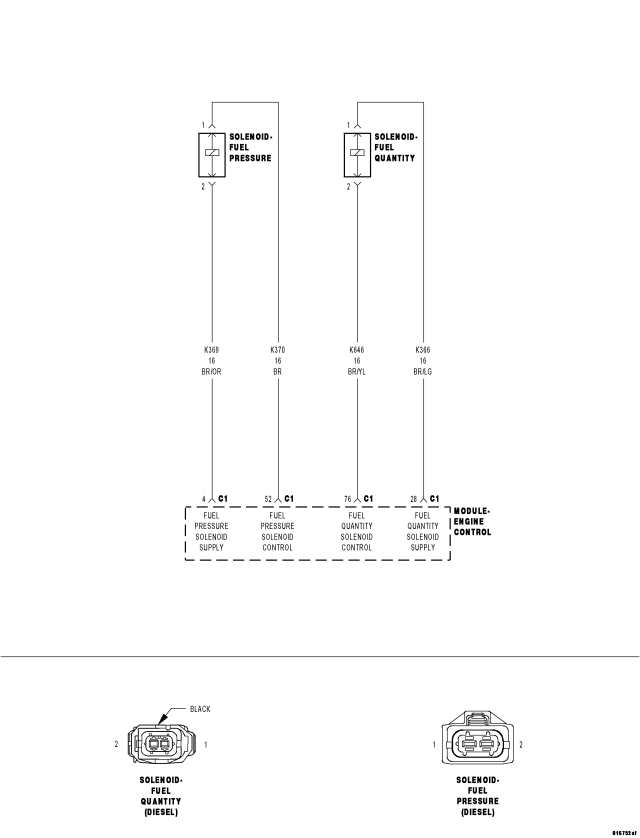
For a complete wiring diagram Refer to Section 8W
- When Monitored:
With the ignition on and the ECM Fuel Pressure Solenoid command off.
- Set Condition:
The ECM does not detect voltage on the Fuel Pressure Solenoid Control circuit for 0.28 second.
| Possible Causes |
| FUEL PRESSURE SOLENOID CIRCUIT(S) SHORTED TO GROUND |
| FUEL PRESSURE SOLENOID CIRCUIT(S) SHORTED TO VOLTAGE |
| FUEL PRESSURE SOLENOID CIRCUIT(S) SHORTED TOGETHER |
| FUEL PRESSURE SOLENOID OPEN CIRCUIT(S) |
| INTERMITTENT CONDITION |
| FUEL PRESSURE SOLENOID |
| ENGINE CONTROL MODULE |
Diagnostic Test
1. CHECK FOR ACTIVE DTCNOTE: If the ECM detects and stores a DTC, the ECM also stores the engine/vehicle operating conditions under which the DTC was set. Some of these conditions are displayed on the scan tool at the same time the DTC is displayed.
NOTE: Before erasing stored DTCs, record these conditions. Attempting to duplicate these conditions may assist when checking for an active DTC.
WARNING: HIGH-PRESSURE FUEL LINES DELIVER DIESEL FUEL UNDER EXTREME PRESSURE FROM THE INJECTION PUMP TO THE FUEL INJECTORS. THIS MAY BE AS HIGH AS 23,200 PSI (1600 BAR). USE EXTREME CAUTION WHEN INSPECTING FOR HIGH-PRESSURE FUEL LEAKS.
WARNING: FUEL UNDER THIS AMOUNT OF PRESSURE CAN PENETRATE SKIN CAUSING PERSONAL INJURY OR DEATH. INSPECT FOR HIGH-PRESSURE FUEL LEAKS WITH A SHEET OF CARDBOARD. WEAR SAFETY GOGGLES AND ADEQUATE PROTECTIVE CLOTHING WHEN SERVICING FUEL SYSTEM.
Turn the ignition on.
With the scan tool, erase ECM DTCs.
Start the engine several times, turning the ignition off for at least 30 seconds between each run cycle.
Monitor the scan tool for ECM DTCs.
Did this DTC set again?
Yes
- Go To2
No
- Refer to the *CHECKING FOR AN INTERMITTENT DTC Diagnostic Procedure. (Refer to 9 - ENGINE - DIAGNOSIS AND TESTING)
2. CHECKING FOR OTHER DTCS
NOTE: An open ASD power supply to the ECM will cause multiple DTC's including this DTC to set.
NOTE: Check the ECM for other DTC's. If other DTC's are set with this DTC refer to the symptom list and perform the CHECKING THE ECM POWER AND GROUND CIRCUITS test before continuing.
Are the ECM power and ground circuits functioning properly?
Yes
- Go To3
No
- Refer to the *CHECKING THE ECM POWER AND GROUND CIRCUITS Diagnostic Procedure. (Refer to 9 - ENGINE - DIAGNOSIS AND TESTING) .
3. FUEL PRESSURE SOLENOID CIRCUIT(S) OPEN
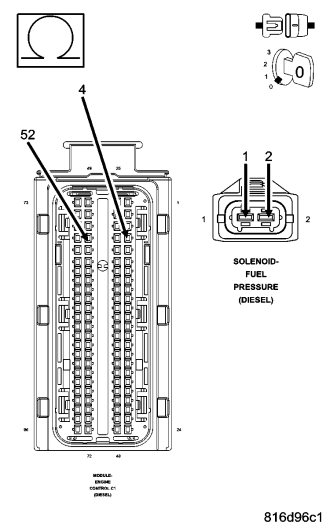
Turn the ignition off.
Disconnect the ECM harness connectors.
Disconnect the Fuel Pressure Solenoid harness connector.
Measure the resistance of each of the Fuel Pressure Solenoid circuits between the ECM harness connector and the Fuel Pressure Solenoid harness connector.
Is the resistance below 10.0 ohms for each measurement?
Yes
- Go To4
No
- Repair the circuit(s) that measured above 10.0 ohms for an open.
- Perform the ECM Verification Test Ver. 1 (Refer to 9 - ENGINE - DIAGNOSIS AND TESTING).
4. FUEL PRESSURE SOLENOID CIRCUIT(S) SHORTED TO GROUND
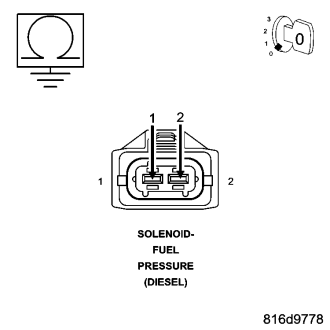
Measure the resistance between ground and each of the Fuel Pressure Solenoid circuits in the Fuel Pressure Solenoid harness connector.
Is the resistance above 1000 ohms for each measurement?
Yes
- Go To5
No
- Repair the circuit(s) that measured below 1000 ohms for a short to ground.
- Perform the ECM Verification Test Ver. 1 (Refer to 9 - ENGINE - DIAGNOSIS AND TESTING).
5. FUEL PRESSURE SOLENOID CIRCUIT(S) SHORTED TOGETHER
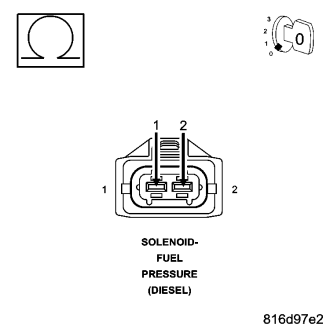
Measure the resistance between the Fuel Pressure Solenoid circuits in the Fuel Pressure Solenoid harness connector.
Is the resistance above 1000 ohms?
Yes
- Go To6
No
- Repair the Fuel Pressure Solenoid circuits for a short together.
- Perform the ECM Verification Test Ver. 1 (Refer to 9 - ENGINE - DIAGNOSIS AND TESTING).
6. FUEL PRESSURE SOLENOID CIRCUIT(S) SHORTED TO VOLTAGE
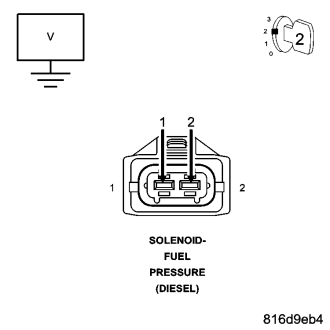
Remove the ASD Relay.
Connect a jumper wire between cavity 30 and cavity 87 of the ASD Relay connector.
Turn the ignition on.
Measure the voltage each of the Fuel Pressure Solenoid circuits in the Fuel Pressure Solenoid harness connector.
Is the voltage below 1.0 volt for each measurement?
Yes
- Go To7
No
- Repair the circuit(s) that measured above 1.0 volts for a short to voltage.
- Perform the ECM Verification Test Ver. 1 (Refer to 9 - ENGINE - DIAGNOSIS AND TESTING).
7. FUEL PRESSURE SOLENOID
Turn the ignition off.
Remove the jumper wire and install the ASD relay.
Turn the ignition on.
With the scan tool, erase ECM DTCs.
Monitor the scan tool for ECM DTCs.
NOTE: The scan tool should display P2294-FUEL PRESSURE SOLENOID OPEN CIRCUIT.
Turn the ignition off.
Connect a jumper wire between cavity 1 and cavity 2 of the Fuel Pressure Solenoid harness connector.
Turn the ignition on.
With the scan tool, erase ECM DTCs.
Monitor the scan tool for ECM DTCs.
NOTE: The scan tool should display P2296-FUEL PRESSURE SOLENOID SHORT CIRCUIT.
Does the scan tool display the appropriate DTC for each condition?
Yes
- Replace the Fuel Pressure Solenoid in accordance with the Service Information.
- Perform the ECM Verification Test Ver. 1 (Refer to 9 - ENGINE - DIAGNOSIS AND TESTING).
No
- Replace and program the Engine Control Module in accordance with the Service Information.
- Perform the ECM Verification Test Ver. 1 (Refer to 9 - ENGINE - DIAGNOSIS AND TESTING).