RADIATOR
DESCRIPTION
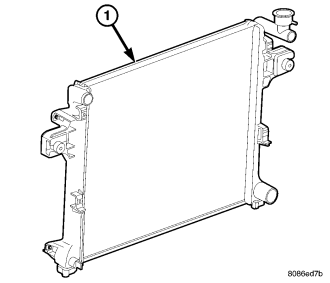
All vehicles are equipped with a cross flow type radiator (1) with plastic side tanks .
Plastic tanks, while stronger than brass, are subject to damage by impact, such as from tools or wrenches. Handle radiator with care.
REMOVAL
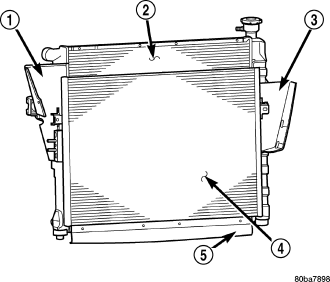
WARNING: Do not remove the cylinder block drain plugs or loosen the radiator draincock with the system hot and under pressure. Serious burns from coolant can occur. Refer to cooling system draining.
Do not waste reusable coolant. If the solution is clean, drain the coolant into a clean container for reuse.
CAUTION: When removing the radiator or A/C condenser for any reason, note the location of all radiator-to-body and radiator-to-A/C condenser rubber air seals . These are used at the top, bottom and sides of the radiator and A/C condenser. To prevent overheating, these seals must be installed to their original positions.
1. Disconnect the negative battery cable at battery.
2. Drain coolant from radiator (Refer to 7 - COOLING - STANDARD PROCEDURE) .
3. Remove the front grille (Refer to 23 - BODY/EXTERIOR/GRILLE - REMOVAL).
4. Remove the cooling fan from the engine, if equipped.
5. Remove the two radiator mounting bolts.
6. Disconnect the connector for the electric fan.
7. Disconnect the power steering cooler line from cooler.
8. Disconnect the radiator upper and lower hoses.
9. Disconnect the overflow hose from radiator (2).
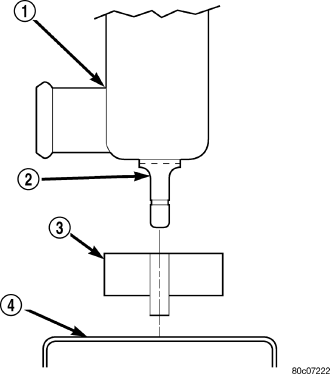
10. The lower part of radiator is equipped with two alignment dowel pins (2). They are located on the bottom of radiator tank and fit into rubber grommets. These rubber grommets are pressed into the radiator lower crossmember.
WARNING: The air conditioning system (if equipped) is under a constant pressure even with the engine off. Refer to refrigerant warnings in, heating and air conditioning before handling any air conditioning component.
NOTE: The radiator and radiator cooling fan can be removed as an assembly. It is not necessary to remove the cooling fan before removing or installing the radiator.
11. Gently lift up and remove radiator from vehicle. Be careful not to scrape the radiator fins against any other component. Also be careful not to disturb the air conditioning condenser (if equipped).
CLEANING
Clean radiator fins With the engine cold, apply cold water and compressed air to the back (engine side) of the radiator to flush the radiator and/or A/C condenser of debris.INSPECTION
The radiator cooling fins should be checked for damage or deterioration. Inspect cooling fins to make sure they are not bent or crushed, these areas result in reduced heat exchange causing the cooling system to operate at higher temperatures. Inspect the plastic end tanks for cracks, damage or leaks. Inspect the radiator neck for damage or distortion.INSTALLATION
CAUTION: Before installing the radiator or A/C condenser, be sure the radiator-to-body and radiator-to-A/C condenser rubber air seals are properly fastened to their original positions. These are used at the top, bottom and sides of the radiator and A/C condenser. To prevent overheating, these seals must be installed to their original positions.
1. Gently lower the radiator and fan shroud into the vehicle. Guide the two radiator alignment dowels into the rubber grommets located in lower radiator crossmember.
2. Connect the radiator upper and lower hoses and hose clamps to radiator.
CAUTION: The tangs on the hose clamps must be positioned straight down.
3. Install coolant reserve/overflow tank hose at radiator.
4. Install both radiator mounting bolts.
5. Reconnect the electric cooling fan.
6. Install the grille (Refer to 23 - BODY/EXTERIOR/GRILLE - INSTALLATION).
7. Reinstall the cooling fan to the engine.
8. Rotate the fan blades (by hand) and check for interference at fan shroud.
9. Refill cooling system (Refer to 7 - COOLING - STANDARD PROCEDURE).
10. Connect battery cable at battery.
11. Start and warm engine. Check for leaks.