SEAL-PINION
REMOVAL
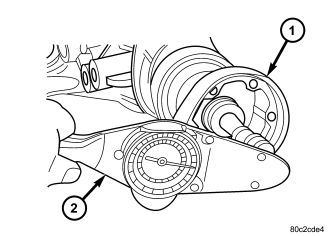
1. With vehicle in neutral, position vehicle on hoist.
2. Remove brake calipers and rotors.
3. Remove propeller shaft.
4. Rotate pinion gear a minimum of ten times and verify the pinion rotates smoothly.
5. Record torque to rotate the pinion gear (1) with a inch pound torque wrench (2).
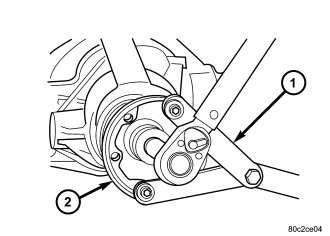
6. Using a short piece of pipe and Spanner Wrench 6958 (1) to hold the pinion companion flange (2) and remove the pinion nut.
7. Mark flange and pinion shaft for installation reference.
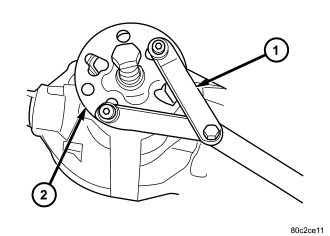
8. Remove pinion companion flange with Puller C-452 (2) and Spanner Wrench 6958 (1).
9. Pry pinion seal out with a seal pick.
INSTALLATION
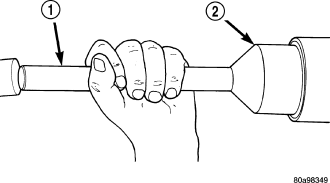
1. Apply a light coating of gear lubricant on the lip of pinion seal. Install seal with Installer 8681(2).
2. Position pinion flange on pinion shaft with reference marks aligned. Install pinion flange with Installer W-162-D, Cup 8109 and Wrench 6958.
CAUTION: Do not exceed the minimum tightening torque 217 N·m (160 ft. lbs.) while installing pinion nut at this point. Failure to follow these instructions will result in damage.
3. Install a new nut on the pinion gear. Tighten the nut only enough to remove the shaft end play.
CAUTION: Never loosen pinion nut to decrease pinion rotating torque and never exceed specifications. Failure to follow these instructions will result in damage.
4. Rotate pinion a minimum of ten time and verify pinion rotates smoothly.
5. Measure pinion torque to rotate (1) with an inch pound torque wrench (2). Pinion torque to rotate should be equal to recorded reading plus 0.56 N·m (5 in. lbs.).
6. If pinion torque to rotate is low, tighten pinion nut in 6.8 N·m (5 ft. lbs.) increments until pinion torque to rotate is achieved.
CAUTION: If maximum torque 352 N·m (260 ft. lbs.) reached prior to reaching the required rotating torque, the collapsible spacer may have been damaged. Failure to follow these instructions will result in damage.
7. Install propeller shaft.
8. Fill differential with gear lubricant.