TANK - FUEL
REMOVAL
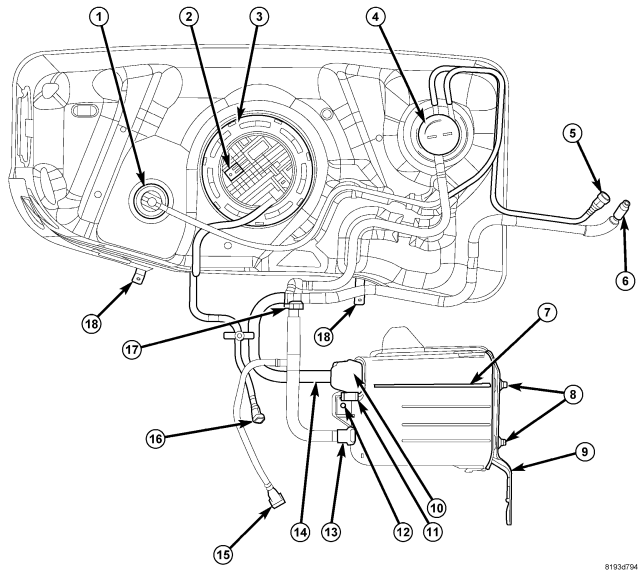
1. Release fuel system pressure. (Refer to 14 - FUEL SYSTEM/FUEL DELIVERY - STANDARD PROCEDURE)
2. Drain fuel tank. (Refer to 14 - FUEL SYSTEM/FUEL DELIVERY - STANDARD PROCEDURE)
3. If equipped, remove fuel tank skid plate and tow hooks. Certain equipment packages will also require removal of the trailer hitch.
4. Disconnect fuel line fittings at (5) and (6).
5. Disconnect fuel lines fittings at (16) and (17).
6. Disconnect fuel fill hose at left side of tank.
7. Disconnect fuel pump module electrical connector jumper. This is located near front of fuel tank.
8. Support tank with a hydraulic jack.
9. Remove four fuel tank mounting bolts from tank straps (18) (2 at front of tank; 2 at rear of tank), and remove both tank support straps.
10. Carefully lower tank a few inches.
11. Continue lowering tank while guiding remaining hoses and lines through plastic isolator sleeve.
INSTALLATION
1. Position fuel tank to hydraulic jack.
2. Raise tank while carefully guiding vent tubes/hoses through isolator sleeve and crossmember.
3. Continue raising tank until positioned to body.
4. Attach two fuel tank mounting straps (18) and four tank mounting bolts. Tighten bolts to 61 N·m (45 ft. lbs.) torque.
5. Connect fuel pump module electrical connector jumper harness.
6. Connect fuel line fittings at (5) and (6).
7. Connect fuel line fittings at (16) and (17).
8. Install fuel fill hose and hose clamp to fuel tank fitting. Rotate hose until white painted index mark on hose is located at alignment notch on fuel tank fitting. Tighten clamp to 3.4 N·m (30 in. lbs.) torque.
9. Connect fuel line quick-connect fitting.
10. If equipped, install fuel tank skid plate, trailer hitch and tow hooks.
11. Lower vehicle.
12. Connect negative battery cable to battery.
13. Fill fuel tank with fuel.
14. Start engine and check for fuel leaks.