ASSEMBLY
AIR INLET HOUSING
NOTE: The air inlet housing must be removed from HVAC housing and disassembled for service of the recirculation-air door.
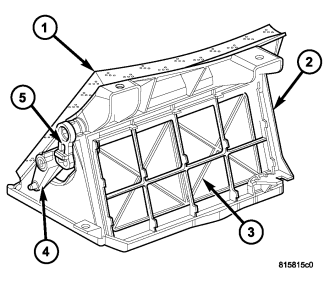
NOTE: If the seal on the air door is deformed or damaged, the air door must be replaced.
1. Position the recirculation-air door (3) into the air inlet housing (2).
2. Install the pivot lever (4) onto the side of the air inlet housing.
CAUTION: Make sure that the recirculation-air door pivot shaft is properly seated in the pivot holes located in the air inlet housing.
3. Align the recirculation door lever (5) with the pivot lever and install the recirculation door lever into the end of the pivot shaft of the recirculation-air door. Make sure the recirculation door lever is fully engaged to the pivot shaft and the pivot lever.
NOTE: If the foam seal on the air inlet housing is deformed or damaged, the seal must be replaced.
4. If removed, install a new foam seal (1) onto the top of the air inlet housing.
5. Install the air inlet housing onto the HVAC housing (refer to 24 - HEATING & AIR CONDITIONING/DISTRIBUTION/HOUSING-HVAC - HOUSING-AIR INLET - INSTALLATION).
HVAC HOUSING
NOTE: The HVAC housing must be removed from the vehicle and disassembled for service of the A/C evaporator and the mode-air and blend-air doors.
NOTE: LHD model shown in illustrations. RHD model similar.
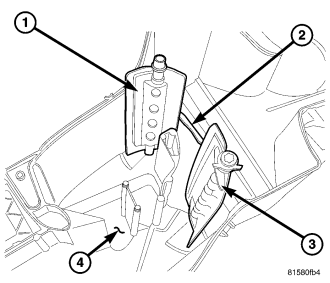
1. If removed, install the blend door arm (2) onto both blend-air doors (1 and 3).
NOTE: If the seal on any air door is deformed or damaged, the air door must be replaced.
2. Position both blend-air doors into the pivot holes in the lower half of the HVAC housing.
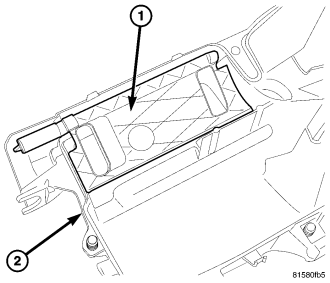
NOTE: If the seal on any air door is deformed or damaged, the air door must be replaced.
3. Position the floor/defrost-air door (1) into the pivot grooves in the lower half of the HVAC housing (2).
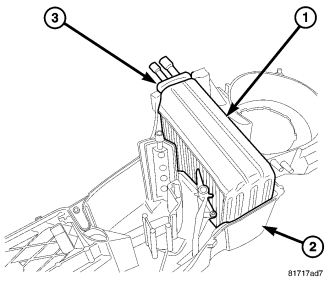
4. If removed, install the rubber seal (3) around the tubes of the A/C evaporator (1).
NOTE: Make sure that the evaporator drain is clean and unrestricted and that the rubber seal around the evaporator tubes is properly positioned in the HVAC housing.
NOTE: If the A/C evaporator is being replaced, add 60 milliliters (2 fluid ounces) of refrigerant oil to the refrigerant system. Use only refrigerant oil of the type recommended for the A/C compressor in the vehicle.
NOTE: If the foam insulator around the heater core is deformed or damaged, the insulator must be replaced.
NOTE: Make sure that the foam insulator is properly positioned in the HVAC housing.
5. Install the A/C evaporator and its foam insulator into the lower half of the HVAC housing (2).
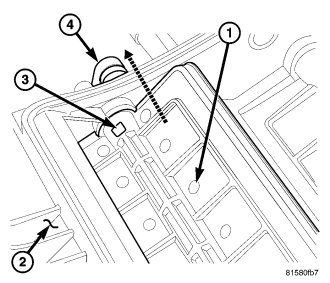
NOTE: If the seal on the air door is deformed or damaged, the air door must be replaced.
6. Position the panel-air door (1) into the upper half of the HVAC housing (2).
CAUTION: Make sure that the panel-air door pivot shaft is properly seated in the pivot holes located in the upper half of the HVAC housing.
7. Align the panel door lever (4) with the pivot shaft of the panel-air door and install the lever into the pivot shaft. Make sure the retaining tab (3) is fully engaged.
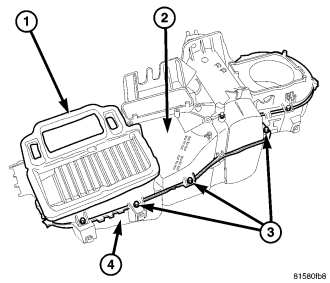
8. Align the blend-air door pivot shafts with the pivot holes in the upper half of the HVAC housing (2) and install it onto the lower half of the HVAC housing (4).
9. Install the screws (3) that secure the two halves of the HVAC housing together. Tighten the screws to 2 N·m (17 in. lbs.).
NOTE: If the foam seal on the panel/defrost outlet is deformed or damaged, the seal must be replaced.
10. If removed, install a new foam seal (1) onto the panel/defrost outlet located on the upper half of the HVAC housing.
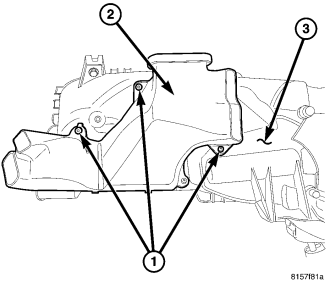
NOTE: If the foam seal on the floor distribution duct is deformed or damaged, the seal must be replaced.
11. Position the floor distribution duct (2) onto the bottom of the HVAC housing (3).
12. Install the three screws (1) that secure the floor distribution duct to the HVAC housing. Tighten the screws to 2 N·m (17 in. lbs.).
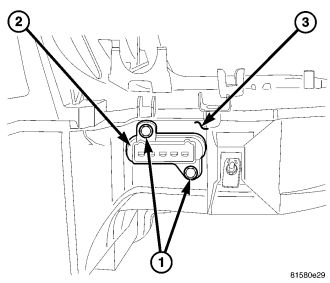
13. Position the blower motor resistor (2) into the rear of the HVAC housing (3).
14. Install the two screws (1) that secure the blower motor resistor to the HVAC housing. Tighten the screws to 2 N·m (17 in. lbs.).
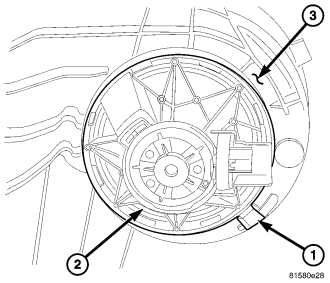
15. Align and install the blower motor (2) into the HVAC housing (3).
16. Rotate the blower motor until the locking tab (1) secures the blower motor to the HVAC housing.
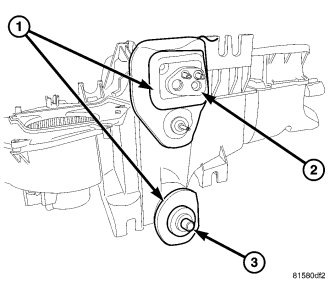
NOTE: If any foam or rubber seal is deformed or damaged, the seal must be replaced.
17. Install the foam and rubber seals (1) around the evaporator tapping block (2) and the condensate drain (3).
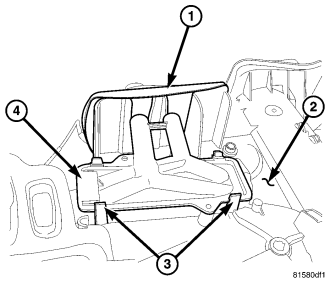
NOTE: If the foam insulator around the heater core is deformed or damaged, the insulator must be replaced.
NOTE: Make sure that the foam insulator is properly positioned in the HVAC housing.
18. Carefully install the heater core (4) into the top of the HVAC housing (2).
19. Engage the four retaining tabs (3) that secure the heater core to the HVAC housing.
NOTE: If the foam seal around the heater core tubes is deformed or damaged, the seal must be replaced.
20. Install the foam seal (1) onto the front of the HVAC housing and around the heater core tubes.
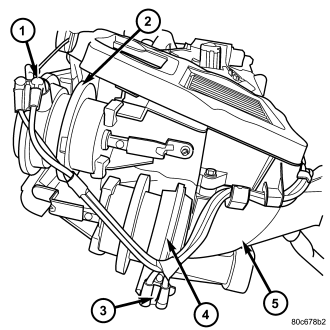
21. Position the HVAC vacuum harness and connectors (1 and 3) to the HVAC housing (5) and install the vacuum harness into the routing clips.
22. Install the panel door actuator (2) and the floor/defrost door actuator (4) on to the HVAC housing (Refer to 24 - HEATING & AIR CONDITIONING/CONTROLS/ACTUATOR-MODE DOOR - INSTALLATION).
23. Connect the mode door actuators to the mode-air door levers.
24. Connect the vacuum harness connectors to the mode door actuators.
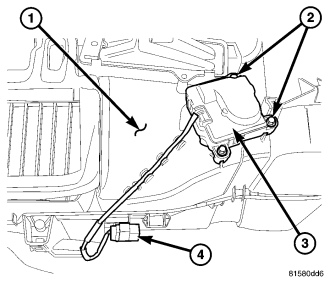
25. Position the blend door actuator (3) onto the top of the HVAC housing (1), making sure the actuator spline is positioned properly with the door spline. If necessary, rotate the actuator slightly to align the splines on the actuator output shaft with those on the blend door pivot.
26. Install the three screws (2) that secure the blend door actuator to the HVAC housing. Tighten the screws to 2 N·m (17 in. lbs.).
27. Engage the wire harness lead and connector (4) to the retainers located on the top and on the rear of the HVAC housing.
NOTE: If the foam seal on the air inlet housing is deformed or damaged, the seal must be replaced.
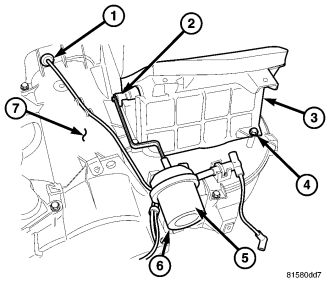
28. Position the air inlet housing (3) onto the top of the HVAC housing (7).
29. Install the four screws (4) that secure the air inlet housing to the HVAC housing. Tighten the screws to 2 N·m (17 in. lbs.).
30. Install the recirculation door actuator (5) onto the HVAC housing (Refer to 24 - HEATING & AIR CONDITIONING/CONTROLS/ACTUATOR-RECIRCULATION DOOR - INSTALLATION).
31. Connect the recirculation door actuator to the recirculation door lever (2).
32. Connect the HVAC vacuum harness connector (6) to the recirculation door actuator.
33. Install the HVAC vacuum harness and grommet (1) onto the top of HVAC housing.
34. Install the HVAC housing (Refer to 24 - HEATING & AIR CONDITIONING/DISTRIBUTION/HOUSING-HVAC - INSTALLATION).