INSTALLATION
BULB
CAUTION: Always use the correct bulb size and type for replacement. An incorrect bulb size or type may overheat and cause damage to the lamp, the socket or the lamp wiring.
NOTE: The following procedure applies only to vehicles manufactured for the North American market. Vehicles manufactured for export markets do not have a bulb, socket or wiring provided to illuminate the front side marker lamp. The front side marker lamp housing and lens are present, but serve only as a reflector on export vehicles.
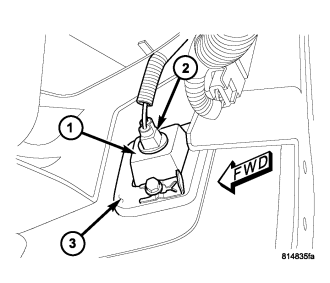
1. Align the base of the bulb with the front side marker bulb socket (2).
2. Push the bulb straight into the socket until the base is firmly seated.
3. Reach between the front of the adjacent right or left front fender wheel liner and the lower bumper fascia (3) to access the back of the lamp housing (1).
4. Align the socket and bulb with the keyed opening on the back of the housing.
5. Insert the socket and bulb into the housing until the socket is firmly seated.
6. Rotate the socket clockwise about 30 degrees to lock it into place.
7. Reinstall the four fasteners securing the front of the wheel liner to the lower edge of the fascia and the outboard surface of the frame rail ahead of the front wheel.
8. Reconnect the battery negative cable.
LAMP
NOTE: Vehicles manufactured for export markets do not have a bulb, socket or wiring provided to illuminate the front side marker lamp. The front side marker lamp housing and lens are present, but serve only as a reflector on export vehicles.
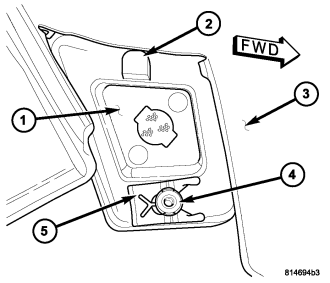
1. Position the front side marker lamp unit (1) to the lamp mounting hole on the outside of the fascia.
2. Engage the tab (2) at the top of the lamp into the notch at the top of the mounting hole then push the pin (4) on the lower end of the lamp through the round hole at the base of the mounting hole.
3. Reach between the front of the adjacent right or left front fender wheel liner and the lower bumper fascia (3) to access the back of the lamp housing.
4. Slide the retaining clip (5) onto the pin on the lower end of the lamp housing to secure the lamp to the fascia.
5. If the vehicle is so equipped, align the socket and bulb with the keyed opening on the back of the housing.
6. If the vehicle is so equipped, insert the socket and bulb into the housing until the socket is firmly seated.
7. If the vehicle is so equipped, rotate the socket clockwise about 30 degrees to lock it into place.
8. Reinstall the four fasteners securing the front of the wheel liner to the lower edge of the fascia and the outboard surface of the frame rail ahead of the front wheel.
9. Reconnect the battery negative cable.