POWER SEAT SWITCH
DESCRIPTION
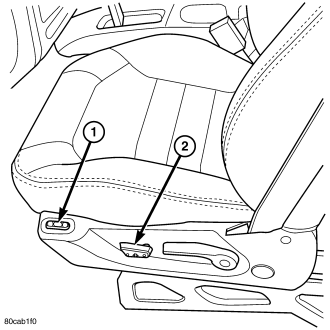
Vehicles equipped with the power seat option utilize a six-way power seat switch (2). This six-way power seat switch features one seat cushion shaped knob, visible on the outboard seat cushion side shield.
The switch is secured to the back of the seat cushion side shield with two screws. However, the control knob must be removed before the seat switch can be removed from the side shield.
The individual switches internal to the power seat switch assembly cannot be repaired. If one switch is damaged or faulty, the entire power seat switch assembly must be replaced.
OPERATION
The power seat tracks can be adjusted in six different ways using the power seat switches. See the owner's manual in the vehicle glove box for more information on the power seat switch functions and the seat adjusting procedures.
When a power seat switch control knob or knobs are actuated, a battery feed and a ground path are applied through the switch contacts to the power seat track adjuster motor. The selected adjuster motor operates to move the seat track through its drive unit in the selected direction until the switch is released, or until the travel limit of the seat track is reached. When the switch is moved in the opposite direction, the battery feed and ground path to the motor are reversed through the switch contacts. This causes the adjuster motor to run in the opposite direction.
No power seat switch should be held applied in any direction after the seat track has reached its travel limit. The power seat adjuster motors each contain a self-resetting circuit breaker to protect them from overload. However, consecutive or frequent resetting of the circuit breaker must not be allowed to continue, or the motor may be damaged.
REMOVAL
1. Disconnect and isolate the battery negative cable.
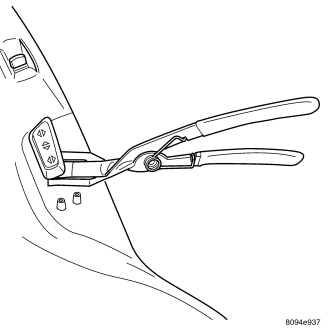
2. Using a push pin remover or another suitable wide flat-bladed tool, gently pry the power seat switch knob off of the switch control levers.
3. Remove the two forward-most screws that secure the outboard seat cushion side shield to the seat cushion frame.
4. Remove the recliner handle retaining screw and remove the recliner handle.
5. Pull the outboard seat cushion side shield away from the seat cushion frame far enough to access the power seat switch wire harness tie-strap and connector. Cut the tie-strap, if equipped.
6. Disconnect the power seat wire harness connector from the power seat switch connector receptacle. Depress the connector retaining tab and pull straight apart.
7. Using a very short phillips-headed screwdriver, remove the two screws that secure the power seat switch to the inside of the outboard seat cushion side shield.
8. Remove the power seat switch from the outboard seat cushion side shield.
INSTALLATION
1. Reconnect the power seat wire harness connector to the power seat switch connector receptacle.
2. Position the power seat switch onto the outboard seat cushion side shield. Make certain the alignment dowel is inserted into the corresponding hole in the power seat switch.
3. Install and tighten the two screws that secure the power seat switch to the inside of the outboard seat cushion side shield. Tighten the screws to 1.5 N·m (14 in. lbs.).
4. Position the outboard seat cushion side shield onto the seat cushion frame
5. Install and tighten the two screws that secure the outboard seat cushion side shield to the seat cushion frame. Tighten the screws to 1.5 N·m (14 in. lbs.).
6. Install the recliner handle and retaining screw. Tighten the screws to 1.5 N·m (14 in. lbs.).
7. Position the power seat switch knob onto the switch control levers and push firmly and evenly until it snaps into place.
8. Reconnect the battery negative cable.