CURTAIN AIRBAG
DESCRIPTION
Optional side curtain airbags are available for this vehicle when it is also equipped with dual front airbags. These airbags are passive, inflatable, Supplemental Restraint System (SRS) components, and vehicles with this equipment can be readily identified by a molded identification trim button with the SRS - AIRBAG logo located on the headliner above each B-pillar. This system is designed to reduce injuries to the vehicle occupants in the event of a side impact collision.
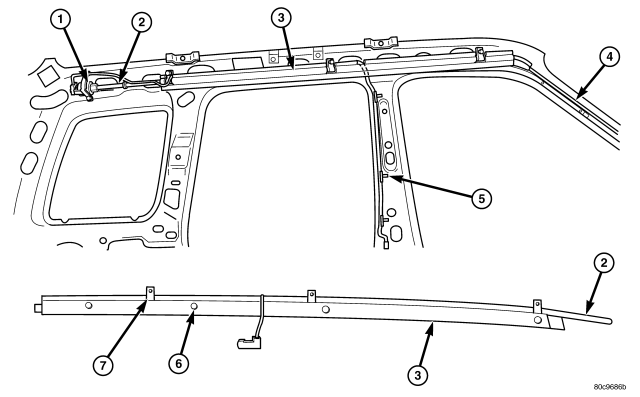
Vehicles equipped with side curtain airbags have two individually controlled curtain airbag units. These airbag units are concealed and mounted above the headliner where they are each secured to one of the roof side rails. Each folded airbag cushion is contained within a long extruded plastic channel (3) that extends along the roof rail from the A-pillar at the front of the vehicle to just behind the C-pillar at the rear of the vehicle. The channel is secured with plastic push-in fasteners to the roof rail (6).
A long tether (4) extends down the A-pillar from the front of the airbag cushion, where it is retained to the pillar with a plastic push-in routing clip and is secured to the base of the A-pillar near the belt line with a push pin fastener.
The hybrid-type inflator (1) for each airbag is secured to the roof rail at the rear of the airbag unit between the C-pillar and the D-pillar, and is connected to the airbag cushion by a long tubular manifold (2). The bracket holding the inflator and three other brackets (7) holding the manifold are secured to the roof rail with screws.
A two-wire pigtail harness is routed forward from the airbag inflator through a trough along the top of the plastic airbag channel on the roof rail and down the B-pillar, where it is retained by three routing clips (5). The pigtail harness is connected to a take out and connector of the body wire harness on the B-pillar, which connects the airbag unit to the Airbag Control Module (ACM) (also known as the Occupant Restraint Controller/ORC).
The side curtain airbag unit cannot be adjusted or repaired and must be replaced if deployed, ineffective, or in any way damaged. Once a side curtain airbag has been deployed, the complete airbag unit, the headliner, the upper A, B, and C-pillar trim, and all other visibly damaged components must be replaced.
OPERATION
Each side curtain airbag is deployed individually by an electrical signal generated by the Airbag Control Module (ACM) (also known as the Occupant Restraint Controller/ORC) to which it is connected through left or right curtain airbag line 1 and line 2 (or squib) circuits. The hybrid-type inflator assembly for each airbag contains a small canister of highly compressed inert gas. When the ACM sends the proper electrical signal to the airbag inflator, the electrical energy creates enough heat to ignite chemical pellets within the inflator.
Once ignited, these chemicals burn rapidly and produce the pressure necessary to rupture a containment disk in the inert gas canister. The inflator and inert gas canister are sealed and connected to a tubular manifold so that all of the released gas is directed into the folded curtain airbag cushion, causing the cushion to inflate. As the airbag cushion inflates it will drop down from the roof rail between the edge of the headliner and the side glass/body pillars to form a curtain-like cushion to protect the vehicle occupants during a side impact collision.
The front tether keeps the front portion of the bag taut to the side of the vehicle, thus ensuring that the bag will deploy in the proper position. Following the airbag deployment, the airbag cushion quickly deflates by venting the inert gas through the loose weave of the cushion fabric, and the deflated cushion hangs down loosely from the roof rail.
Proper diagnosis of the side curtain airbag inflator and squib circuits requires the use of a diagnostic scan tool. Refer to the appropriate diagnostic information.
REMOVAL
WARNING: To avoid personal injury or death, on vehicles equipped with airbags, disable the supplemental restraint system before attempting any steering wheel, steering column, airbag, occupant classification system, seat belt tensioner, impact sensor, or instrument panel component diagnosis or service. Disconnect and isolate the battery negative (ground) cable, then wait two minutes for the system capacitor to discharge before performing further diagnosis or service. This is the only sure way to disable the supplemental restraint system. Failure to take the proper precautions could result in accidental airbag deployment.
WARNING: To avoid personal injury or death, when removing a deployed airbag, rubber gloves, eye protection, and a long-sleeved shirt should be worn. There may be deposits on the airbag unit and other interior surfaces. In large doses, these deposits may cause irritation to the skin and eyes.
WARNING: To avoid personal injury or death, use extreme care to prevent any foreign material from entering the side curtain airbag, or becoming entrapped between the side curtain airbag cushion and the headliner. Failure to observe this warning could result in occupant injuries upon airbag deployment.
NOTE: The following procedure is for replacement of an ineffective or damaged side curtain airbag. If the airbag is ineffective or damaged, but not deployed, review the recommended procedures for handling non-deployed supplemental restraints. (Refer to 8 - ELECTRICAL/RESTRAINTS - STANDARD PROCEDURE - HANDLING NON-DEPLOYED SUPPLEMENTAL RESTRAINTS). If the side curtain airbag has been deployed, review the recommended procedures for service after a supplemental restraint deployment before removing the airbag from the vehicle. (Refer to 8 - ELECTRICAL/RESTRAINTS - STANDARD PROCEDURE - SERVICE AFTER A SUPPLEMENTAL RESTRAINT DEPLOYMENT).
1. Disconnect and isolate the battery negative cable. Wait two minutes for the system capacitor to discharge before further service.
2. Remove the lower trim from the inside of the B-pillar. (Refer to 23 - BODY/INTERIOR/B-PILLAR LOWER TRIM - REMOVAL).
3. Remove the headliner from the vehicle. (Refer to 23 - BODY/INTERIOR/HEADLINER - REMOVAL).
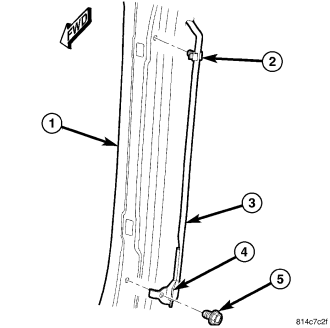
4. Remove the push-pin fastener (5) that secures the side curtain airbag tether retainer (4) to the base of the A-pillar (1) near the belt line.
5. Disengage the side curtain airbag tether (3) plastic retainer clip (2) from the A-pillar.
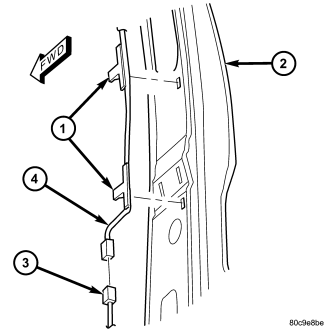
6. Disconnect the side curtain airbag pigtail wire connector (4) from the body wire harness connector (3) near the base of the B-pillar (2).
7. Disengage the three side curtain airbag pigtail wire retainer clips (1) from the B-pillar.
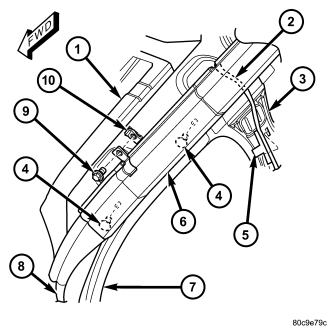
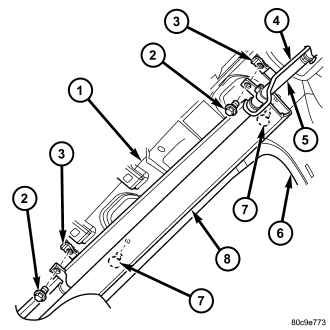
8. Remove the three screws (9 or 2) that secure the side curtain airbag manifold tube (5) brackets to the U-nuts (10 or 3) in the roof rail (1).
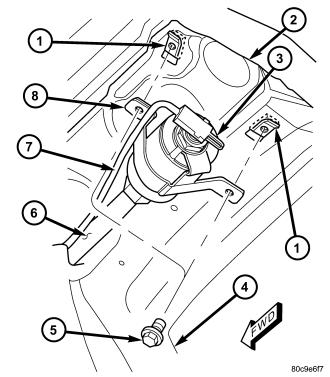
9. Remove the two screws (5) that secure the side curtain airbag inflator (3) bracket (8) to the U-nuts (1) in the roof rail (2).
10. Grasp the extruded plastic side curtain airbag channel firmly and pull it straight away from the roof rail far enough to disengage all four plastic push-in fasteners that secure it.
11. Remove the side curtain airbag from the vehicle as a unit.
INSTALLATION
WARNING: To avoid personal injury or death, on vehicles equipped with airbags, disable the supplemental restraint system before attempting any steering wheel, steering column, airbag, occupant classification system, seat belt tensioner, impact sensor, or instrument panel component diagnosis or service. Disconnect and isolate the battery negative (ground) cable, then wait two minutes for the system capacitor to discharge before performing further diagnosis or service. This is the only sure way to disable the supplemental restraint system. Failure to take the proper precautions could result in accidental airbag deployment.
WARNING: To avoid personal injury or death, when removing a deployed airbag, rubber gloves, eye protection, and a long-sleeved shirt should be worn. There may be deposits on the airbag unit and other interior surfaces. In large doses, these deposits may cause irritation to the skin and eyes.
WARNING: To avoid personal injury or death, use extreme care to prevent any foreign material from entering the side curtain airbag, or becoming entrapped between the side curtain airbag cushion and the headliner. Failure to observe this warning could result in occupant injuries upon airbag deployment.
NOTE: The following procedure is for replacement of an ineffective or damaged side curtain airbag. If the airbag is ineffective or damaged, but not deployed, review the recommended procedures for handling non-deployed supplemental restraints. (Refer to 8 - ELECTRICAL/RESTRAINTS - STANDARD PROCEDURE - HANDLING NON-DEPLOYED SUPPLEMENTAL RESTRAINTS). If the side curtain airbag has been deployed, review the recommended procedures for service after a supplemental restraint deployment before removing the airbag from the vehicle. (Refer to 8 - ELECTRICAL/RESTRAINTS - STANDARD PROCEDURE - SERVICE AFTER A SUPPLEMENTAL RESTRAINT DEPLOYMENT).
1. Position the side curtain airbag into the vehicle as a unit.
2. Align all four plastic push-in fasteners (4 or 7) that secure the extruded plastic side curtain airbag channel (6 or 8) with their holes in the roof side rail (1) and push them straight into the roof rail until they are fully seated.
3. Install and tighten the upper screw (5) that secures the side curtain airbag inflator bracket (8) to the U-nut (1) in the roof rail, followed by the lower screw. Tighten the screws to 12 N·m (105 in. lbs.).
4. Working from the rear of the vehicle to the front, install and tighten each of the three screws that secure the side curtain airbag manifold tube brackets to the U-nuts in the roof rail. Tighten the screws to 12 N·m (105 in. lbs.).
5. Route the side curtain airbag pigtail wire (4) through the trough along the top of the extruded plastic airbag channel on the roof side rail, then between the channel and the body down the B-pillar (2).
NOTE: Be certain that the side curtain airbag pigtail wire is routed behind the airbag channel, between the channel and the body above the B-pillar.
6. Engage the three side curtain airbag pigtail wire retainer clips (1) into the B-pillar.
7. Reconnect the side curtain airbag pigtail wire connector to the body wire harness connector (3) near the base of the B-pillar.
8. Engage the side curtain airbag tether (3) plastic retainer clip (2) into the A-pillar (1).
9. Install the push-pin fastener (5) that secures the side curtain airbag tether retainer (4) to the base of the A-pillar near the belt line.
10. Reinstall the headliner into the vehicle. (Refer to 23 - BODY/INTERIOR/HEADLINER - INSTALLATION).
11. Reinstall the lower trim onto the inside of the B-pillar. (Refer to 23 - BODY/INTERIOR/B-PILLAR LOWER TRIM - INSTALLATION).
12. Do not reconnect the battery negative cable at this time. The supplemental restraint system verification test procedure should be performed following service of any supplemental restraint system component. (Refer to 8 - ELECTRICAL/RESTRAINTS - STANDARD PROCEDURE - VERIFICATION TEST).