CABLE-PARK INTERLOCK
REMOVAL
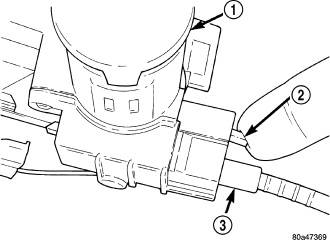
1. Lower the steering column.
2. With the ignition switch in the “RUN” position depress the park-interlock cable locking tab (2), located on top of the cable connector at the steering column and pull the cable straight out.
3. Remove the park-interlock cable from steering column.
4. Remove the floor console and related trim. (Refer to 23 - BODY/INTERIOR/CENTER CONSOLE - REMOVAL)
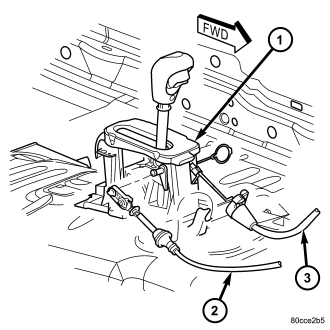
5. Disconnect the park-interlock cable (3) from the shift lever assembly and remove the cable from the shifter assembly bracket.
6. Release the park-interlock cable from any remaining clips.
7. Remove park-interlock cable from the vehicle.
INSTALLATION
NOTE: The gearshift cable must be secured into position and properly adjusted before the installation of the Park-Interlock Cable.
1. Push the park-interlock cable (3) straight into the square mounting hole in the steering column until cable snaps in place.
2. Snap park-interlock cable tie strap into hole in steering column tube.
3. Route cable to the shifter mechanism.
4. Install the cable end fitting into shifter lever (1).
5. Snap cable adjuster ears into floor shifter bracket.
6. Place the ignition key cylinder in the LOCK position.
7. Push the cable adjuster lock clamp downward to lock it.
8. Test the park-interlock cable operation.
9. Install the floor console and related trim. (Refer to 23 - BODY/INTERIOR/CENTER CONSOLE - INSTALLATION)
ADJUSTMENTS - PARK-INTERLOCK CABLE
The park-interlock cable is part of the Brake Transmission Shift Interlock (BTSI) system. Correct cable adjustment is important to proper interlock operation. The gear shift and park lock cables must both be correctly adjusted in order to shift out of PARK.
1. Remove floor console as necessary for access to the park-interlock cable. (Refer to 23 - BODY/INTERIOR/CENTER CONSOLE - REMOVAL)
2. Shift the transmission into the PARK position.
3. Turn ignition switch to LOCK position. Be sure ignition key cylinder is in the LOCK position. Cable will not adjust correctly in any other position.
4. Pull cable lock button up to release cable (3).
5. Ensure that the cable is free to self-adjust by pushing cable rearward and releasing.
6. Push lock button down until it snaps in place.
7. Verify proper operation. (Refer to 21 - TRANSMISSION/AUTOMATIC/SHIFT INTERLOCK SYSTEM - DIAGNOSIS AND TESTING)
8. Install the floor console and related trim. (Refer to 23 - BODY/INTERIOR/CENTER CONSOLE - INSTALLATION)