CRANKSHAFT
DESCRIPTION - 3.8L
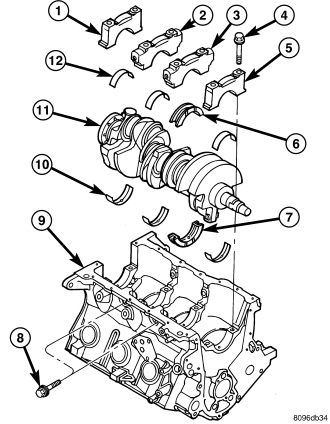
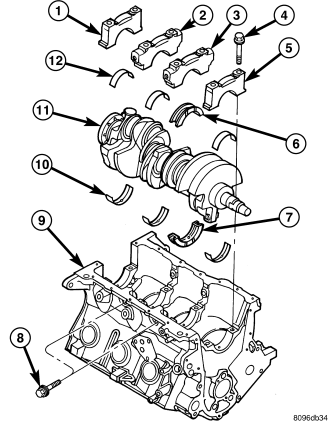
The nodular iron crankshaft is supported by four main bearings, with number two position providing thrust bearing location . Each main bearing cap has two vertical retaining bolts. The two center main caps have horizontal bolts to add increased rigidity to the lower engine block . Crankshaft end sealing is provided by front and rear rubber seals.
STANDARD PROCEDURE - MEASURING CRANKSHAFT END PLAY
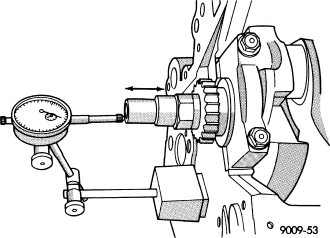
1. Mount a dial indicator to front of engine with the locating probe on nose of crankshaft .
2. Move crankshaft all the way to the rear of its travel.
3. Zero the dial indicator.
4. Move crankshaft all the way to the front and read the dial indicator. (Refer to 9 - ENGINE - SPECIFICATIONS) for end play specification.
REMOVAL
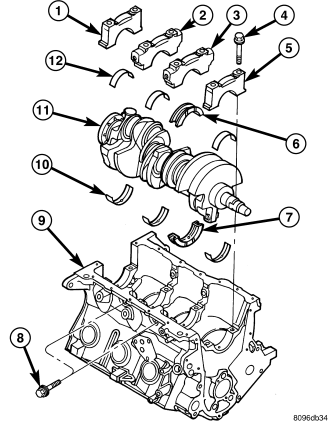
1. Remove the engine assembly (Refer to 9 - ENGINE - REMOVAL).
2. Mount engine on an engine stand.
3. Remove the oil filter.
4. Remove the oil pan and oil pick-up tube (Refer to 9 - ENGINE/LUBRICATION/OIL PAN - REMOVAL).
5. Remove the timing chain cover (Refer to 9 - ENGINE/VALVE TIMING/TIMING CHAIN COVER - REMOVAL).
6. Remove timing chain and sprockets (Refer to 9 - ENGINE/VALVE TIMING/TIMING CHAIN AND SPROCKETS - REMOVAL).
7. Remove crankshaft rear oil seal and retainer (Refer to 9 - ENGINE/ENGINE BLOCK/CRANKSHAFT OIL SEAL - REAR - REMOVAL).
NOTE: The 3.8L can have any number or combination of standard forged or cracked connecting rod caps. Do not mix or interchange the rod caps.
8. Rotate the crankshaft until connecting rod cap is accessible.
9. Paint mark or scribe the connecting rod cap position.
10. Remove connecting rod bearing cap. Use care to prevent damage to the crankshaft bearing surfaces.
11. Repeat removal procedure for each connecting rod cap.
12. Remove and discard the main bearing cross bolts and washers.
NOTE: Install new cross bolt and washer assembly upon reassembly.
13. Remove the main bearing cap bolts
14. Remove the main bearing caps .
15. Remove the crankshaft from engine block .
INSTALLATION
1. Lubricate with engine oil and install the crankshaft main bearing halves in the engine block.
2. Position the crankshaft in engine block .
3. Perform main bearing fitting procedure (Refer to 9 - ENGINE/ENGINE BLOCK/CRANKSHAFT MAIN BEARINGS - STANDARD PROCEDURE).
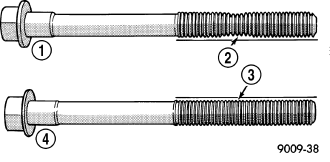
4. Inspect main cap bolts for stretching . Replace bolts that are stretched.
NOTE: The main cap bolts should be examined before reuse. Bolt stretch can be checked by holding a scale or straight edge against the threads. If all the threads do not contact the scale the bolt must be replaced .
5. Install the main bearing caps and bolts. Tighten bolts to 41 N·m (30 ft. lbs.) plus ¼ turn.
NOTE: Install new cross bolt and washer assembly upon reassembly.
6. Install and tighten the NEW cross bolts and washer assemblies to 61 N·m (45 ft. lbs.) .
7. Position and install the connecting rod and bearing caps on the crankshaft (Refer to 9 - ENGINE/ENGINE BLOCK/CONNECTING ROD BEARINGS - STANDARD PROCEDURE).
8. Install the crankshaft rear oil seal (Refer to 9 - ENGINE/ENGINE BLOCK/CRANKSHAFT OIL SEAL - REAR - INSTALLATION).
9. Install the crankshaft sprocket (Refer to 9 - ENGINE/VALVE TIMING/TIMING CHAIN AND SPROCKETS - INSTALLATION).
10. Install the timing chain and camshaft sprocket (Refer to 9 - ENGINE/VALVE TIMING/TIMING CHAIN AND SPROCKETS - INSTALLATION).
11. Install the timing chain cover (Refer to 9 - ENGINE/VALVE TIMING/TIMING CHAIN COVER - INSTALLATION).
12. Install the oil pick-up tube and oil pan (Refer to 9 - ENGINE/LUBRICATION/OIL PAN - INSTALLATION).
13. Install the engine assembly (Refer to 9 - ENGINE - INSTALLATION).