CANISTER - VAPOR
OPERATION
A maintenance free, EVAP canister is used on all vehicles. The EVAP canister is filled with granules of an activated carbon mixture. Fuel vapors entering the EVAP canister are absorbed by the charcoal granules.
Fuel tank pressure vents into the EVAP canister. Fuel vapors are temporarily held in the canister until they can be drawn into the intake manifold. The duty cycle EVAP canister purge solenoid allows the EVAP canister to be purged at predetermined times and at certain engine operating conditions.
The EVAP canister is also to be considered as part of the ORVR system.
REMOVAL
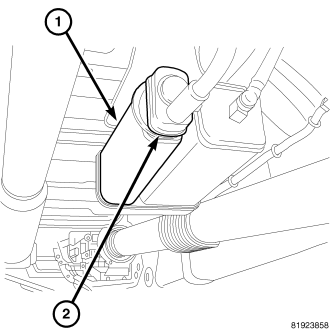
The EVAP canister (1) is located under the vehicle next to the rear prop shaft. The ESIM switch (2) is attached to the EVAP canister.
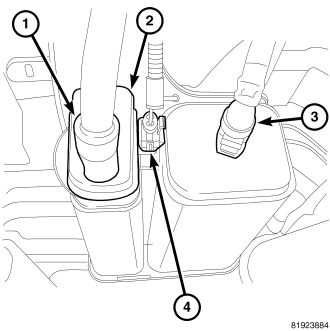
1. Raise and support vehicle.
2. Clean dirt or debris from canister vacuum lines.
3. Disconnect electrical connector (4) at ESIM switch (2).
4. Disconnect rubber hose (1) from ESIM switch.
5. Disconnect fitting (3) at EVAP canister.
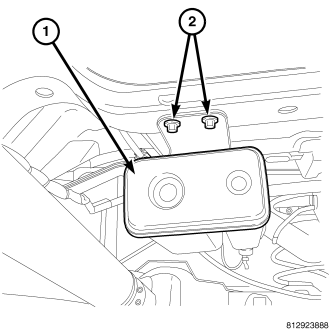
6. Remove two bolts (2) at front of canister mounting bracket (1).
7. Remove two bolts at rear of canister mounting bracket.
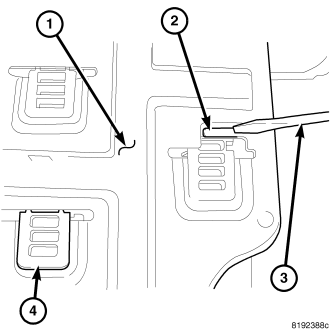
8. To separate EVAP canister (4) from mounting bracket (1), pry on lock-tab (2).
INSTALLATION
1. Attach canister to mounting bracket. Lock canister to mounting bracket by using lock tab (2).
2. Install two bolts (2) at front of canister mounting bracket (1).
3. Install two bolts at rear of canister mounting bracket.
4. Connect electrical connector (4) to ESIM switch (2).
5. Connect rubber hose (1) to ESIM switch.
6. Connect fitting (3) to EVAP canister.
7. Lower vehicle.
8. The vapor/vacuum lines and hoses must be firmly connected. Also check the vapor/vacuum lines at the ESIM switch, filter and EVAP purge solenoid for damage or leaks. If a leak is present, a Diagnostic Trouble Code (DTC) may be set.