INSTALLATION
STABILIZER BAR
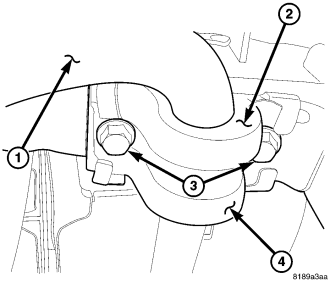
1. Install the stabilizer bar (1) to the vehicle.
NOTE: Stabilizer bar link to axle bolt should be tightened with vehicle sitting on its tires
2. Install the right side stabilizer bar bracket bolts (3) to the frame. Tighten to 102 N·m (75 ft. lbs.).
3. Install the left side stabilizer bar bracket bolts (3) to the frame. Tighten to 102 N·m (75 ft. lbs.).
4. Install the splash shield.
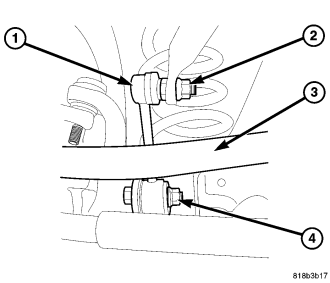
5. Install the right upper stabilizer bar link nut (2) to the stabilizer bar. Tighten to 102 N·m (75 ft. lbs.).
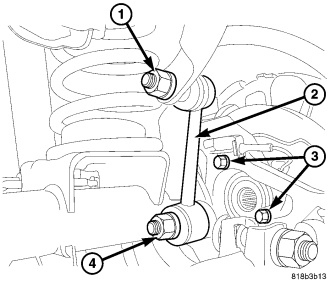
6. Install the left upper stabilizer bar link nut (1) to the stabilizer bar. Tighten to 102 N·m (75 ft. lbs.).
7. Remove the support and lower the vehicle.
DISCONNECTING STABILIZER BAR
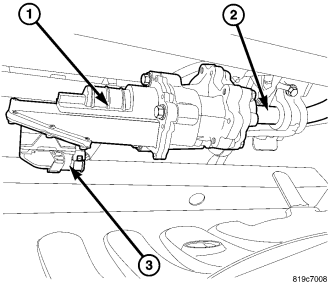
WARNING: The disconnecting stabilizer bar unit (1) is not serviced separately from the bar (2). Do not disassemble this unit from the stabilizer bar.
NOTE: The stabilizer links, stabilizer bar retainers/ bushings and the stabilizer bar as a complete unit only are serviceable. The new bar consists of the disconnecting unit and electronic actuator (1) attached as an assembly to the bar.
1. Position the stabilizer bar (1) on the frame rail and install the retainers (4) with bushings (2) and bolts (3). Ensure the bar is centered with equal spacing on both sides.
2. Tighten the retainer bolts (3) to 61 N·m (45 ft. lbs.).
NOTE: The seal must be clean and intact in the electrical connector (3) when reconnecting to the actuator (1).
3. Reconnect the electronic actuator electrical connector (3) for the disconnecting stabilizer bar.
NOTE: Stabilizer bar link to axle bolt should be tightened with vehicle sitting on its tires
4. Install links (1) and nuts (2) to the stabilizer bar. Hold the link shaft with a wrench and tighten the nuts (2) to 102 N·m (75 ft. lbs.).
5. Remove the supports and lower the vehicle.
6. Using a scan tool program the new stabilizer bar to the vehicle.