CABLE-SHIFT
REMOVAL
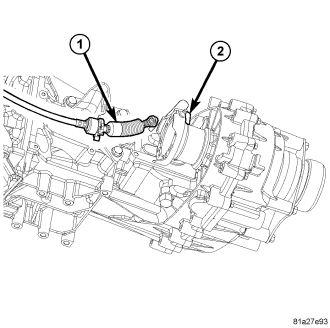
1. Shift transfer case into 4L.
2. Raise vehicle.
3. Remove clip securing the transfer case shift cable (2) to the shift cable support bracket.
4. Disengage any additional shift cable routing clips, if necessary.
5. Disengage the shift cable from the transfer case manual lever.
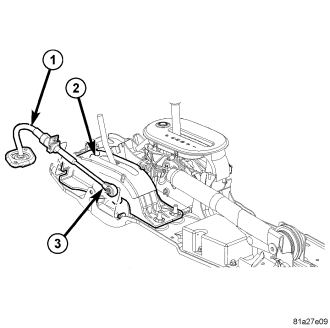
6. Lower the vehicle.
7. Remove the floor console as necessary to access the shifter mechanism. (Refer to 23 - BODY/INTERIOR/CENTER CONSOLE - REMOVAL)
8. Disengage the transfer case shift cable from the shift lever pin and body.
9. Disengage the shift cable grommet from the floor and remove the shift cable from the vehicle.
INSTALLATION
1. Route the shift cable through the opening in the floor pan.
2. Connect the transfer case shift cable to the shift lever body and pin.
3. Install any floor console components previously removed. (Refer to 23 - BODY/INTERIOR/CENTER CONSOLE - INSTALLATION)
4. Verify that the floor shifter is in the 4L position.
5. Raise vehicle.
6. Route the shift cable through the opening in the shift cable support bracket.
7. Install the cable and a new spring clip into the slot in the support bracket.
8. Install any additional routing clips on the shift cable.
9. Verify that the transfer case is in the 4L position. The 4L position for the transfer case is with the manual lever to the full rearward position.
10. Attach the shift cable to the transfer case manual lever.
11. Lower vehicle and check for proper transfer case shifter operation.