CONVERTER, Catalytic
3.6L
3.6L
LEFT SIDE
- Disconnect the negative battery cable.
- Slightly raise the vehicle.
- Remove the drivers side front wheel.
-
Remove the drivers side inner wheel splash shield.
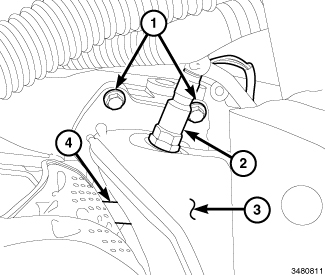
NOTE: The catalytic converter flange is secured to the cylinder head. A steel sleeve holds the lower section of the converter flange to the head while two bolts fasten the flange to the cylinder head. The steel sleeve does not need to be removed for converter removal.
- Disconnect the upper (2) and lower O2 sensors wiring connectors.
- Saturate the bolts (1) and nuts with heat valve lubricant. Allow 5 minutes for penetration.
-
Remove the upper catalytic converter flange bolts (1) from the cylinder head.
-
Raise the vehicle.
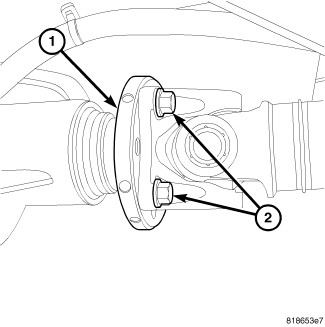
- If equipped, remove the engine skid plate.
- Remove the bolts (2) that secure the front drive shaft to the front differential flange (1).
-
Remove the drive shaft from the flange and position aside.
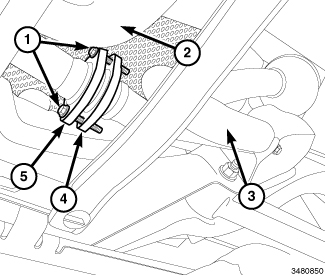
- Saturate the bolts (1) and nuts with heat valve lubricant. Allow 5 minutes for penetration.
- Remove the lower catalytic converter flange bolts (1) from the y-pipe (3).
- Using care. Lift the catalytic converter upwards to remove from the steel sleeve and out from the bottom of the vehicle.
- Remove the heatshield from the converter.
-
Remove the O2 sensors.
RIGHT SIDE
-
Raise the vehicle.
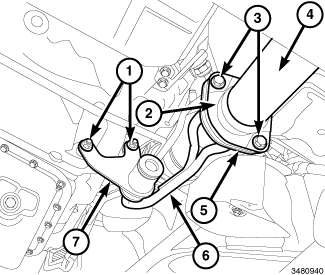
- If equipped, remove the engine skid plate.
- Saturate the bolts (3) and nuts (1) with heat valve lubricant. Allow 5 minutes for penetration.
- Remove the exhaust hanger bracket (7).
-
Remove the lower catalytic converter flange bolts (3) from the y-pipe (4).
-
Lower vehicle.
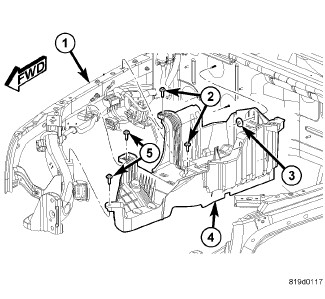
-
Remove the battery box (Refer to 08 - Electrical/8F - Engine Systems/Battery System/TRAY, Battery - Removal)
.
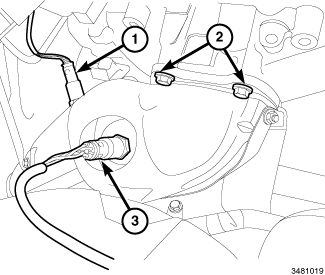
NOTE: The catalytic converter flange is secured to the cylinder head. A steel sleeve holds the lower section of the converter flange to the head while two bolts fasten the flange to the cylinder head. The steel sleeve does not need to be removed for converter removal.
- Disconnect the upper (2) and lower O2 sensors wiring connectors.
- Remove the upper bolts (2) at the flange to the manifold.
- Using care. Lift the catalytic converter upwards to remove from the steel sleeve.
- Remove the heatshield from the converter.
-
Remove the O2 sensors.
2.8L
2.8L
 |
If torches are used when servicing
the exhaust system, do not allow any flame near the fuel lines or
the fuel tank. Failure to follow these instructions may result in
possible serious or fatal injury.
WARNING:
- Partially raise and support the vehicle.
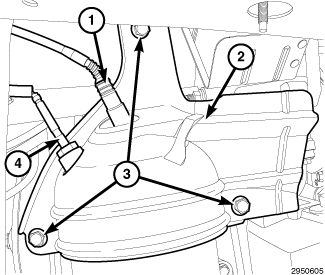
- Remove the front right wheelhouse splash shield (Refer to 23 - Body/Exterior/SHIELD, Splash - Removal) .
- Disconnect and remove the temperature sensor (4) and the O2 sensor (1).
-
Remove the mounting bolts (3) for the catalytic converter heat shield (2).
- Raise vehicle.
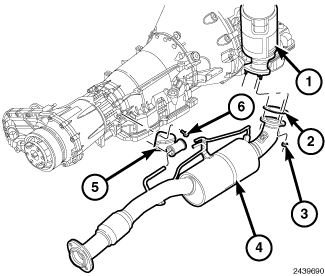
- Saturate the exhaust bolts and nuts (3) with heat valve lubricant. Allow 5 minutes for penetration.
- Remove the diesel particulate filter (DPF) (Refer to 11 - Exhaust System/FILTER, Diesel Particulate - Removal) .
-
Remove the exhaust pipe (Refer to 11 - Exhaust System/PIPE, Exhaust - Removal)
.
-
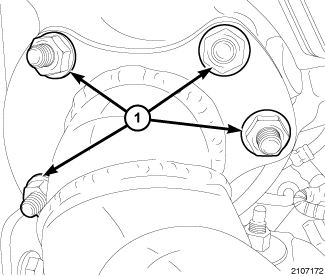
Remove the nuts (1) from the front catalytic converter to turbocharger flange.
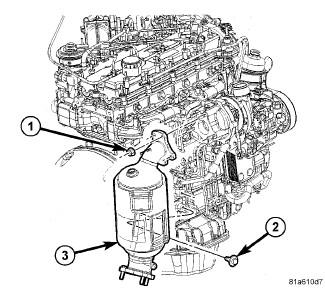
- Remove the bracket bolts (2).
-
Remove the catalytic converter (3) from the vehicle.
3.6L
3.6L
LEFT SIDE
|
| NOTE: |
The catalytic converter flange is secured to the cylinder head. A steel sleeve holds the lower section of the converter flange to the head while two bolts fasten the flange to the cylinder head. The steel sleeve does not need to be removed for converter removal. |
- Install the O2 sensors.
- Install the heatshield.
- Using care, position the catalytic converter assembly (3) into the steel sleeve and onto the cylinder head through the bottom of the vehicle.
- Loosely install the bolts (1) from the Y-pipe (2) to the catalytic converter (3).
-
Position the exhaust pipe for proper clearance with the frame and underbody parts. A minimum clearance of 25.4 mm (1.0 in.) is required. Tighten the bolts (1) at to 23 N·m (17 ft. lbs.).
- Slightly lower the vehicle to gain access to the catalytic converter flange to cylinder head.
- Tighten the bolts (1) at exhaust manifold to 23 N·m (17 ft. lbs.).
- Connect the O2 sensors electrical connectors.
- Install the front drivers side splash shield.
-
Install the drivers side front wheel.
-
Raise vehicle.
- Tighten the catalytic converter assembly to Y-pipe flange bolts to 27 N·m (20 ft. lbs.).
-
Install the front driveshaft onto the front differential flange (1). Tighten the bolts (2) to 110 N·m (81 ft. lbs.).
- Lower the vehicle.
- Connect the negative battery cable
- Start the vehicle and inspect for exhaust leaks. Repair exhaust leaks as necessary.
RIGHT SIDE
| NOTE: |
The catalytic converter flange is secured to the cylinder head. A steel sleeve holds the lower section of the converter flange to the head while two bolts fasten the flange to the cylinder head. The steel sleeve does not need to be removed for converter removal. |
|
- Install the O2 sensors (1 and 3).
- Install the heatshield.
- Guide the catalytic converter into the steel sleeve and install the upper flange bolts (2). Tighten bolts to 23 N·m (17 ft. lbs.).
-
Connect the O2 sensor connectors.
-
Install the battery tray box (Refer to 08 - Electrical/8F - Engine Systems/Battery System/TRAY, Battery - Installation)
.
-
Raise the vehicle.
- Align the Y-pipe flange (2) to the catalytic converter flange (5) and install the bolts (3). Tighten the bolts to 23 N·m (17 ft. lbs.).
- Install the catalytic converter support bracket (7). Tighten the nuts (1) at to 23 N·m (17 ft. lbs.).
- Check the exhaust system for contact with the body panels. Make adjustments, if necessary.
- Lower vehicle.
- Connect the negative battery cable.
-
Start the vehicle and inspect for exhaust leaks. Repair exhaust leaks as necessary.
2.8L
2.8L
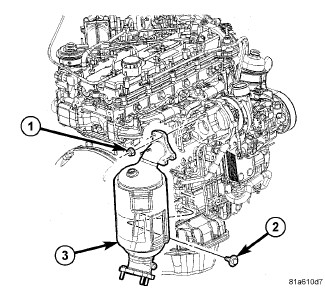 |
- Position the front catalytic converter assembly (3) onto the turbocharger.
- Install the catalytic converter to turbocharger flange nuts (1). Do not tighten at this time.
- Install the two catalytic converter mounting bolts (2). Do not tighten at this time.
- Install the Diesel Particulate Filter (DPF) (Refer to 11 - Exhaust System/FILTER, Diesel Particulate - Installation) .
- Install the exhaust pipe (Refer to 11 - Exhaust System/PIPE, Exhaust - Installation) .
- Position the exhaust pipe for proper clearance with the frame and underbody parts. A minimum clearance of 25.4 mm (1.0 in.) is required.
-
Tighten the catalytic
converter mounting bolts (2) to 16 N·m (12 ft. lbs.).
- Tighten the catalytic converter to turbocharger flange nuts (1) and catalytic converter mounting bolts to 27 N·m (19 ft. lbs.).
-
Tighten the muffler
to catalytic converter flange retaining nuts to 28 N·m (21 ft. lbs.).
- Partially lower the vehicle.
- Install the catalytic converter heat shield (2). Tighten the bolts (3) to 45 N·m (33 ft. lbs.).
- Install the O2 sensor. Tighten the sensor (1) to 50 N·m (37 ft. lbs.).
- Install the temperature sensor. Tighten the sensor (4) to 27 N·m (20 ft. lbs.).
- Install the front right wheelhouse splash shield (Refer to 23 - Body/Exterior/SHIELD, Splash - Installation) .
- Lower the vehicle.
- Start the vehicle and inspect for exhaust leaks. Repair any exhaust leaks as necessary.
-
Check the exhaust system
for contact with the body panels. Make adjustments, if necessary.