RADIO
DESCRIPTION
DESCRIPTION
Interaction with the radio features is done through the ISC screen module and switch bank located in the center stack of the instrument panel.
RADIO ANTI-THEFT CODE PROCEDURE The following is for vehicles that are equiped with power net or NTG4 radios. If the TGM or the radio have been removed or replaced, a four digit security code is required in order for the radio to function:
- The key must be in the "RUN" position.
- Press the "ON/VOL" control button.
- The word "CODE" or " Please enter Anti-Theft Code" will appear on the display.
- Enter the 4-digit code by pressing the corresponding preset buttons in sequence.
| NOTE: |
If three consecutive attempts are made to enter an invalid anti-theft code the radio will enter a ‘WAIT’ state. While in this state the radio display will read ‘WAIT’. To exit the ‘WAIT’ state the radio must remain powered with the ignition in the run position for a continuous 30 minutes (the vehicle may be driven during this time). After exiting the ‘WAIT’ state the radio will again display ‘CODE’ and a valid anti-theft code may be entered. |
REMOVAL
REMOVAL
 |
On vehicles equipped with airbags, (refer to electrical/restraints) before attempting any steering wheel, steering column, or instrument panel component diagnosis or service. Failure to take the proper precautions could result in accidental airbag deployment and possible personal injury.
WARNING:
| NOTE: |
For REQ radios, turn ignition to RUN and press the SET + SCAN buttons simultaneously to place the radio into transportation mode. The radio will display "Transportation" on the display within 5 seconds. If the radio is inoperative or not REQ, skip this step. |
- If radio is equipped with an internal hard disk drive (HDD), perform a complete backup of user data, (Refer to 08 - Electrical/8A - Audio and Video - Standard Procedure) .
- Disconnect the battery negative cable.
- Remove the center bezel. (Refer to 23 - Body/Instrument Panel/BEZEL, Instrument Panel - Removal) .
- Remove the radio mounting fasteners.
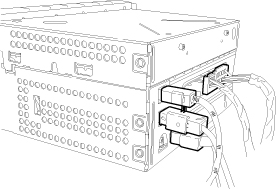
- Pull out the radio and disconnect the electrical and antenna connectors.
-
Remove the radio.
INSTALLATION
INSTALLATION
|
On vehicles equipped with airbags, (refer to electrical/restraints) before attempting any steering wheel, steering column, or instrument panel component diagnosis or service. Failure to take the proper precautions could result in accidental airbag deployment and possible personal injury.
WARNING:
- Connect the electrical and antenna connectors and install the radio.
- Install the radio mounting fasteners.
- Install the center bezel (Refer to 23 - Body/Instrument Panel/BEZEL, Instrument Panel - Installation) .
- Connect the battery negative cable.
- If radio is equipped with an internal hard disk drive (HDD), restore user data from backup, (Refer to 08 - Electrical/8A - Audio and Video - Standard Procedure) .
| NOTE: |
REQ RADIO, After installation of the radio, remove the radio from "Transportation Mode" by pulling the IOD fuse or using the scan tool and perform a battery reset. |