FAN, Cooling
DESCRIPTION
DESCRIPTION
The electric cooling fan replaces the engine driven mechanical fan. The electric cooling fan is integral to the fan shroud and is located between the radiator and the engine.
The electric fan is controlled by the Powertrain Control Module (PCM).
The electric cooling fan is not serviceable. Any failure of the fan blade, electric motor or fan shroud requires replacement of the fan module.
Do not attempt to service the
electric cooling fan or fan blades separately, replace the cooling
module as an assembly. Failure to do so may cause severe damage to
the electric cooling fan assembly.
CAUTION:
GAS
GAS
 |
- Disconnect the negative battery cable.
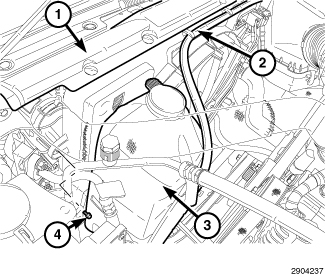
- Remove the overflow bottle supply line (2).
- Remove the coolant overflow container (3) by pulling upwards.
- Remove the air filter lid and position aside.
- Remove the upper cooling fan mounting bolts (4).
-
Remove the upper radiator
seal (1).
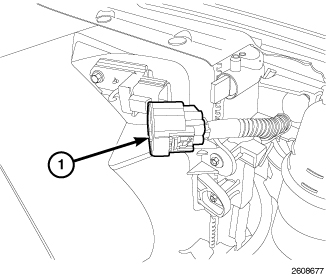
- Disconnect the electric fan jumper harness (1) at the fan shroud.
-
Remove the fan shroud
by pulling upwards and away from the radiator.
DIESEL
DIESEL
 |
- Disconnect the negative battery cable.
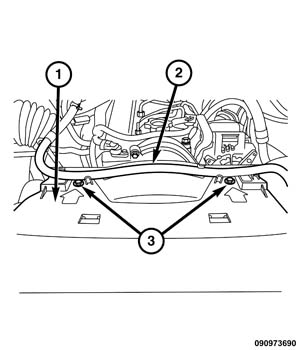
- Remove the radiator overflow hose (2) from fan shroud (1).
- Remove the air cleaner body (Refer to 09 - Engine/Air Intake System/BODY, Air Cleaner/Removal) .
- Remove the upper cooling fan mounting bolts (3).
-
Remove the upper radiator
seal.
- Disconnect the electric fan wire harness connector (1) at the fan shroud.
-
Remove bolts and the
fan shroud by pulling upwards and away from the radiator.
CLEANING
CLEANING
Clean the fan blades using a mild soap and water. Do not use an abrasive to clean the blades.
INSPECTION
INSPECTION
Do not attempt to bend or straighten fan blades if fan is not within specifications.
WARNING:
- Lay fan on a flat surface with leading edge facing down. With tip of blade touching flat surface, replace fan if clearance between opposite blade and surface is greater than 2.0 mm (.090 inch). Rocking motion of opposite blades should not exceed 2.0 mm (.090 inch). Test all blades in this manner.
- Inspect fan assembly for cracks, bends, loose rivets or broken welds. Replace fan if any damage is found.
GAS
GAS
|
- Position fan assembly into the lower support mounts.
- Install the upper fan mounting bolts (4). Tighten the bolts to 4.5 N·m (40 in. lbs.).
-
Install the upper fan
seal.
- Connect the electric fan jumper harness (1) at the fan.
- Install the coolant recovery bottle and the hose.
- Install the air filter lid.
-
Connect the negative
battery cable.
DIESEL
DIESEL
|
- Install the fan assembly into the lower support mounts. Tighten the bolts to 9 N·m (80 in. lbs.).
-
Connect the electric
fan wire harness connector (1) at the fan.
- Install the upper fan seal.
- Install the upper fan mounting bolts (3). Tighten the bolts to 9 N·m (80 in. lbs.).
- Install the air cleaner body (Refer to 09 - Engine/Air Intake System/BODY, Air Cleaner/Installation) .
- Install the coolant recovery bottle hose (2) to fan shroud (1).
-
Connect the negative
battery cable.