ARM, Lower Control
DESCRIPTION
DESCRIPTION
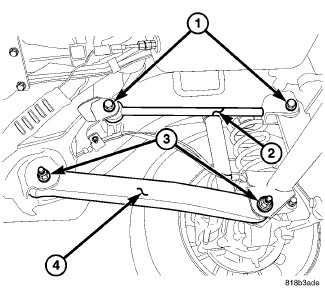
The lower suspension arms are steel and use bushings at both ends of the arm. The arms mount to the frame rail bracket and the axle brackets.
OPERATION
OPERATION
The lower suspension arm bushings provide isolation from the axle. The arm and bushings provide location and react to loads from the axle. The lower suspension arms can be used to adjust caster and pinion angle by installing a cam bolt service package.
REMOVAL
REMOVAL
 |
-
Raise and support the vehicle.
NOTE: If the vehicle is equipped with a cam bolt service kit, paint or scribe marks on the cam adjuster and the suspension arm for installation reference.
- Remove the lower suspension arm nut and cam/bolt (3) from the axle.
-
Remove the nut and bolt (3) from the frame rail bracket and remove the lower suspension arm (4).
INSTALLATION
INSTALLATION
|
-
Position the lower
suspension arm (4) in the axle bracket and frame rail bracket.
NOTE: Position the paint dot located on the control arm toward the axle and facing outboard. If paint dot is not visible, the bend should point inboard, and the short end should attach to the axle side.
NOTE: Frame and axle bolts should be installed outboard to inboard.
- Install the frame bolt and nut (3) finger tighten.
- Install bolt and new nut (3) finger tighten in the axle.
-
Lower the vehicle.
NOTE: If a castor adjustment kit has been installed, there is a different torque specification.
- For original equipment bolt/nut, tighten the axle bracket nut to 159 N·m (117 ft. lbs.). For a castor adjustment kit bolt/nut, tighten the axle bracket nut to 85 N·m (63 ft. lbs.).
- Tighten frame bracket nut to 159 N·m (117 ft. lbs.).
-
Align vehicle to specifications. (Refer to 02 - Front Suspension/Wheel
Alignment - Standard Procedure)
.