RAIL, Fuel
DESCRIPTION
DESCRIPTION
High pressure fuel from the fuel pump is routed to the fuel rail. The fuel injectors are captured between the fuel rail and the lower intake manifold. The fuel rail supplies the necessary fuel to each individual fuel injector.
A quick-connect fitting with a safety latch clip is used to attach the fuel line to the fuel rail.
The fuel rail is not repairable.
The left and right sections of
the fuel rail are connected with either a flexible connecting hose,
or joints. Do not attempt to separate the rail halves at these connecting
hose or joints. Due to the design of the connecting hose or joint,
it does not use any clamps. Never attempt to install a clamping device
of any kind to the hose or joint. When removing the fuel rail assembly
for any reason, be careful not to bend or kink the connecting hose
or joint.
CAUTION:
REMOVAL
REMOVAL
 |
The fuel system is under constant
pressure even with engine off. Before servicing the fuel rail, fuel
system pressure must be released.
WARNING:
- Release fuel system pressure (Refer to 14 - Fuel System/Fuel Delivery - Standard Procedure) .
- Disconnect and isolate the negative battery cable.
-
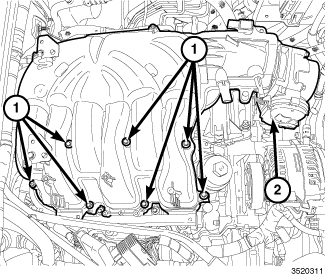
Remove the air cleaner body and upper intake manifold (2) (Refer to 09 - Engine/Manifolds/MANIFOLD, Intake - Removal)
.
-
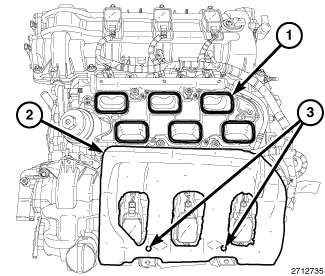
Remove the insulator (2) from the LH cylinder head cover.
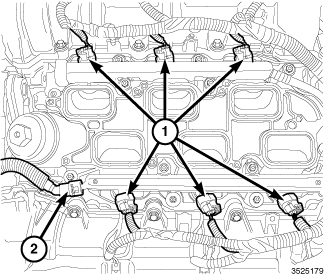
- Disconnect the fuel injector electrical connectors (1).
-
Disconnect the fuel supply hose (2) from the fuel rail (Refer to 14 - Fuel System/Fuel Delivery/FITTING, Quick Connect - Standard Procedure)
.
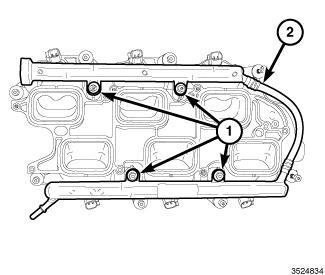
CAUTION: The left and right fuel rails are replaced as an assembly. Do not attempt to separate the rail halves at the connector tube. Due to the design of this tube, it does not use any clamps. Never attempt to install a clamping device of any kind on the tube. When removing the fuel rail assembly for any reason, be careful not to bend or kink the tube.
-
Remove the four bolts (1) from the fuel rail (2).
CAUTION: When removing the fuel rail from the lower intake manifold, one or more fuel injectors may remain in the intake manifold resulting in residual fuel spilling onto the engine from the fuel rail.
-
Lift the fuel rail and the fuel injectors from the lower intake manifold.
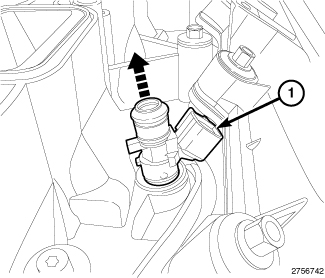
-
Remove any remaining fuel injectors (1) from the lower intake manifold.
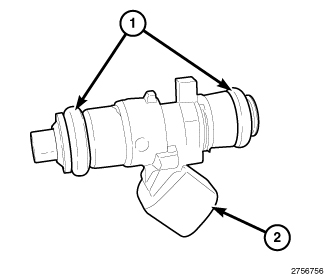
- If required, remove the fuel injectors from the fuel rail (Refer to 14 - Fuel System/Fuel Injection/INJECTOR(S) , Fuel - Removal).
-
Remove and discard all fuel injector O-ring seals (1).
INSTALLATION
INSTALLATION
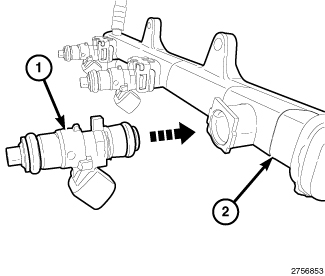 |
-
If removed, install the six fuel injectors to the fuel rail with new O-ring seals (Refer to 14 - Fuel System/Fuel Injection/INJECTOR(S)
, Fuel - Installation).
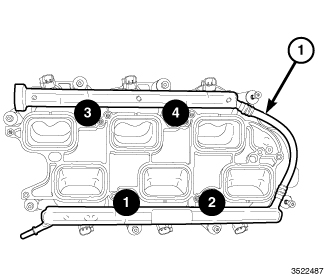
- Clean out the fuel injector bores in the lower intake manifold.
- Apply a small amount of engine oil to each fuel injector O-ring. This will help in fuel rail installation.
-
Install the fuel rail (1) to the lower intake manifold with four bolts tightened in the sequence shown to 7 N·m (62 in. lbs.).
- Connect the fuel injector electrical connectors (1).
-
Connect the fuel supply hose to the fuel rail (2) (Refer to 14 - Fuel System/Fuel Delivery/FITTING, Quick Connect - Standard Procedure)
-
Install the insulator (2) to the two alignment posts (3) on top of the LH cylinder head cover.
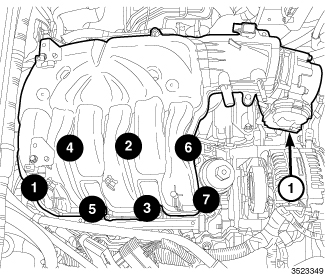
- Install the upper intake manifold (1), support brackets and air cleaner body (Refer to 09 - Engine/Manifolds/MANIFOLD, Intake - Installation)
- Connect the negative battery cable and tighten nut to 5 N·m (45 in. lbs.).
-
Start the engine and check for leaks.