LAMP, Fog, Front
BULB
BULB
Do not contaminate the bulb glass
by touching it with your fingers or by allowing it to contact other
oily surfaces. Shortened bulb life will result.
CAUTION:
 |
- Disconnect and isolate the battery negative cable.
- For export market vehicles, turn the front wheels fully in either direction.
- Raise and support the vehicle.
- For domestic market vehicles equipped with the optional electronic sway bar disconnect feature, service of the right fog lamp bulb will also require removal of the front bumper lower air dam from the vehicle.
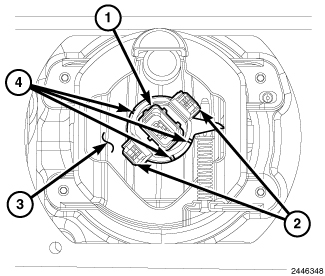
- From behind the front bumper, disconnect the engine compartment wire harness connector from the front fog lamp bulb connector receptacle (1).
- Firmly grasp the bulb by the two latch features (2) and squeeze them together to unlock the bulb from the back of the front fog lamp housing (3).
-
Pull the bulb straight out from the keyed opening in the housing.
LAMP
LAMP
 |
- Disconnect and isolate the battery negative cable.
- For export market vehicles, turn the front wheels fully in either direction.
- Raise and support the vehicle.
- For domestic market vehicles, remove the front bumper lower air dam from the vehicle.
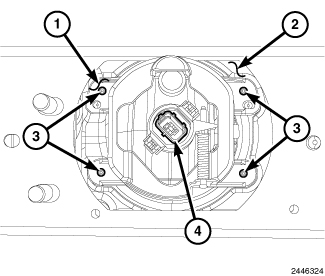
- Disconnect the engine compartment wire harness connector from the front fog lamp bulb connector receptacle (4).
- Remove the four screws (3) that secure the front fog lamp housing (1) to the back of the front bumper cover (2).
-
Remove the lamp from the back of the front bumper cover.
BULB
BULB
Always use the correct bulb size
and type for replacement. An incorrect bulb size or type may overheat
and cause damage to the lamp, the socket or the lamp wiring.
CAUTION:
Do not contaminate the bulb glass
by touching it with your fingers or by allowing it to contact other
oily surfaces. Shortened bulb life will result.
CAUTION:
|
- Reach up behind the front bumper to access and align the index tabs (4) of the front fog lamp bulb with the slots in the collar of the bulb opening on the back of the front fog lamp housing (3).
- Insert the bulb into the housing until the index tabs are engaged in the slots of the collar.
- Firmly and evenly push the bulb straight into the lamp housing until both bulb latch features (2) snap into place and are fully engaged.
- Reconnect the engine compartment wire harness connector to the bulb connector receptacle (1).
- If it was removed during bulb removal, reinstall the front bumper lower air dam onto the vehicle.
- Lower the vehicle.
-
Reconnect the battery negative cable.
LAMP
LAMP
|
- Position the front fog lamp housing (1) to the back of the front bumper cover (2). Be certain that the two alignment pins on the back of the front bumper cover are engaged in the alignment holes in the lamp housing.
- Install and tighten the four screws (3) that secure the lamp to the back of the front bumper cover. Tighten the screws to 2 N·m (18 in. lbs.).
- Reconnect the engine compartment wire harness connector to the fog lamp bulb connector receptacle (4).
- If it was removed during bulb removal, reinstall the front bumper lower air dam onto the vehicle.
- Lower the vehicle.
- Reconnect the battery negative cable.
-
Confirm proper front fog lamp alignment. (Refer to 08 - Electrical/8L - Lamps and Lighting/Lamps/Lighting - Exterior - Standard Procedure)
.