A/C COMPRESSOR - 2.8L ENGINE
A/C COMPRESSOR - 2.8L ENGINE
Refer to the applicable Warnings and Cautions for this system before performing the following operation and . Failure to follow these instructions may result in possible serious or fatal injury.
WARNING:
The A/C receiver/drier must be
replaced if an internal failure of the A/C compressor has occurred .
Failure to replace the A/C receiver drier can cause serious damage
to the replacement A/C compressor.
CAUTION:
| NOTE: |
The A/C compressor may be removed and repositioned without disconnecting the refrigerant lines or discharging the refrigerant system. Discharging is not necessary if servicing the A/C clutch or engine. |
 |
- Disconnect and isolate the negative battery cable.
- Recover the refrigerant from the refrigerant system (Refer to 24 - Heating and Air Conditioning/Plumbing - Standard Procedure) .
- Remove the charge air cooler outlet hose from the throttle body and position the hose out of the way (Refer to 09 - Engine/Turbocharger System/COOLER and HOSES, Charge Air - Removal) .
- Remove the accessory drive belt (Refer to 07 - Cooling/Accessory Drive/BELT, Serpentine - Removal) .
- Remove the generator (Refer to 08 - Electrical/8F - Engine Systems/Charging/GENERATOR - Removal) .
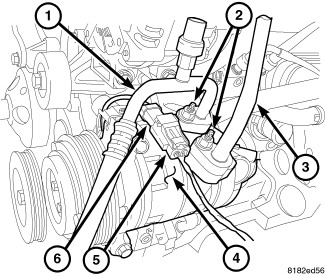
- Remove the nuts (2) that secure the A/C discharge line (1) and A/C suction line (3) to the A/C compressor (4).
- Disconnect the A/C discharge and suction lines from the A/C compressor. Remove and discard the O-ring seals and gaskets.
-
Disconnect the engine wire harness connector (5) from the field coil connector (6).
- Remove the splash shield from the left front fender to gain access to the lower compressor fastener (Refer to 23 - Body/Exterior/SHIELD, Splash - Removal) .
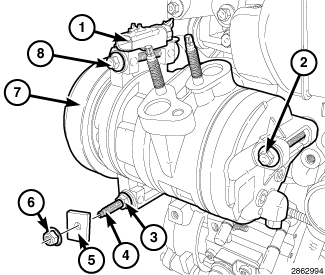
- If equipped, remove the retaining nut (6) and transmission cooler line bracket (5) from the stud (4).
- Support the A/C compressor (7) and remove the nut (3), stud and two bolts (2 and 6).
- Remove the A/C compressor from the engine compartment.
-
Install plugs in, or tape over the open refrigerant line fittings and compressor ports.