A/C COMPRESSOR - 3.6L ENGINE
A/C COMPRESSOR - 3.6L ENGINE
If the A/C compressor is being
replaced, be certain to adjust the refrigerant system oil level .
Failure to properly adjust the refrigerant oil level will prevent
the A/C system from operating as designed and can cause serious A/C
compressor damage.
CAUTION:
The A/C receiver/drier must be
replaced if an internal failure of the A/C compressor has occurred .
Failure to replace the A/C receiver drier can cause serious damage
to the replacement A/C compressor.
CAUTION:
| NOTE: |
When replacing multiple A/C system components, see the Refrigerant Oil Capacities chart to determine how much oil should be removed from the new A/C compressor (Refer to 24 - Heating and Air Conditioning/Plumbing/OIL, Refrigerant - Standard Procedure) . |
| NOTE: |
Replacement of the refrigerant line O-ring seals and gaskets is required anytime a refrigerant line is disconnected. Failure to replace the rubber O-ring seals and metal gaskets may result in a refrigerant system leak. |
 |
-
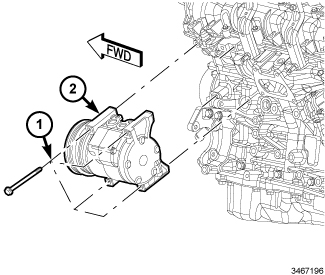
If the A/C compressor (2) is being replaced, the refrigerant oil in the old compressor must be first drained and measured. Then the oil in the new A/C compressor must be drained. Finally, the new compressor must be refilled with the same amount of new refrigerant oil that was drained out of the old compressor (Refer to 24 - Heating and Air Conditioning/Plumbing/OIL, Refrigerant - Standard Procedure)
. When replacing multiple A/C system components, see the Refrigerant Oil Capacities chart to determine how much oil should be added to the refrigerant system (Refer to 24 - Heating and Air Conditioning/Plumbing/OIL, Refrigerant - Standard Procedure)
. Use only refrigerant oil of the type recommended for the A/C compressor in the vehicle.
NOTE: The two rear retaining bolts must be installed onto the A/C compressor prior to positioning the compressor onto the engine.
- Position the A/C compressor onto the engine and loosely install the four bolts (1).
- Tighten each of the bolts to 28 N·m (21 ft. lbs.) using the following sequence:
-
Install the accessory drive belt (Refer to 07 - Cooling/Accessory Drive/BELT, Serpentine - Installation)
.
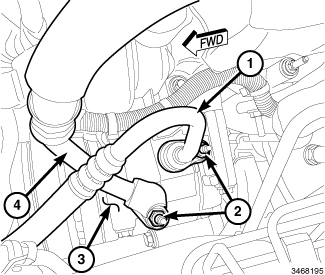
- Connect the engine wire harness to the A/C clutch coil connector.
- Remove the plugs or tape from the opened refrigerant line fittings and compressor ports.
- Lubricate new rubber O-ring seals with clean refrigerant oil and install them and new gaskets onto the refrigerant line fittings. Use only the specified O-rings as they are made of a special material for the R-134a system. Use only refrigerant oil of the type recommended for the A/C compressor in the vehicle.
- Connect the A/C discharge line (1) and the A/C suction line (4) to the A/C compressor (3).
-
Install the nuts (2) that secure the A/C refrigerant lines to the A/C compressor. Tighten the nuts to 23 N·m (17 ft. lbs.).
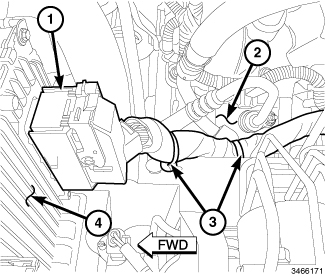
- Connect the wire harness connector (1) to the Powertrain Control Module (PCM) (4) and engage the connector lock.
- Engage the wire harness brackets (3) to the frame rail and to the stud on the A/C compressor (2).
- Install the coolant recovery container (Refer to 07 - Cooling/Engine/BOTTLE, Coolant Recovery - Installation) .
- Reconnect the negative battery cable.
-
Evacuate and charge the refrigerant system (Refer to 24 - Heating and Air Conditioning/Plumbing - Standard Procedure)
.