MOTOR, Window Regulator
REMOVAL
REMOVAL
 |
- Partially raise or lower the door glass to relieve tension on motor and cables. Secure the glass as necessary.
- Disconnect and isolate the negative battery cable.
-
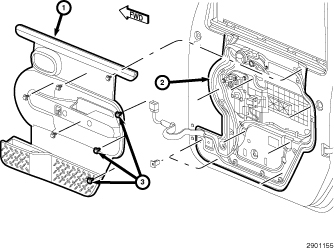
Remove the door interior trim panel (1), (Refer to 23 - Body/Door - Front/PANEL, Door Trim - Removal)
or (Refer to 23 - Body/Doors - Rear/PANEL, Rear Door Trim - Removal)
for the appropriate procedure.
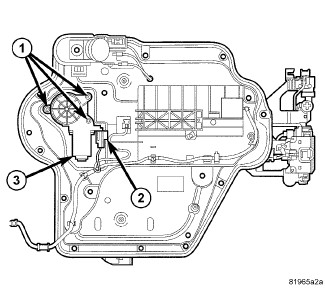
- Disconnect the power window motor electrical connector (2) from the motor electrical connector receptacle.
-
Remove the three fasteners (1) that secure the power window motor and gear assembly (3) to the carrier plate.
-
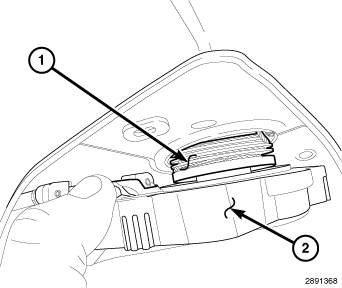
Using a flat bladed tool, lightly pry the cable drive (1) away from the motor (2) and remove the motor and gear assembly.
INSTALLATION
INSTALLATION
| NOTE: |
The power window motor may need to actuated momentarily to line up the gear in the drive assembly with the regulator. |
|
- Connect the power window motor electrical connector (2) to the motor electrical connector receptacle.
- Position the power window motor and gear assembly (3) on the carrier plate aligning the drive gear with the regulator.
- If necessary, temporarily connect the battery to actuate the motor.
-
Install and tighten the three fasteners (1) that secure the power window motor and gear assembly to the carrier plate.
- Reinstall the door interior trim panel (2), (Refer to 23 - Body/Door - Front/PANEL, Door Trim - Installation) or (Refer to 23 - Body/Doors - Rear/PANEL, Rear Door Trim - Installation) for the appropriate procedure.
-
Connect the negative battery cable.