STARTER
- DIAGNOSIS AND TESTING - STARTER MOTOR
- 3.6L
- 2.8L DIESEL (AUTO TRANS)
- 2.8L DIESEL (MANUAL TRANS)
- 3.6L
- 2.8L DIESEL (AUTO TRANS)
- 2.8L DIESEL (MANUAL TRANS)
DIAGNOSIS AND TESTING - STARTER MOTOR
DIAGNOSIS AND TESTING - STARTER MOTOR
| NOTE: |
This test can only be performed with starter motor removed from vehicle. |
Correct starter motor operation can be confirmed by performing the following free running bench test. Refer to Specifications for starter motor specifications.
- Remove starter motor from vehicle. Refer to Starter Motor Removal and Installation.
- Mount starter motor securely in a soft-jawed bench vise. The vise jaws should be clamped on the mounting flange of starter motor. Never clamp on starter motor by field frame.
- Connect a suitable volt-ampere tester and a 12-volt battery to starter motor in series, and set ammeter to 100 ampere scale. See instructions provided by manufacturer of volt-ampere tester being used.
- Install jumper wire from solenoid terminal to solenoid battery terminal. The starter motor should operate. If starter motor fails to operate, replace faulty starter motor assembly.
- Adjust carbon pile load of tester to obtain free running test voltage. Refer to Specifications for starter motor free running test voltage specifications.
- Note reading on ammeter and compare reading to free running test maximum amperage draw. Refer to Specifications for starter motor free running test maximum amperage draw specifications.
- If ammeter reading exceeds maximum amperage draw specification, replace faulty starter motor assembly.
STARTER SOLENOID
| NOTE: |
Certain vehicles with certain engines may require starter motor removal for the following test. |
 |
- If necessary, remove starter motor from vehicle. Refer to Starter Motor Removal and Installation.
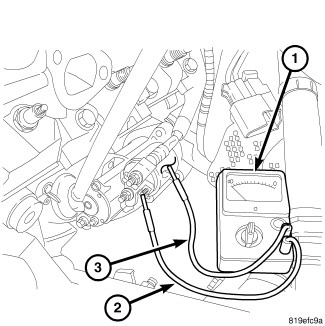
- Disconnect solenoid connector wiring from starter motor.
-
Check for continuity between solenoid terminal (2) and solenoid case (3). There should be continuity. If not OK, replace faulty starter motor assembly.
3.6L
3.6L
 |
- Disconnect and isolate the negative battery cable.
- Raise and support the vehicle (Refer to 04 - Vehicle Quick Reference/Hoisting - Standard Procedure) .
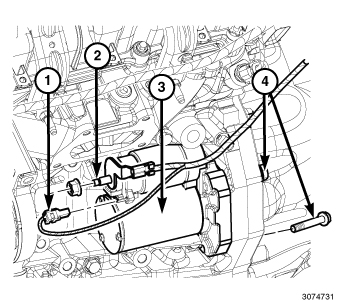
- Disconnect the starter solenoid electrical connector (1) from the starter solenoid terminal.
- Remove the battery cable nut and battery cable from the solenoid stud (2).
- Remove the starter mounting bolts (4).
-
Remove the starter assembly (3) from the transmission.
2.8L DIESEL (AUTO TRANS)
2.8L DIESEL (AUTO TRANS)
 |
- Disconnect and isolate negative battery cable.
-
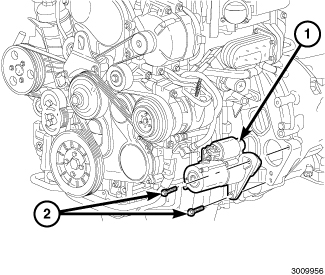
While supporting the starter motor (1), remove the two bolts (2) securing the starter motor to the transmission.
NOTE: Always support starter motor during this process. Do not let starter motor hang from wire harness.
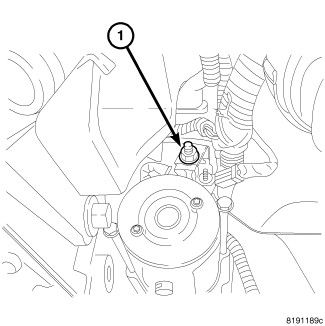
- Remove the B+ cable retainer (1) and remove the B+ cable.
- Disconnect the solenoid terminal connector from starter solenoid.
-
Remove the starter motor.
2.8L DIESEL (MANUAL TRANS)
2.8L DIESEL (MANUAL TRANS)
 |
- Disconnect and isolate negative battery cable.
- Raise and support vehicle.
-
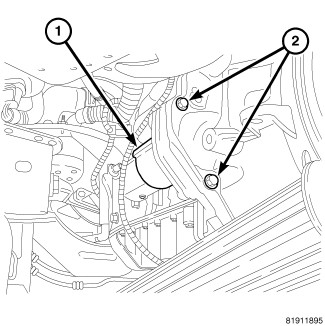
While supporting starter motor (1), remove two bolts (2) securing starter motor to transmission.
- Lower starter motor far enough to access and remove nut (1) securing battery cable to starter solenoid B(+) terminal stud. Always support starter motor during this process. Do not let starter motor hang from wire harness.
- Remove battery cable at starter.
- Disconnect solenoid terminal wire harness connector from starter solenoid.
-
Remove starter motor.
3.6L
3.6L
|
- Position the starter (3) inside the transmission.
- Install the starter mounting bolts (4) and tighten to 55 N·m (41 ft. lbs.).
- Connect the starter solenoid electrical connector (1) to starter solenoid terminal.
- Install the battery cable and nut to the solenoid stud (2). Tighten the nut to 11 N·m (97 in. lbs.).
-
Connect the negative battery cable and tighten nut to 5 N·m (4.5 in. lbs.).
2.8L DIESEL (AUTO TRANS)
2.8L DIESEL (AUTO TRANS)
|
| NOTE: |
Always support starter motor during this process. Do not let starter motor hang from wire harness. |
- Install the B+ cable and install the B+ cable retainer (1).
- Install the solenoid terminal connector to the starter solenoid.
-
Install the starter motor.
- While supporting the starter motor (1), install the two bolts (2) securing the starter motor to the transmission.
-
Connect the negative battery cable.
2.8L DIESEL (MANUAL TRANS)
2.8L DIESEL (MANUAL TRANS)
|
- Connect solenoid terminal wire harness connector to starter solenoid. Always support starter motor during this process. Do not let starter motor hang from wire harness.
-
Install battery cable eyelet onto starter solenoid stud. Install and tighten nut (1). Refer to Torque Specifications.
- Position starter motor to transmission. Install and tighten two mounting bolts (2). Refer to Torque Specifications.
- Lower vehicle.
-
Connect negative battery cable.