P2308-IGNITION COIL 3 SECONDARY CIRCUIT - INSUFFICIENT IONIZATION
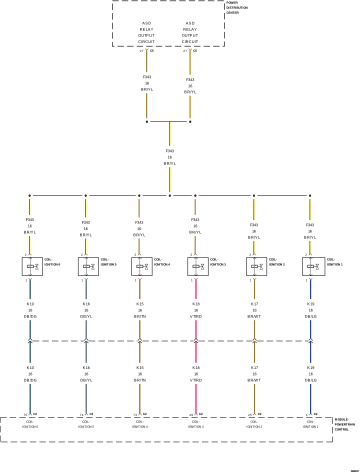 |
For a complete wiring diagram, refer to the Wiring Information.
-
When Monitored:
Engine running and battery voltage greater than 10.0 Volts.
-
Set Condition:
If the Powertrain Control Module (PCM) detects that the secondary ignition burn time is incorrect, too short, or not present, an error is detected. One Trip Fault. Three good trips to turn off the MIL.
Possible Causes |
|---|
| (F344) ASD RELAY OUTPUT CIRCUIT |
| (K18) COIL CONTROL NO.3 CIRCUIT OPEN |
| (K18) COIL CONTROL NO.3 CIRCUIT SHORTED TO GROUND |
| COIL ON PLUG |
| POWERTRAIN CONTROL MODULE (PCM) |
Always perform the Pre-Diagnostic Troubleshooting procedure before proceeding. (Refer to 28 - DTC-Based Diagnostics/MODULE, Powertrain Control (PCM) - Standard Procedure).
| NOTE: | Diagnose any ASD related DTCs before continuing. |
| 1. | Start the engine. |
| 2. | With a scan tool, select View DTCs. |
| NOTE: | It may be necessary to drive the vehicle to meet the conditions to set this DTC, try to repeat the conditions in which the fault originally set by reviewing the Freeze Frame data. |
Is the DTC Active at this time?
Yes
- Go To 2
No
- Perform the INTERMITTENT CONDITION diagnostic procedure. (Refer to 28 - DTC-Based Diagnostics/MODULE, Powertrain Control (PCM) - Standard Procedure).
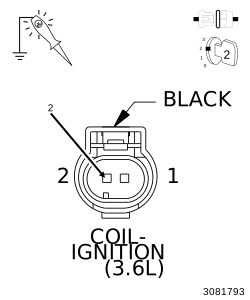
2. (F344) ASD RELAY OUTPUT CIRCUIT
 |
| 1. | Turn the ignition off. |
| 2. | Disconnect the Coil on Plug harness connector. |
| 3. | Ignition on, engine not running. |
| 4. | With a scan tool, actuate the ASD Relay. |
| 5. | Using a 12-Volt test light connected to ground, probe the (F344) ASD Relay Output circuit in the Coil on Plug harness connector. |
Does the test light illuminate brightly?
Yes
- Go To 3
No
- Repair the open or short to ground in the (F344) ASD Relay Output circuit between the IPM and Coil harness connector.
-
Perform the POWERTRAIN VERIFICATION TEST. (Refer to 28 - DTC-Based Diagnostics/MODULE, Powertrain Control (PCM)
- Standard Procedure).
NOTE: Stop All Actuations.
 |
When the engine is operating, do
not stand in direct line with the fan. Do not put your hands near
the pulleys, belts or fan. Do not wear loose clothing. Failure to
follow these instructions may result in possible serious or fatal
injury.
WARNING:
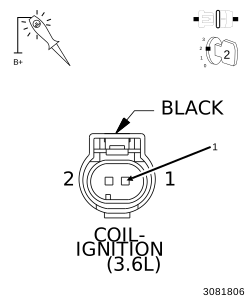
| 1. | Using a 12-Volt test light connected to a 12 Volt source, probe the (K18) Coil Control No.3 circuit. |
| 2. | Crank the engine for 5.0 seconds while observing the test light. |
What is the condition of the test light while cranking the engine?
Brightly blinking.
- Go To 4
ON constantly.
- Go To 5
OFF constantly.
-
Go To 6
| 1. | Turn the ignition off. |
| 2. | Remove the Spark Plug(s) in accordance with the Service Information. |
| 3. | Inspect the Spark Plug(s) for the following conditions: |
| NOTE: | Lightly tap the bottom of the spark plug on a solid surface. The electrode in the spark plug should not move. |
Were any of the above conditions present?
Yes
-
Replace the Spark Plug in accordance with the Service Information.
NOTE: If carbon tracking is found on the Spark Plug, inspect the boot on the Coil On Plug assembly for signs of damage and replace if necessary. - Perform the POWERTRAIN VERIFICATION TEST. (Refer to 28 - DTC-Based Diagnostics/MODULE, Powertrain Control (PCM) - Standard Procedure).
No
- Replace the Coil On Plug and Spark Plug in accordance with the Service Information.
- Perform the POWERTRAIN VERIFICATION TEST. (Refer to 28 - DTC-Based Diagnostics/MODULE, Powertrain Control (PCM) - Standard Procedure).
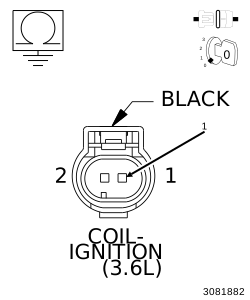
5. (K18) COIL CONTROL NO.3 CIRCUIT SHORTED TO GROUND
 |
| 1. | Turn the ignition off. |
| 2. | Disconnect the PCM C2 harness connector. |
| 3. | Measure the resistance between ground and the (K18) Coil Control No.3 circuit in the Coil on Plug harness connector. |
Is the resistance below 100 Ohms?
Yes
- Repair the short to ground in the (K18) Coil Control No.3 circuit.
- Perform the POWERTRAIN VERIFICATION TEST. (Refer to 28 - DTC-Based Diagnostics/MODULE, Powertrain Control (PCM) - Standard Procedure).
No
-
Go To 7
6. (K18) COIL CONTROL NO.3 CIRCUIT OPEN
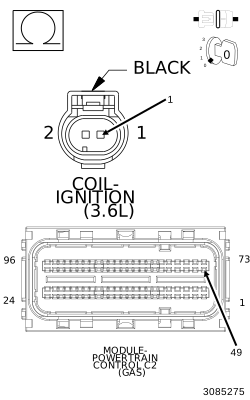 |
| 1. | Turn the ignition off. |
| 2. | Disconnect the PCM C2 harness connector. |
| 3. | Measure the resistance of the (K18) Coil Control No.3 circuit from the Coil on Plug harness connector to the PCM C2 harness connector. |
Is the resistance below 5.0 Ohms?
Yes
- Go To 7
No
- Repair the open in the (K18) Coil Control No.3 circuit.
-
Perform the POWERTRAIN VERIFICATION TEST. (Refer to 28 - DTC-Based Diagnostics/MODULE, Powertrain Control (PCM)
- Standard Procedure).
7. POWERTRAIN CONTROL MODULE (PCM)
| 1. | Using the wiring diagram/schematic as a guide, inspect the wiring and connectors between the Ignition Coil and the Powertrain Control Module (PCM). |
| 2. | Look for any chafed, pierced, pinched, or partially broken wires. |
| 3. | Look for broken, bent, pushed out or corroded terminals. Verify that there is good pin to terminal contact in the Ignition Coil and the Powertrain Control Module connectors. |
| 4. | Perform any Technical Service Bulletins that may apply. |
Were there any problems found?
Yes
- Repair as necessary.
- Perform the POWERTRAIN VERIFICATION TEST. (Refer to 28 - DTC-Based Diagnostics/MODULE, Powertrain Control (PCM) - Standard Procedure).
No
- Replace and program the Powertrain Control Module (PCM) in accordance with the Service Information. (Refer to 08 - Electrical/8E - Electronic Control Modules/MODULE, Powertrain Control - Removal) .
- Perform the POWERTRAIN VERIFICATION TEST. (Refer to 28 - DTC-Based Diagnostics/MODULE, Powertrain Control (PCM) - Standard Procedure).