WIRING HARNESS TESTING
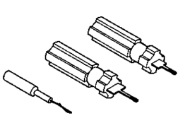
TROUBLESHOOTING TOOLS
When diagnosing a problem in an electrical circuit there are several common tools necessary. These tools are listed and explained below:
Voltmeter
The voltmeter is used to measure the electrical pressure or the voltage difference between two points. A voltmeter reads available voltages such as battery voltage, generator output voltage, and voltage drop across a component or conductor. A high voltage drop may indicate a high resistance in the circuit. The voltmeter can be used to locate an open circuit and circuits with an unintentional ground. Observing polarity, always connect a voltmeter in parallel to the existing circuit. If the leads are reversed on a digital multimeter, a minus sign appears in the display.
Most of the electrical components
used in today's vehicles are Solid State. When checking voltages in
these circuits, use a meter with a 10 - megohm or greater impedance
rating.
CAUTION:
Ohmmeter
The ohmmeter is used to measure the resistance of a component or the resistance between two points in a circuit in ohms, and to check a portion of the circuit for continuity. Some meters have a built-in tone to indicate that the circuit has continuity. No resistance indicates a short circuit or unintentional ground whereas resistance that is higher than specification indicates a high resistance in the circuit such as a loose, dirty or corroded connection, or a defective component. An “OL” reading means that the circuit or component had infinite resistance; an open circuit or defective component is indicated. Ohmmeters have an internal battery and must never be connected to a power circuit. Connecting an ohmmeter to a powered circuit causes the meter fuse to blow and can damage its dry cell battery. Ohmmeters can be connected into a circuit without regard to polarity, unless the circuit contains a diode. When using an ohmmeter, the component or portion of the circuit must be isolated from other components or branches to avoid false readings.
Most of the electrical components
used in today's vehicles are Solid State. When checking resistance
in these circuits use a meter with a 10 - megohm or greater impedance
rating. In addition, make sure the power is disconnected from the
circuit. Circuits that are powered up by the vehicle's electrical
system can cause damage to the equipment and provide false readings.
CAUTION:
Ammeter
Amperage or current is the measure of the rate of electron "flow" in a circuit. It is measured in the unit of the Ampere, simply called an Amp (A). In order to measure current in a circuit, the circuit must be broken or opened, and an ammeter must be inserted in series (in-line) with the circuit so that all the current that flows through the circuit will have to go through the meter. When measuring current in this manner, it requires the meter be made part of the circuit, this type of measurement is more difficult than measuring either voltage or resistance.
When an ammeter is placed in series with a circuit, it ideally drops no voltage as current goes through it. In other words, it acts very much like a piece of wire, with very little resistance from one test probe to the other. Consequently, an ammeter will act as a short circuit if placed in parallel (across the terminals of) a substantial source of voltage. If this is done, a surge in current will result, potentially damaging the meter. Ammeters are generally protected from excessive current by means of a small fuse located inside the meter housing. If the ammeter is accidently connected across a substantial voltage source, the resultant surge in current will "blow" the fuse and render the meter incapable of measuring current until the fuse is replaced.
Consult the owner's manual of the particular model of meter you own for details on measuring current.
Do not crank the engine or turn
on any accessories that may draw more than 10 Amps. You may open the
protective fuse in the multimeter.
CAUTION:
12-Volt Test Light
The 12-Volt test light when properly used, is one of the best and quickest pieces of test equipment available for troubleshooting 12-volt power systems. It's especially good for times when there are only two voltages, battery voltage and no voltage. For example, if you're checking to see if you have 12-volts on the Battery(+), the test light will immediately tell you if voltage is present or not.
With any test equipment, you should confirm that it's in good working order before you begin testing. For a test light, you have to have a voltage source. Connect the test light's ground clip to a good ground and touch it to a point where you believe that there is 12-volt supply. If the light doesn't light up, check the light by connecting it directly across the battery. Initially, make sure that you have the ground clip on the negative battery terminal. If you touch the probe to the positive terminal, the test light should light up. If it doesn't and the battery is not completely dead, the test light isn't working properly. The test light must be in proper working order before any circuit testing can occur.
Jumper Wire
The sole purpose of the jumper wire is to complete a circuit. It is nothing more than a suitable length of insulated wire with terminals or connectors on each end. Jumper wires may be bought or made with various sizes of wire and styles of terminals including alligator clips, spade lugs and pin plugs, and should include a fuse device of some type for circuit and component protection. A jumper wire is used to verify a faulty conductor by substituting a known good one. It is jumped across a suspicious conductor in the circuit. If the circuit works with the jumper, but not without, there is an open somewhere in the area being jumped. A jumper wire is ONLY used to bypass a faulty conductor (including switches and connectors). NEVER bypass a load device with a jumper wire. The circuit needs the resistance from the load device and shorting across it causes high current flow, which could damage other components.
Never use a jumper wire across
a load, such as a motor, connected between a battery feed and ground.
WARNING:
 |
Probing Tools
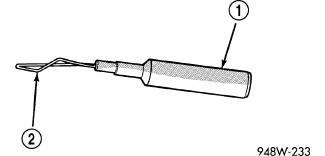
These tools are used for probing terminals in connectors. Select
the proper size tool from Special Tool Package 6807 , and insert the probing end (2) into the terminal being tested.
Use the other end of the tool (1) to insert the meter probe.
INTERMITTENT AND POOR CONNECTIONS
Most intermittent electrical problems are caused by faulty electrical connections or wiring. It is also possible for a sticking component or relay to cause a problem.
Before condemning a component or wiring assembly, check the following items:
- Terminals in the wiring assembly are fully seated into the connector/component and locked into position
- Dirt or corrosion on the terminals. Any amount of corrosion or dirt could cause an intermittent problem
TROUBLESHOOTING WIRING PROBLEMS
When troubleshooting wiring problems there are six steps which can aid in the procedure. The steps are listed and explained below. Always check for non-factory items added to the vehicle before doing any diagnosis. If the vehicle is equipped with these items, disconnect them to verify these add-on items are not the cause of the problem.
Perform the following Six Step Diagnosis Process:
- Verify the problem.
- Verify any related symptoms. Do this by performing operational checks on components that are in the same circuit (Refer to the wiring diagrams).
- Analyze the symptoms. Use the wiring diagrams to determine what the circuit is doing, where the problem most likely is occurring and where the diagnosis will continue.
- Isolate the problem area.
- Repair the problem area.
- Verify the proper operation. For this step, check for proper operation of all items on the repaired circuit (Refer to the wiring diagrams).
| NOTE: |
The Six Step Diagnosis Process used by Chrysler is a time proven process. The basic concepts of this process have been used by others for problem solving for many years. The successful application of this process requires a solid understanding of the conditions that affect each step, and when its time to advance to the next step. These conditions based on experience formulate what is known as “Best Practices”. |