SENSOR, Knock
DESCRIPTION
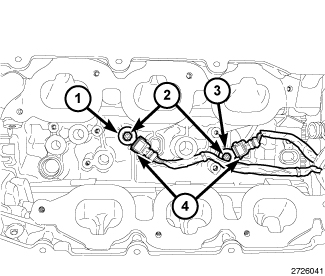 |
| NOTE: |
The forward knock sensor (1) is known to the Powertrain Control Module (PCM) as Knock Sensor 1. The rear knock sensor (3) is known to the PCM as Knock Sensor 2. |
The 3.6L engine uses two knock sensors (1,3) and are bolted to the cylinder block under the intake manifold.
OPERATION
When the knock sensor detects a knock in one of the cylinders on the corresponding bank, it sends an input signal to the Powertrain Control Module (PCM). In response, the PCM retards ignition timing for all cylinders by a scheduled amount.
Knock sensors contain a piezoelectric crystal which constantly vibrates and sends an input voltage (signal) to the PCM while the engine operates. As the intensity of the crystal's vibration increases, the knock sensor output voltage also increases.
The voltage signal produced by the knock sensor increases with the amplitude of vibration. The PCM receives the knock sensor voltage signal as an input. If the signal rises above a predetermined level, the PCM will store that value in memory and retard ignition timing to reduce engine knock. If the knock sensor voltage exceeds a preset value, the PCM retards ignition timing for all cylinders. It is not a selective cylinder retard.
The PCM ignores knock sensor input during engine idle conditions. Once the engine speed exceeds a specified value, knock retard is allowed.
Knock retard uses its own short term and long term memory program.
Long term memory stores previous detonation information in its battery-backed RAM. The maximum authority that long term memory has over timing retard can be calibrated.
Short term memory is allowed to retard timing up to a preset amount under all operating conditions (as long as rpm is above the minimum rpm) except at Wide Open Throttle (WOT). The PCM, using short term memory, can respond quickly to retard timing when engine knock is detected. Short term memory is lost any time the ignition key is turned off.
| NOTE: |
Over or under tightening the sensor mounting bolts will affect knock sensor performance, possibly causing improper spark control. Always use the specified torque when installing the knock sensors. |
REMOVAL
|
| NOTE: |
The forward sensor (1) is known to the powertrain control module (PCM) as knock sensor 1. The rear sensor (3) is known to the PCM as knock sensor 2. |
- Perform the fuel pressure release procedure (Refer to 14 - Fuel System/Fuel Delivery - Standard Procedure) .
- Disconnect and isolate the negative battery cable.
- Drain the cooling system (Refer to 07 - Cooling - Standard Procedure) .
- Remove the air cleaner housing assembly, upper and lower intake manifolds and the oil filter housing (Refer to 09 - Engine/Lubrication/HOUSING, Oil Filter - Removal)
-
Remove the electrical connector (4).
NOTE: There may be a foam strip on the bolt threads. This foam is used only to retain the bolts to the sensors for plant assembly. It is not used as a sealant. Do not apply any adhesive, sealant or thread locking compound to these bolts.
-
Remove the mounting bolt (2) and knock sensor 1 (1) or knock sensor 2 (3).
INSTALLATION
|
| NOTE: |
The forward sensor (1) is known to the powertrain control module (PCM) as knock sensor 1. The rear sensor (3) is known to the PCM as knock sensor 2. |
-
Thoroughly clean the knock sensor mounting holes.
NOTE: Over or under tightening the sensor mounting bolts will affect knock sensor performance, possibly causing improper spark control. Always use the specified torque when installing the knock sensors. The torque specification for the knock sensor bolt is less than the typical 8 mm bolt.
NOTE: There may be a foam strip on the bolt threads. This foam is used only to retain the bolts to the sensors for plant assembly. It is not used as a sealant. Do not apply any adhesive, sealant or thread locking compound to these bolts.
- Install knock sensor 1 (1) or knock sensor 2 (3) with mounting bolt (2). Tighten the mounting bolt to 22 N·m (16 ft. lbs.).
- Connect the electrical connector (4).
- Install the oil filter housing, upper and lower intake manifolds and air cleaner housing assembly (Refer to 09 - Engine/Lubrication/HOUSING, Oil Filter - Installation)
- If removed, install the oil filter and fill the engine crankcase with the proper oil to the correct level (Refer to 09 - Engine/Lubrication/OIL - Standard Procedure)
- Connect the negative battery cable and tighten nut to 5 N·m (45 in. lbs.).
- Fill the cooling system (Refer to 07 - Cooling - Standard Procedure) .
-
Operate the engine until it reaches normal operating temperature. Check cooling system for correct fluid level (Refer to 07 - Cooling - Standard Procedure)