SWITCH, EVIC Control
DESCRIPTION
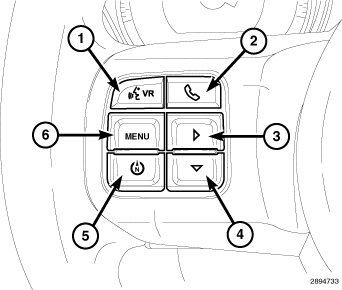 With Electronic Vehicle Information Center |
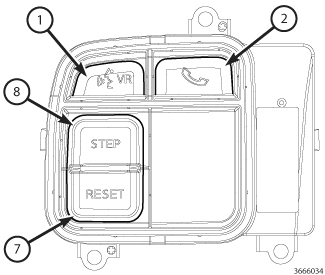 Without Electronic Vehicle Information Center |
The Electronic Vehicle Information Center (EVIC) control switch pod is located in the left spoke of the steering wheel spoke bezel. This switch has up to six push buttons. Four of the push buttons (3 through 6) are used on all vehicles equipped with the EVIC and two of the push buttons (7 and 8) are used on vehicles not equipped with the EVIC. Two additional push buttons (1 and 2) are found on vehicles equipped with the optional Uconnect™ Hands-Free Communication System. The only visible components of the switch pod are the switch push buttons and a decorative bezel around the push buttons, which stands slightly proud of the steering wheel spoke bezel. The remainder of the switch pod including its mounting provisions and its electrical connection are concealed beneath the spoke bezel.
The switch pod housing and push buttons are constructed of molded plastic. Each of the push buttons has white International Control and Display Symbol graphics or text applied to it, which clearly identify the function of each push button. The switch pod is secured through three integral mounting tabs to mounting bosses on the back of the spoke bezel by three screws. A connector receptacle integral to the inboard end of the switch pod housing connects the EVIC control switch pod to the vehicle electrical system through a dedicated take out and connector of the steering wheel wire harness.
The EVIC control switch pod cannot be adjusted or repaired. If any function of the switch is ineffective or damaged, the entire switch pod unit must be replaced.
OPERATION
The Electronic Vehicle Information Center (EVIC) control switch pod is a resistor multiplexed unit that receives source current from and provides hard wired inputs to the Local Interface Network (LIN) slave node integral to the speed control switch pod in the right spoke of the steering wheel spoke bezel. The LIN slave node communicates the switch states of the EVIC control switch pod, the remote radio switches and the horn switch over the LIN data bus to the ElectroMechanical Instrument Cluster (EMIC) (also known as the Cab Compartment Node/CCN), which is the LIN master node.
The EVIC control switch pod (also known as the odometer switch) for vehicles not equipped with the EVIC system contains two switch push buttons whose functions are:
- Reset - This switch button allows the operator to reset the trip odometer (A or B) currently displayed in the odometer display unit of the instrument cluster.
- Step - This switch button allows the operator to step through the total odometer, trip odometer A and trip odometer B display options of the odometer display of the instrument cluster.
The EVIC control switch pod for vehicles equipped with the EVIC system contains four switch push buttons whose functions are:
- Menu - This switch button allows the operator to view the available EVIC menu items, including Compass/Temperature, Trip Computer, Navigation (if equipped), Personal Settings (also known as customer programmable features) or System Status.
- Select / Reset - This switch button allows the operator to select or reset the feature or function currently displayed in the EVIC.
- Compass - This switch button provides instant access to the compass/temperature EVIC display mode from any other mode.
- Step / Scroll Down - This switch button allows the operator to step or scroll down through options or features of the Trip Computer, Personal Settings or System Status functions.
For vehicles equipped with the Uconnect™ Hands-Free Communication System, the EVIC control switch pod contains two additional switch push buttons whose functions are:
- VR (Voice Recognition) - This switch button activates the Uconnect™ Voice Command system.
- Phone - This switch push button activates the Uconnect™ Hands-Free Phone system.
The EMIC LIN master node provides a clean ground and fused B(+) current for all of the switches and sensors on the rotating steering wheel through the LIN slave node circuitry of the speed control switch pod as well as for the Light Emitting Diode (LED) back lighting of both the speed control and the EVIC switch pods. The EMIC continually monitors the LIN bus data and will store a Signal Not Available (SNA) code for any LIN bus input errors. The EMIC also communicates with other electronic modules over the Controller Area Network (CAN) data bus. Therefore, any EMIC DTC information can be retrieved using a diagnostic scan tool connected to the Data Link Connector (DLC).
The analog resistor multiplexed circuits of the EVIC control switch pod as well as the hard wired circuits between the switch pod and the LIN slave node within the speed control switch pod may be diagnosed using conventional diagnostic tools and procedures. Refer to the appropriate wiring information. The wiring information includes wiring diagrams, proper wire and connector repair procedures, details of wire harness routing and retention, connector pin-out information and location views for the various wire harness connectors, splices and grounds.
However, conventional diagnostic methods will not prove conclusive in the diagnosis of the LIN slave or master nodes, the EMIC or the electronic controls and communication between modules and other devices that provide some features of the EVIC system. The most reliable, efficient, and accurate means to diagnose the EVIC control switch pod, the LIN slave or master nodes, the EMIC or the electronic controls and communication related to EVIC system operation requires the use of a diagnostic scan tool. Refer to the appropriate diagnostic information.
REMOVAL
To avoid serious or fatal injury
on vehicles equipped with airbags, disable the Supplemental Restraint
System (SRS) before attempting any steering wheel, steering column,
airbag, seat belt tensioner, impact sensor or instrument panel component
diagnosis or service. Disconnect and isolate the battery negative
(ground) cable, then wait two minutes for the system capacitor to
discharge before performing further diagnosis or service. This is
the only sure way to disable the SRS. Failure to take the proper precautions
could result in accidental airbag deployment.
WARNING:
 |
- Disconnect and isolate the battery negative cable.
- Remove the driver airbag assembly from the steering wheel, (Refer to 10 - Restraints/AIR BAG, Driver - Removal) .
-
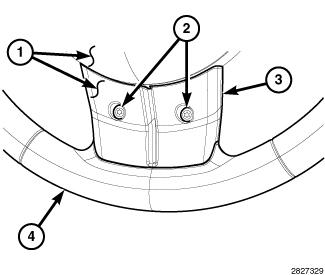
From the back of the steering wheel (4), remove the two screws (2) that secure the center spoke of the rear cover (1) to the center spoke of the steering wheel spoke front bezel (3).
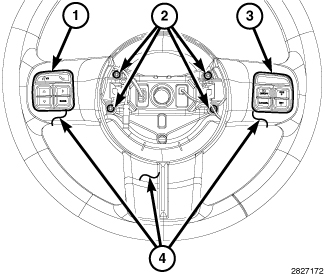
- From the face of the steering wheel, remove the four screws (2) that secure the front spoke bezel (4) to the steering wheel armature within the steering wheel hub cavity.
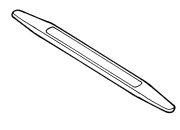
- Using a trim stick (special tool # C-4755 ) or equivalent, carefully pry at the parting line between the front spoke bezel and the steering wheel rear cover enough to unsnap the two horizontal members of the bezel from those of the rear cover.
-
Pull the front spoke bezel away from the steering wheel far enough to access and disconnect the steering wheel wire harness connections from the Electronic Vehicle Information Center (EVIC) switch pod (1) and the speed control switch pod (3).
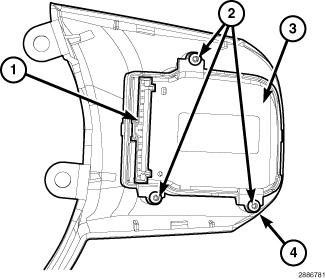
- From the back of the steering wheel spoke front bezel (4), remove the three screws (2) that secure the EVIC switch pod (3) mounting tabs to the bezel.
-
Remove the switch from the bezel.
INSTALLATION
To avoid serious or fatal injury
on vehicles equipped with airbags, disable the Supplemental Restraint
System (SRS) before attempting any steering wheel, steering column,
airbag, seat belt tensioner, impact sensor or instrument panel component
diagnosis or service. Disconnect and isolate the battery negative
(ground) cable, then wait two minutes for the system capacitor to
discharge before performing further diagnosis or service. This is
the only sure way to disable the SRS. Failure to take the proper precautions
could result in accidental airbag deployment.
WARNING:
|
- Position the Electronic Vehicle Information center (EVIC) switch pod (3) to the back of the steering wheel spoke front bezel (4).
- Install and tighten the three screws (2) that secure the switch mounting tabs to the bezel. Tighten the screws securely.
-
Position the front spoke bezel close enough to the steering wheel to reconnect the steering wheel wire harness connections to the Electronic Vehicle Information Center (EVIC) switch pod and the speed control switch pod connector receptacles (3).
- Position the front spoke bezel (4), EVIC switch pod (1) and speed control switch pod (3) as a unit to the steering wheel. Be certain that the steering wheel wire harness is routed between the lower or upper bezel stanchions and the inside circumference of the steering wheel hub cavity so that the wiring will not be pinched when the driver airbag is reinstalled.
- Use hand pressure to squeeze the horizontal spokes of both the front spoke bezel and the steering wheel rear cover together until all of the snap features are fully engaged.
-
Install and tighten the four screws that secure the stanchions of the front spoke bezel to the steering wheel armature within the steering wheel hub cavity. Tighten the screws securely.
-
From the back of the steering wheel (4), install and tighten the two screws (2) that secure the center spoke of the rear cover (1) to the center spoke of the steering wheel spoke front bezel (3). Tighten the screws securely.
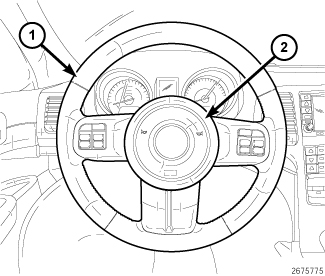
- Install the driver airbag assembly (2), (Refer to 10 - Restraints/AIR BAG, Driver - Installation) .
- Do not reconnect the battery negative cable at this time. The Supplemental Restraint System (SRS) verification test procedure should be performed following service of any SRS component, (Refer to 28 - DTC-Based Diagnostics/CONTROLLER, Occupant Restraint (ORC) - Standard Procedure).
-
Connect the negative battery cable.