BELT, Serpentine
DESCRIPTION
The accessory drive belt drives the power steering pump, the generator and the A/C compressor. Accessory drive belt tension for all engines is maintained by a non-adjustable hydraulic automatic drive belt tensioner.
The accessory drive belt is designed to meet the 10 years / 150,000 miles durability requirements. Belt replacement is not recommended until this requirement has been met or damage was done to the belt.
DIAGNOSIS AND TESTING - ACCESSORY DRIVE BELT
ACCESSORY DRIVE BELT DIAGNOSIS CHART
|
CONDITION |
POSSIBLE CAUSES |
CORRECTION |
|---|---|---|
|
RIB CHUNKING (One or more ribs has separated from belt body) |
1. Foreign objects imbedded in pulley grooves. |
1. Remove foreign objects from pulley grooves. Replace belt. |
|
2. Installation damage |
2. Replace belt |
|
|
RIB OR BELT WEAR |
1. Pulley misaligned |
1. Align pulley(s) |
|
2. Abrasive environment |
2. Clean pulley(s). Replace belt if necessary |
|
|
3. Rusted pulley(s) |
3. Clean rust from pulley(s) |
|
|
4. Sharp or jagged pulley groove tips |
4. Replace pulley. Inspect belt. |
|
|
5. Belt rubber deteriorated |
5. Replace belt |
|
|
BELT SLIPS |
1. Belt slipping because of insufficient tension |
1. Adjust tension (2.5L) |
|
2. Belt or pulley exposed to substance that has reduced friction (belt dressing, oil, ethylene glycol) |
2. Replace belt and clean pulleys |
|
|
3. Driven component bearing failure (seizure) |
3. Replace faulty component or bearing |
|
|
4. Belt glazed or hardened from heat and excessive slippage |
4. Replace belt. |
|
|
LONGITUDAL BELT CRACKING |
1. Belt has mistracked from pulley groove |
1. Replace belt |
|
2. Pulley groove tip has worn away rubber to tensile member |
2. Replace belt |
|
|
"GROOVE JUMPING" (Belt does not maintain correct position on pulley) |
1. Belt tension either too low or too high |
1. Replace accessory drive belt tensioner (Refer to 07 - Cooling/Accessory Drive/TENSIONER, Belt - Removal) |
|
2. Pulley(s) not within design tolerance |
2. Replace pulley(s) |
|
|
3. Foreign object(s) in grooves |
3. Remove foreign objects from grooves |
|
|
4. Pulley misalignment |
4. Align component |
|
|
5. Belt cordline is broken |
5. Replace belt |
|
|
BELT BROKEN (Note: Identify and correct problem before new belt is installed) |
1. Excessive tension |
1. Replace belt and adjust tension to specification |
|
2. Tensile member damaged during belt installation |
2. Replace belt |
|
|
3. Severe misalignment |
3. Align pulley(s) |
|
|
4. Bracket, pulley, or bearing failure |
4. Replace defective component and belt |
|
|
NOISE (Objectionable squeal, squeak, or rumble is heard or felt while drive belt is in operation) |
1. Belt slippage |
1. Replace accessory drive belt tensioner (Refer to 07 - Cooling/Accessory Drive/TENSIONER, Belt - Removal) |
|
2. Bearing noise |
2. Locate and repair |
|
|
3. Belt misalignment |
3. Align belt/pulley(s) |
|
|
4. Belt to pulley mismatch |
4. Install correct belt |
|
|
5. Driven component induced vibration |
5. Locate defective driven component and repair |
|
|
6. System resonant frequency induced vibration |
6. Vary belt tension within specifications. |
|
|
TENSION SHEETING FABRIC FAILURE (Woven fabric on outside, circumference of belt has cracked or separated from body of belt) |
1. Tension sheeting contacting stationary object |
1. Correct rubbing condition |
|
2. Excessive heat causing woven fabric to age |
2. Replace belt |
|
|
3. Tension sheeting splice has fractured |
3. Replace belt |
|
|
CORD EDGE FAILURE (Tensile member exposed at edges of belt or separated from belt body) |
1. Excessive tension |
1. Replace accessory drive belt tensioner (Refer to 07 - Cooling/Accessory Drive/TENSIONER, Belt - Removal) |
|
2. Belt contacting stationary object |
2. Replace belt |
|
|
3. Pulley(s) out of tolerance |
3. Replace pulley |
|
|
4. Insufficient adhesion between tensile member and rubber matrix |
4. Replace belt and adjust tension to specifications |
VISUAL DIAGNOSIS
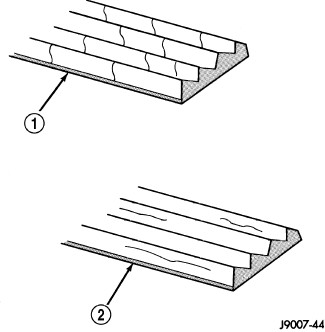 |
When diagnosing serpentine accessory drive belts, small cracks that run across the ribbed surface of the belt from rib to rib (1), are considered normal. These are not a reason to replace the belt. However, cracks running along a rib (not across) (2) are not normal. Any belt with cracks running along a rib must be replaced. Also replace the belt if it has excessive wear, frayed cords or severe glazing.
Refer to the ACCESSORY DRIVE BELT DIAGNOSIS CHART for further belt
diagnosis.
NOISE DIAGNOSIS
Noises generated by the accessory drive belt are most noticeable at idle. Before replacing a belt to resolve a noise condition, inspect all of the accessory drive pulleys for alignment, glazing, or excessive end play.
3.6L
 |
- Disconnect negative battery cable from battery.
- Remove the air intake hose from the fan shroud.
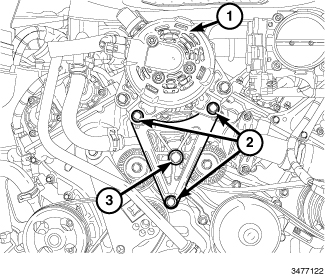
- Remove the lower alternator support bracket M8 bolts (2).
-
Remove the center support bracket M10 bolt (3).
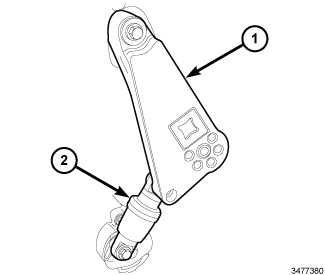
WARNING: A slow and steady application of force and motion is required when compressing the belt tensioner strut. Any aggressive application of force will result in damage to the strut
CAUTION: Do not let the tensioner arm snap back to the freearm position, severe damage may occur to the tensioner.
-
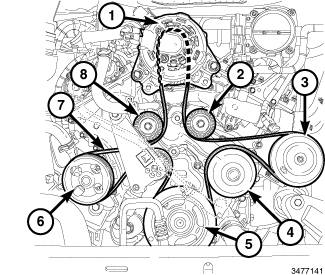
Rotate accessory belt tensioner clockwise until it contacts its stop. Remove accessory drive belt (7), then slowly return the accessory drive belt tensioner into the freearm position .
2.8L
 |
Do not let the tensioner arm snap
back to the freearm position, severe damage may occur to the tensioner.
CAUTION:
3.6L
A slow and steady application of force and motion is required when compressing the belt tensioner strut. Any aggressive application of force will result in damage to the strut
WARNING:
|
-
Check condition of all pulleys.
CAUTION: When installing the accessory drive belt, the belt MUST be routed correctly. If not, the engine may overheat due to the water pump rotating in the wrong direction.
-
Route accessory drive belt (7) around all pulleys except the water pump (3). Rotate the accessory drive belt tensioner clockwise until it contacts its stop position. Route the accessory drive belt (7) around the water pump (3) and slowly let the tensioner rotate into the belt. Make sure the accessory drive belt (7) is properly seated onto all pulleys.
- Position the alternator bracket into position. Hand tighten the support bracket bolts (2).
- Install the M10 support bracket bolt (3). Tighten the bolt to 55 N·M (41 ft. lbs.).
-
Tighten the M8 support bracket bolts (2) to Tighten the bolt to 25 N·M (18 ft. lbs.).
2.8L
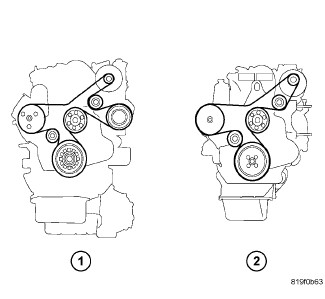 BELT ROUTING |
|
1 - WITH A/C 2 - WITHOUT A/C |
- Check condition of all pulleys.
-
Install accessory drive
belt. Route the belt around all pulleys (1 or 2).
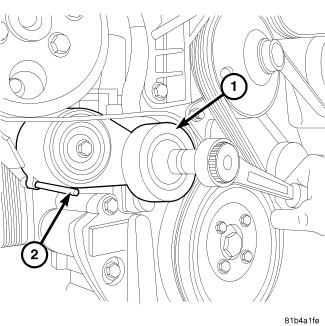
- Using a suitable tool, to hold accessory drive belt tensioner (1) and remove the pin (2).
- Make sure the belt is seated onto all pulleys.
-
Slowly rotate and release
the tensioner (1).
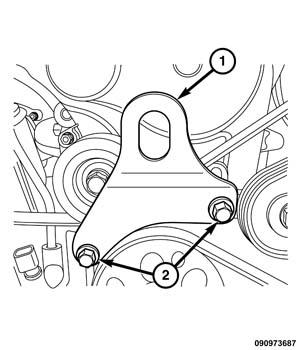
- Install the engine lifting bracket (1). Tighten bolts (2) to 68 N·m (50 ft. lbs.).
-
Connect the
negative battery cable.